Commerce Panel → Company → Settings → Billing
Fynd Commerce uses a prepaid billing model. Subscription fees are due at the beginning of each 30-day billing cycle, meaning you pay upfront before using platform services for the upcoming period.
If a subscription payment is missed, the following timeline applies:
- Days 1–7 (Grace Period): Your account remains fully active. For example, if your payment was due on May 31, you have until June 6 to pay without any service disruption.
- Days 8–14 (Partial Freeze): If the payment is still outstanding, your account is partially frozen. The following services become inaccessible: platform services (Team, Products, and Extensions) and sales channel services (Analytics, Customers, Abandoned Checkouts, Marketing, and Communication).
- Day 15 (Full Block): If the subscription remains unpaid, your Fynd Commerce panel is blocked with immediate effect (e.g., on June 14 in the example above).
If you install an extension mid-cycle, its charges are applied in the next billing cycle. For example, a monthly recurring extension installed on May 20 will be billed on May 31 and remain accessible through June 19.
Navigate to Company → Settings → Billing in your Commerce Panel to access the Billing dashboard.

In accordance with Reserve Bank of India (RBI) guidelines, an e-mandate is an electronic authorisation that allows Fynd Commerce to automatically debit your saved card for recurring subscription payments — without requiring manual approval for each transaction.
When you accept the e-mandate, you authorise Fynd to debit any subscription amount that falls below the e-mandate limit. The e-mandate amount itself is never charged; only the actual subscription payable amount is debited from your saved card.
The e-mandate amount is set at 2.5× the subscription payable amount, rounded up to the nearest ₹100.
Example: If your subscription payable amount is ₹2,499:
E-Mandate Amount = 2.5 × ₹2,499 = ₹6,247.50 → rounded to ₹6,300
- Trial to paid plan: Before activating a paid subscription, the system verifies that the e-mandate on your saved card covers the payable amount (i.e., 2.5× the subscription cost is within the cap).
- Plan upgrade: When upgrading between standard plans, the system recalculates the e-mandate as 1.5× the new subscription amount and verifies your card accordingly.
- Discounted upgrade: If a flat or percentage discount applies, the e-mandate is recalculated based on the discounted amount.
- Adding an extension (trial/free plan): The system checks whether the e-mandate on your saved card is sufficient to cover the extension cost.
- Multiple plans and extensions: When subscribing to multiple ordering channel plans and extensions simultaneously, the total payable is multiplied by 1.5 to determine the required e-mandate, and your card is verified accordingly.
- If the calculated e-mandate exceeds ₹15,000, it is automatically capped at ₹15,000 to prevent excessive pre-authorisation.
- This cap applies across all subscription types, including multiple extensions, ordering channels, and non-eCommerce channels.
- Adding a new card: The e-mandate does not update until the new card is set as the default. Once set, the system verifies and applies the e-mandate to that card.
- Payment failure: If a payment fails, the system triggers an e-mandate check. If the saved card cannot cover the payable amount, you will need to update or replace the card.
- Custom plan upgrade: The system calculates and verifies a new e-mandate based on the upgraded plan amount.
- Plan downgrade: The system checks whether the lower plan amount is within the previously approved e-mandate. If not, a reduced e-mandate value is applied.
- New card on trial plan: Adding a card while on a trial plan immediately triggers an e-mandate calculation to prevent future payment disruptions.
- Click Set Up.
- Tick the checkbox to accept the e-mandate.
- Click Save Card.
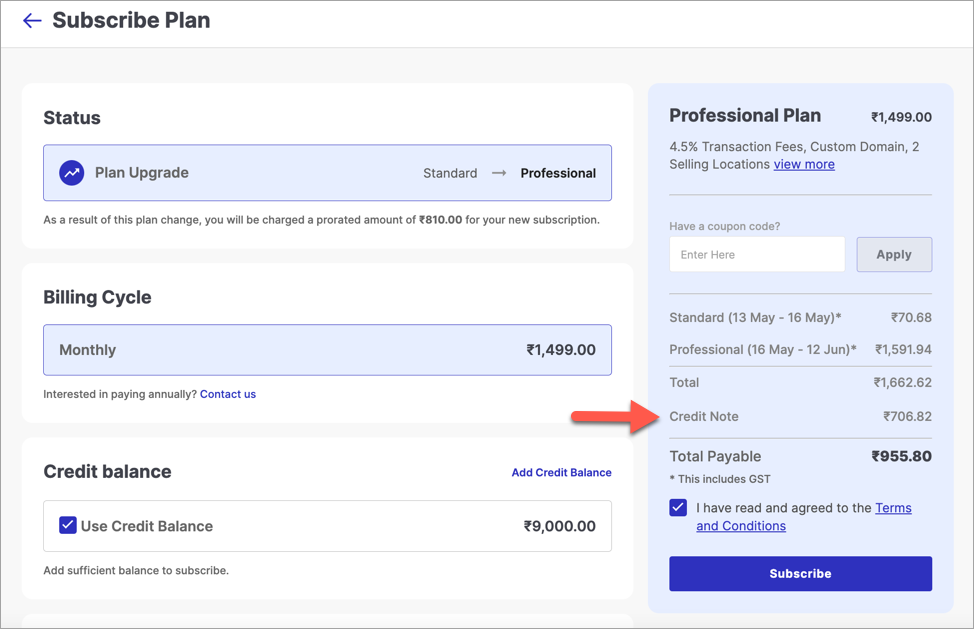
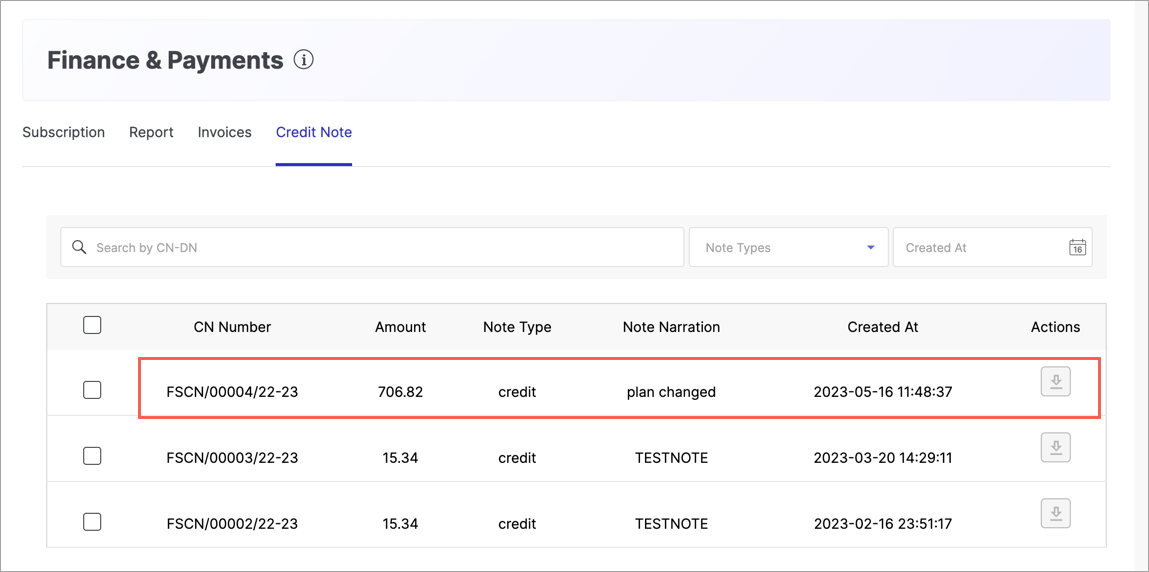
A Credit Note (CN) is issued when you have prepaid for a plan but switch to a different plan before the billing cycle ends. The unused portion of your payment is credited back and can be applied toward your new plan's cost.
Suppose you are on a 30-day billing cycle and switch plans on Day 11:
| Plan | Billing Cycle | Plan Cost (incl. GST) | Days Used | Amount (₹) |
|---|---|---|---|---|
| Standard Plan (₹599) | 30 days | ₹706.82 | 10 | 235.60 |
| Professional Plan (₹1,499) | 30 days | ₹1,768.82 | 20 | 1,179.21 |
| Total Payable | 1,414.81 | |||
| Credit Note (CN) | 706.82 | |||
| Net Amount Due (Total − CN) | 707.99 |
In this example, since ₹706.82 was already paid for the Standard Plan, a Credit Note of ₹706.82 is applied, reducing your net payment to ₹707.99.
Credit Notes serve as a record of prepaid amounts that can be applied to future transactions, ensuring accurate accounting and financial management.
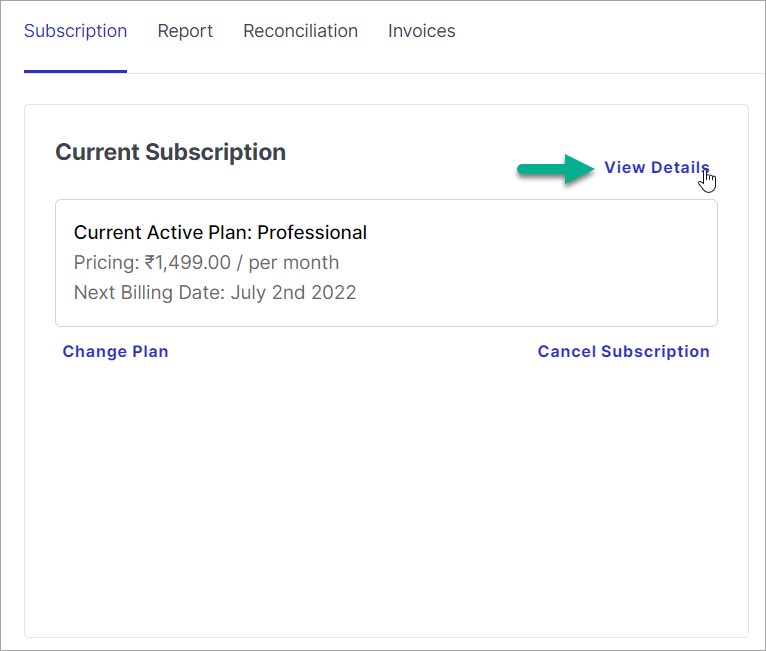
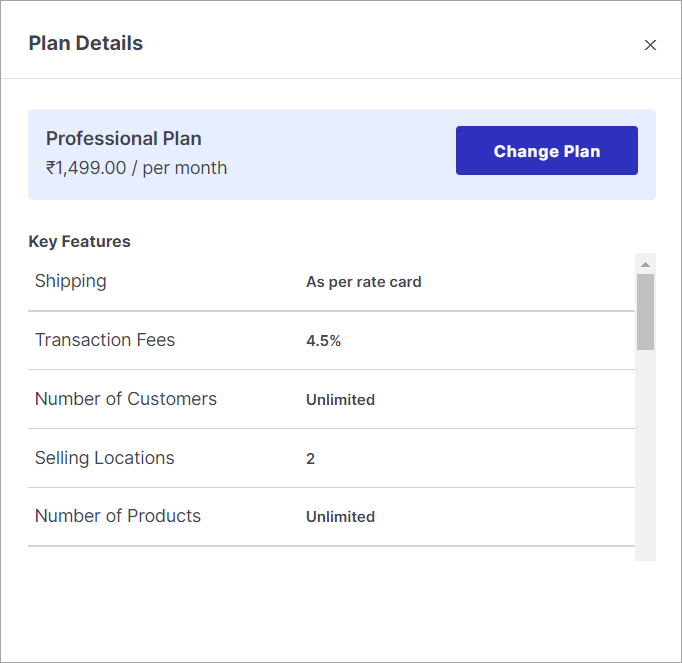
To review your active subscription and its included features at any time, click View Details in the Current Subscription section.
If you are on a trial plan, make sure to subscribe to a paid plan before the trial ends to avoid losing your data.
Timestamps and time zones reflect your browser's local settings. Currency is displayed based on your country of origin or your organisation's base currency.
Credit balance can be used to pay for subscriptions and other charges on Fynd Commerce.
- Enter an amount in the Add Credit Balance field, or select a predefined value from the options on the page.
- Click Proceed To Add.
- Choose your preferred payment method and enter the required payment details.
- Click Pay Now.
Your credit balance will be updated immediately upon successful payment.
If you do not subscribe to a paid plan before your trial ends, your Fynd Commerce account will be blocked with immediate effect.
Click Subscription in the navigation menu.
Click Activate Plan in the Current Subscription section.
Browse the available plans and click Subscribe on the plan that best suits your needs.
Select your preferred payment method:

Figure 7: Selecting Payment Method The Credit Balance option is disabled if your account has insufficient credit balance.
Click View More on the plan card (right side of the page) to review all features included in the selected plan.
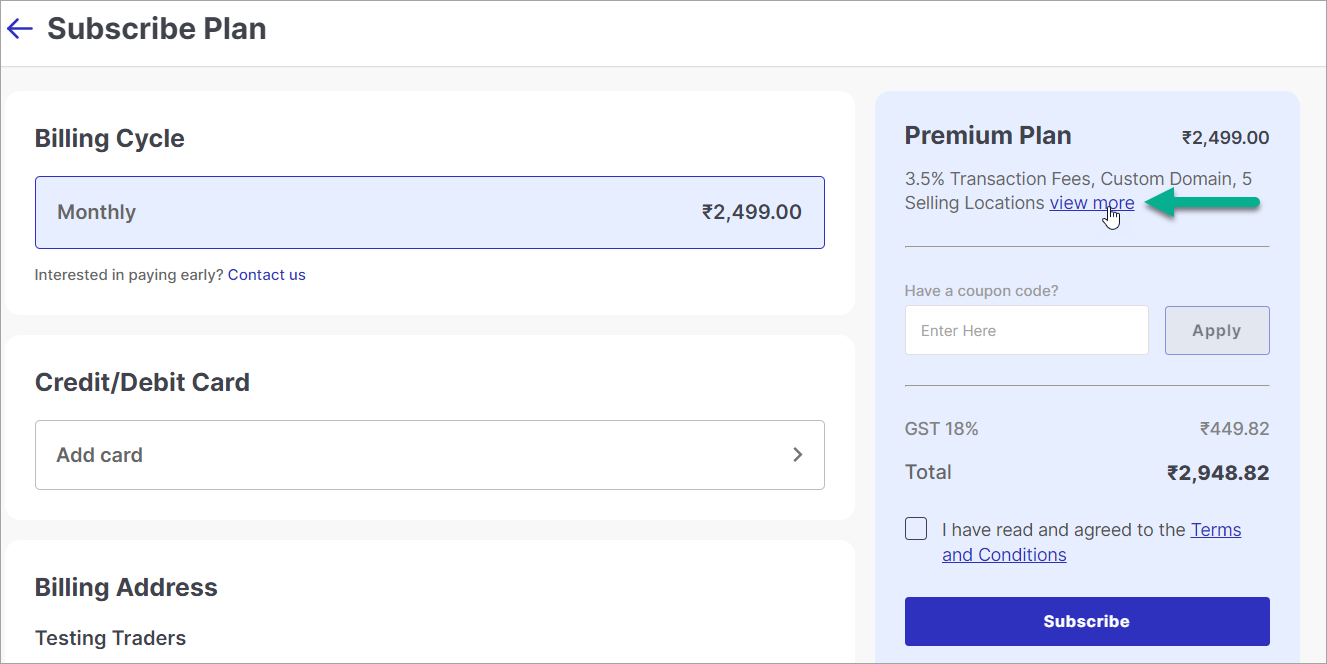
Figure 8a: Clicking View More 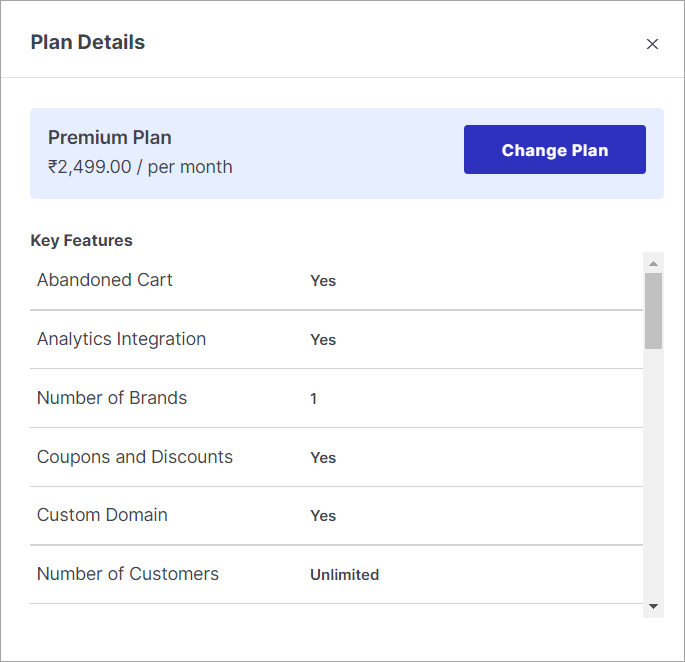
Figure 8b: Plan Features Tick the Terms and Conditions checkbox on the plan card to accept Fynd Commerce's terms.
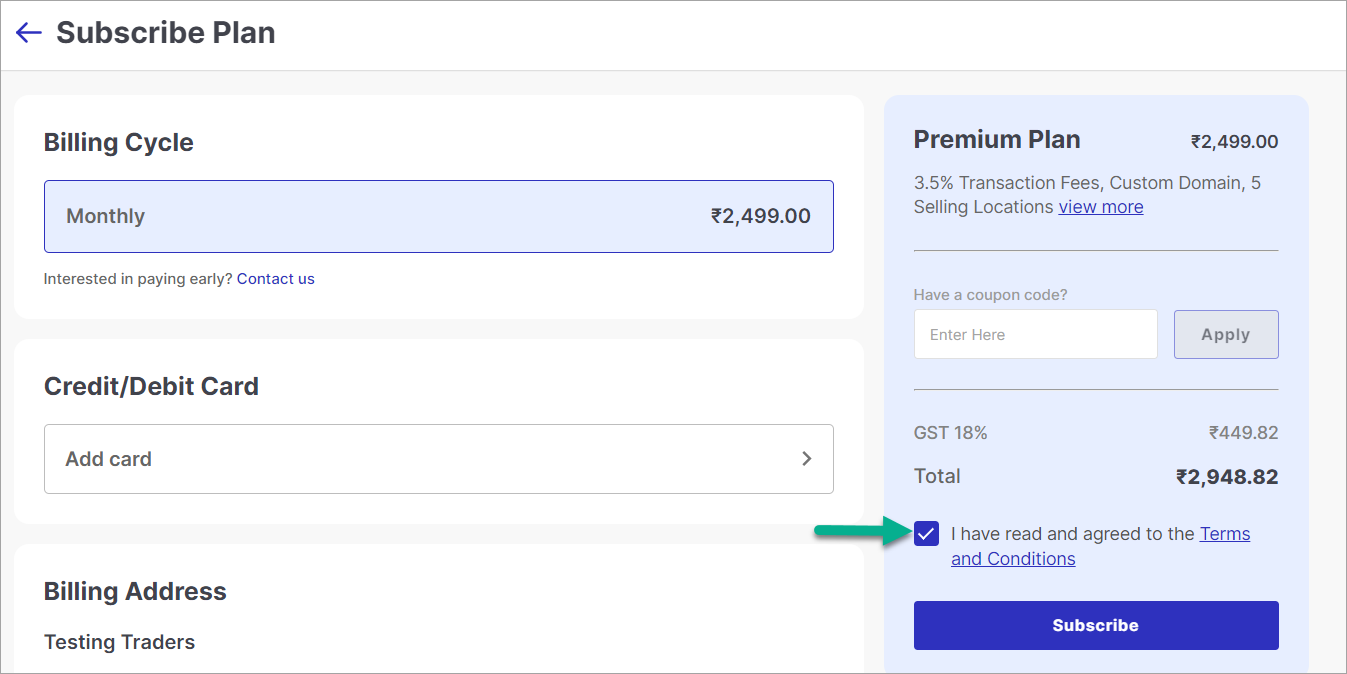
Figure 9: Accepting Terms and Conditions Click Subscribe. A confirmation page will appear once your subscription is successfully activated.
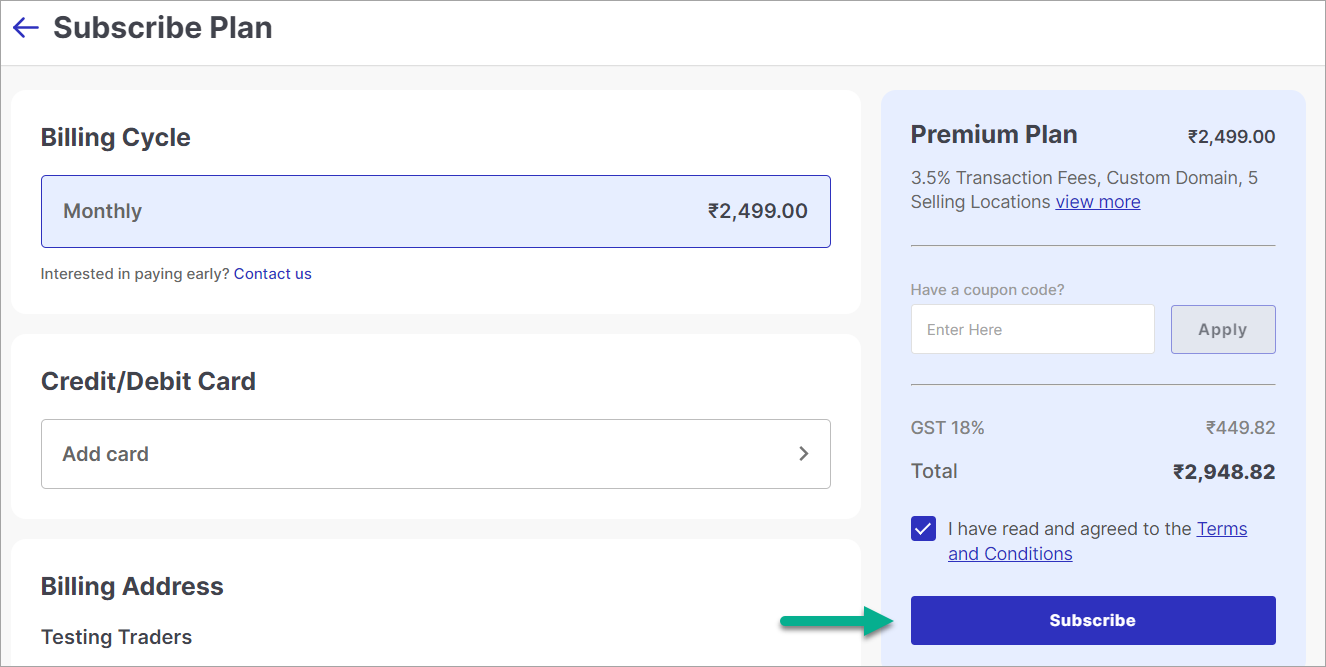
Figure 10: Clicking Subscribe
Fynd Commerce offers the option to work with your Account Manager to set up a plan tailored to your specific business needs. Customised plans include negotiated features and a designated commission rate.
How it works:
- The Fynd Commerce Admin team creates and publishes the customised plan.
- Click View Plans on the home screen to see available options, including your customised plan.
- Select and subscribe to the plan from the list.
If you downgrade your plan, any overpaid amount will be applied as credit toward your next billing cycle.
Click Change Plan in the Current Subscription section.
Select the plan you want to switch to and click Subscribe.
Choose your preferred payment method:
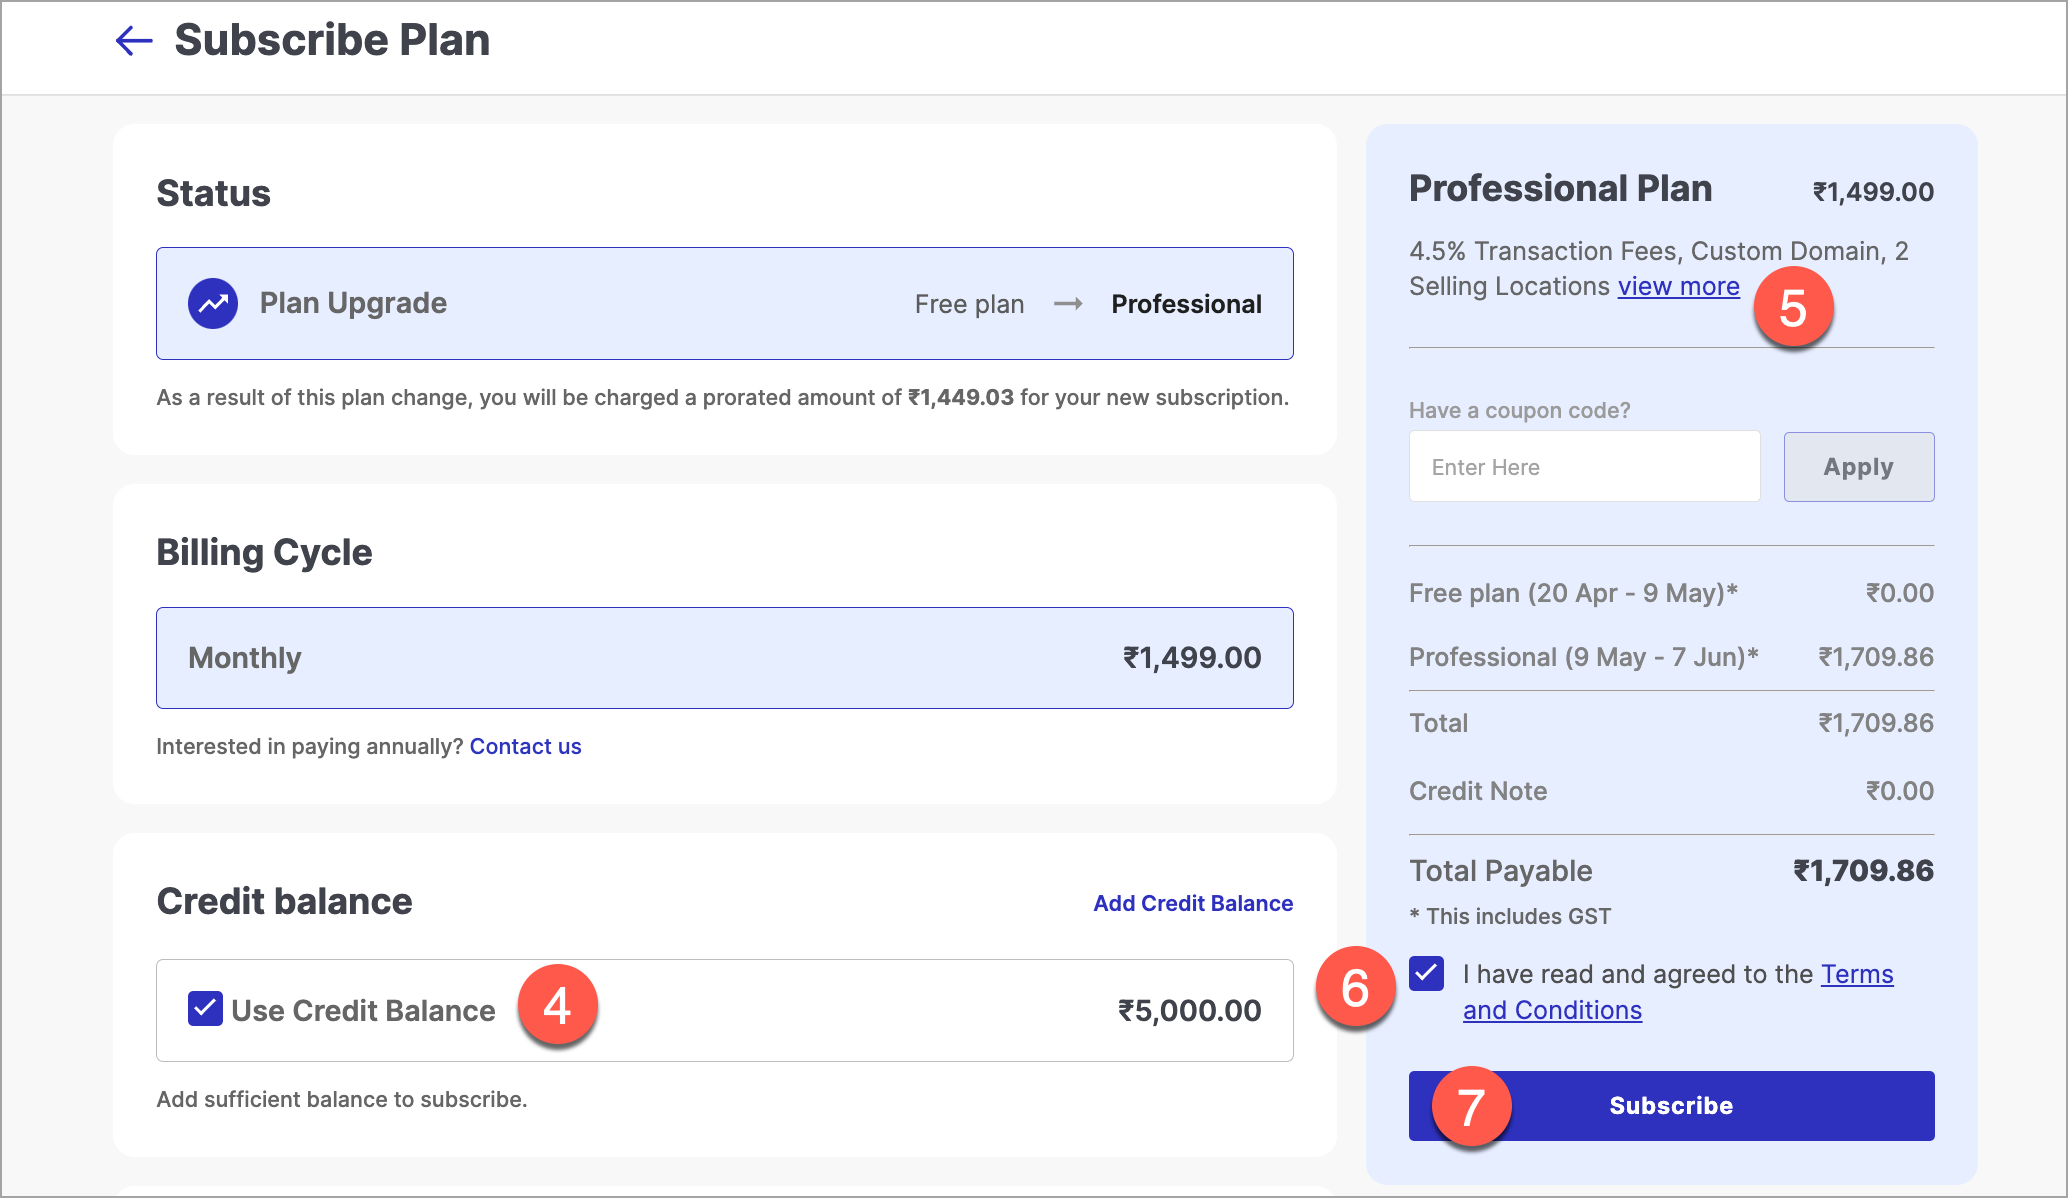
Figure 11: Subscribing to a Plan The Credit Balance option is disabled if your account has insufficient credit balance.
Click View More on the plan card to review the features included in the selected plan.
Tick the Terms and Conditions checkbox to accept Fynd Commerce's terms.
Click Subscribe. A confirmation page will appear once the plan change is successful.
Click Cancel Subscription in the Current Subscription section.
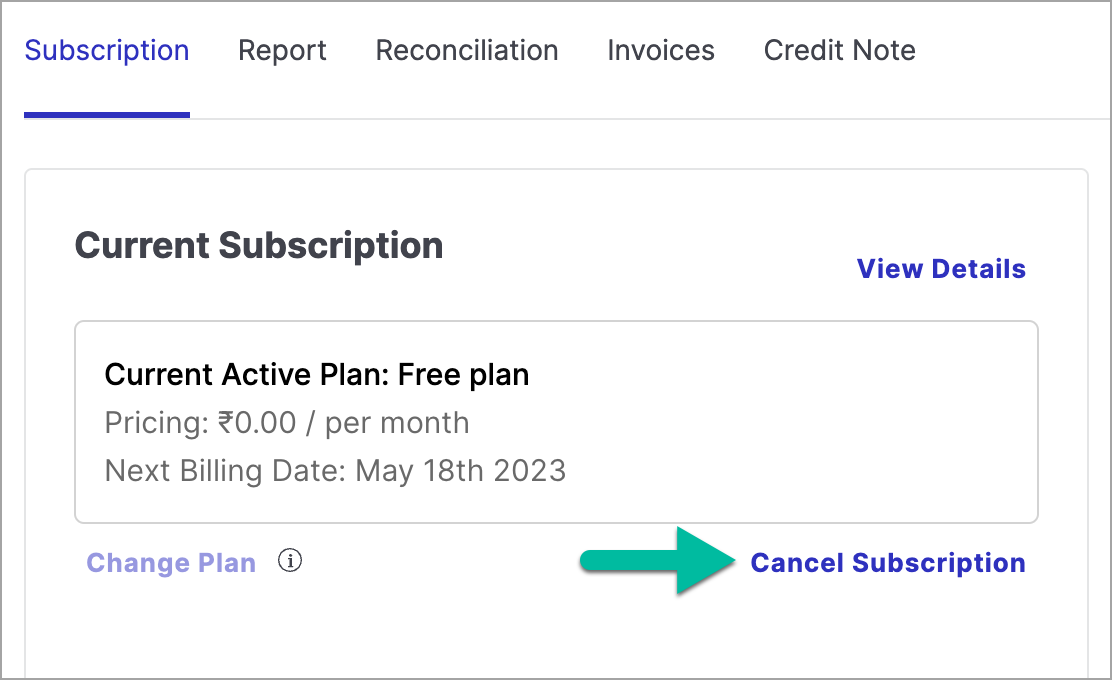
Figure 12: Clicking Cancel Subscription In the Cancel Subscription window, click Contact Support.
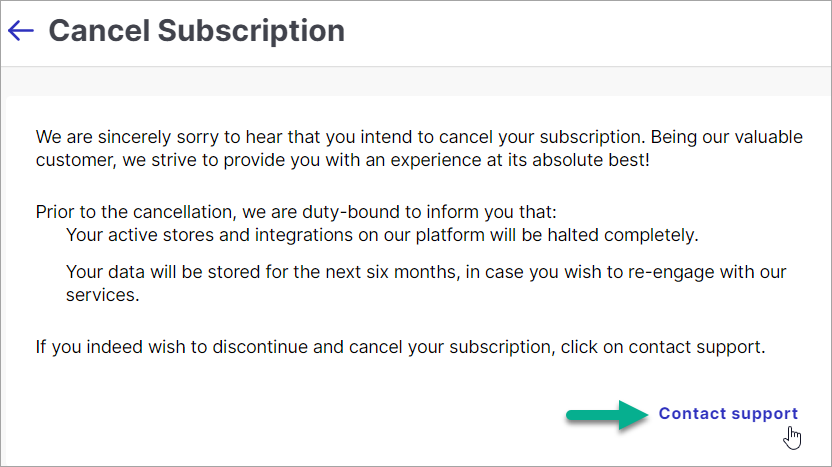
Figure 13: Clicking Contact Support Reach out to the contacts listed under the Support Managers section to complete the cancellation.
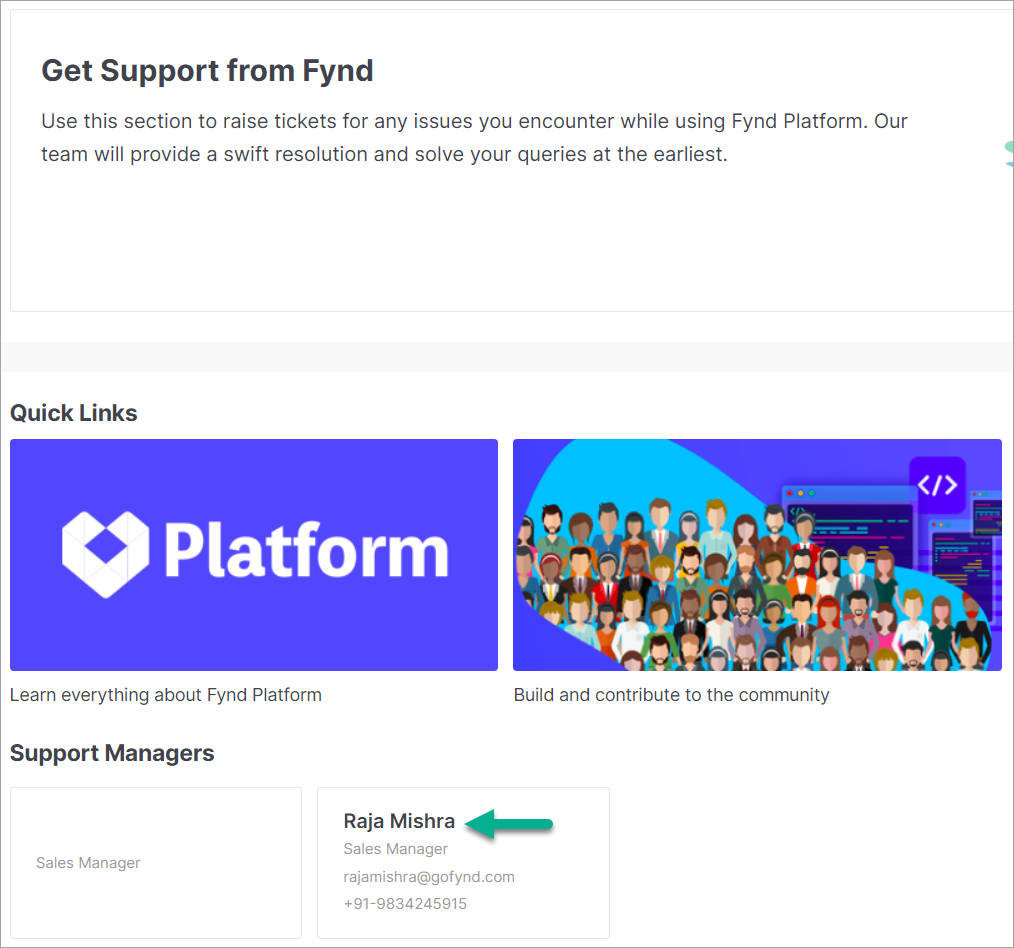
Figure 14: Support Manager Contact Details
Use your Fynd Commerce credit balance to pay for subscriptions. Ensure your balance is sufficient before your billing date. To top up, follow the steps in Add Credit Balance.
Add a credit or debit card to make subscription payments directly.
Click Add Card in the Cards section of the Subscribe Plan window.
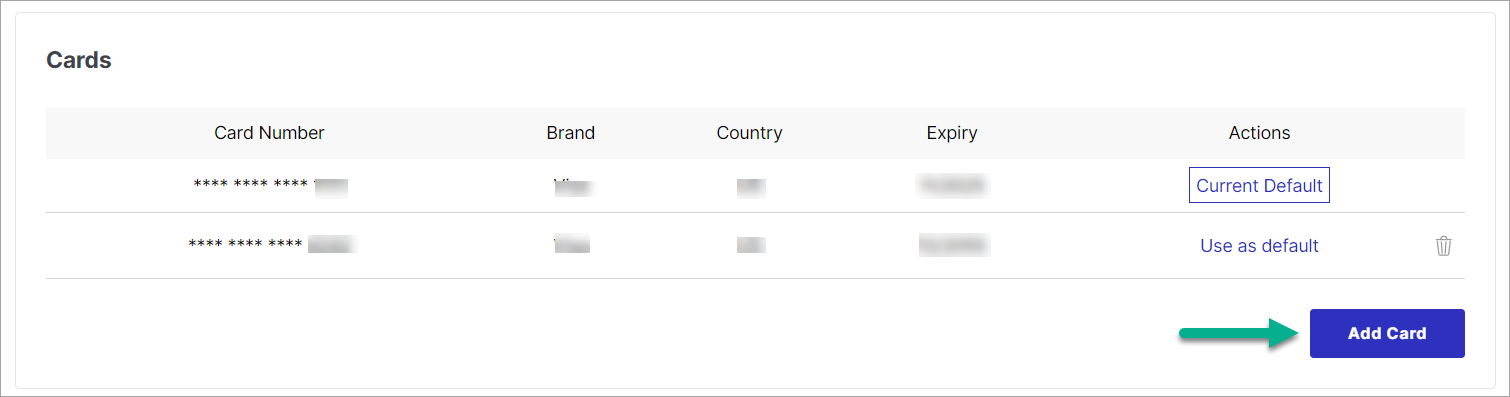
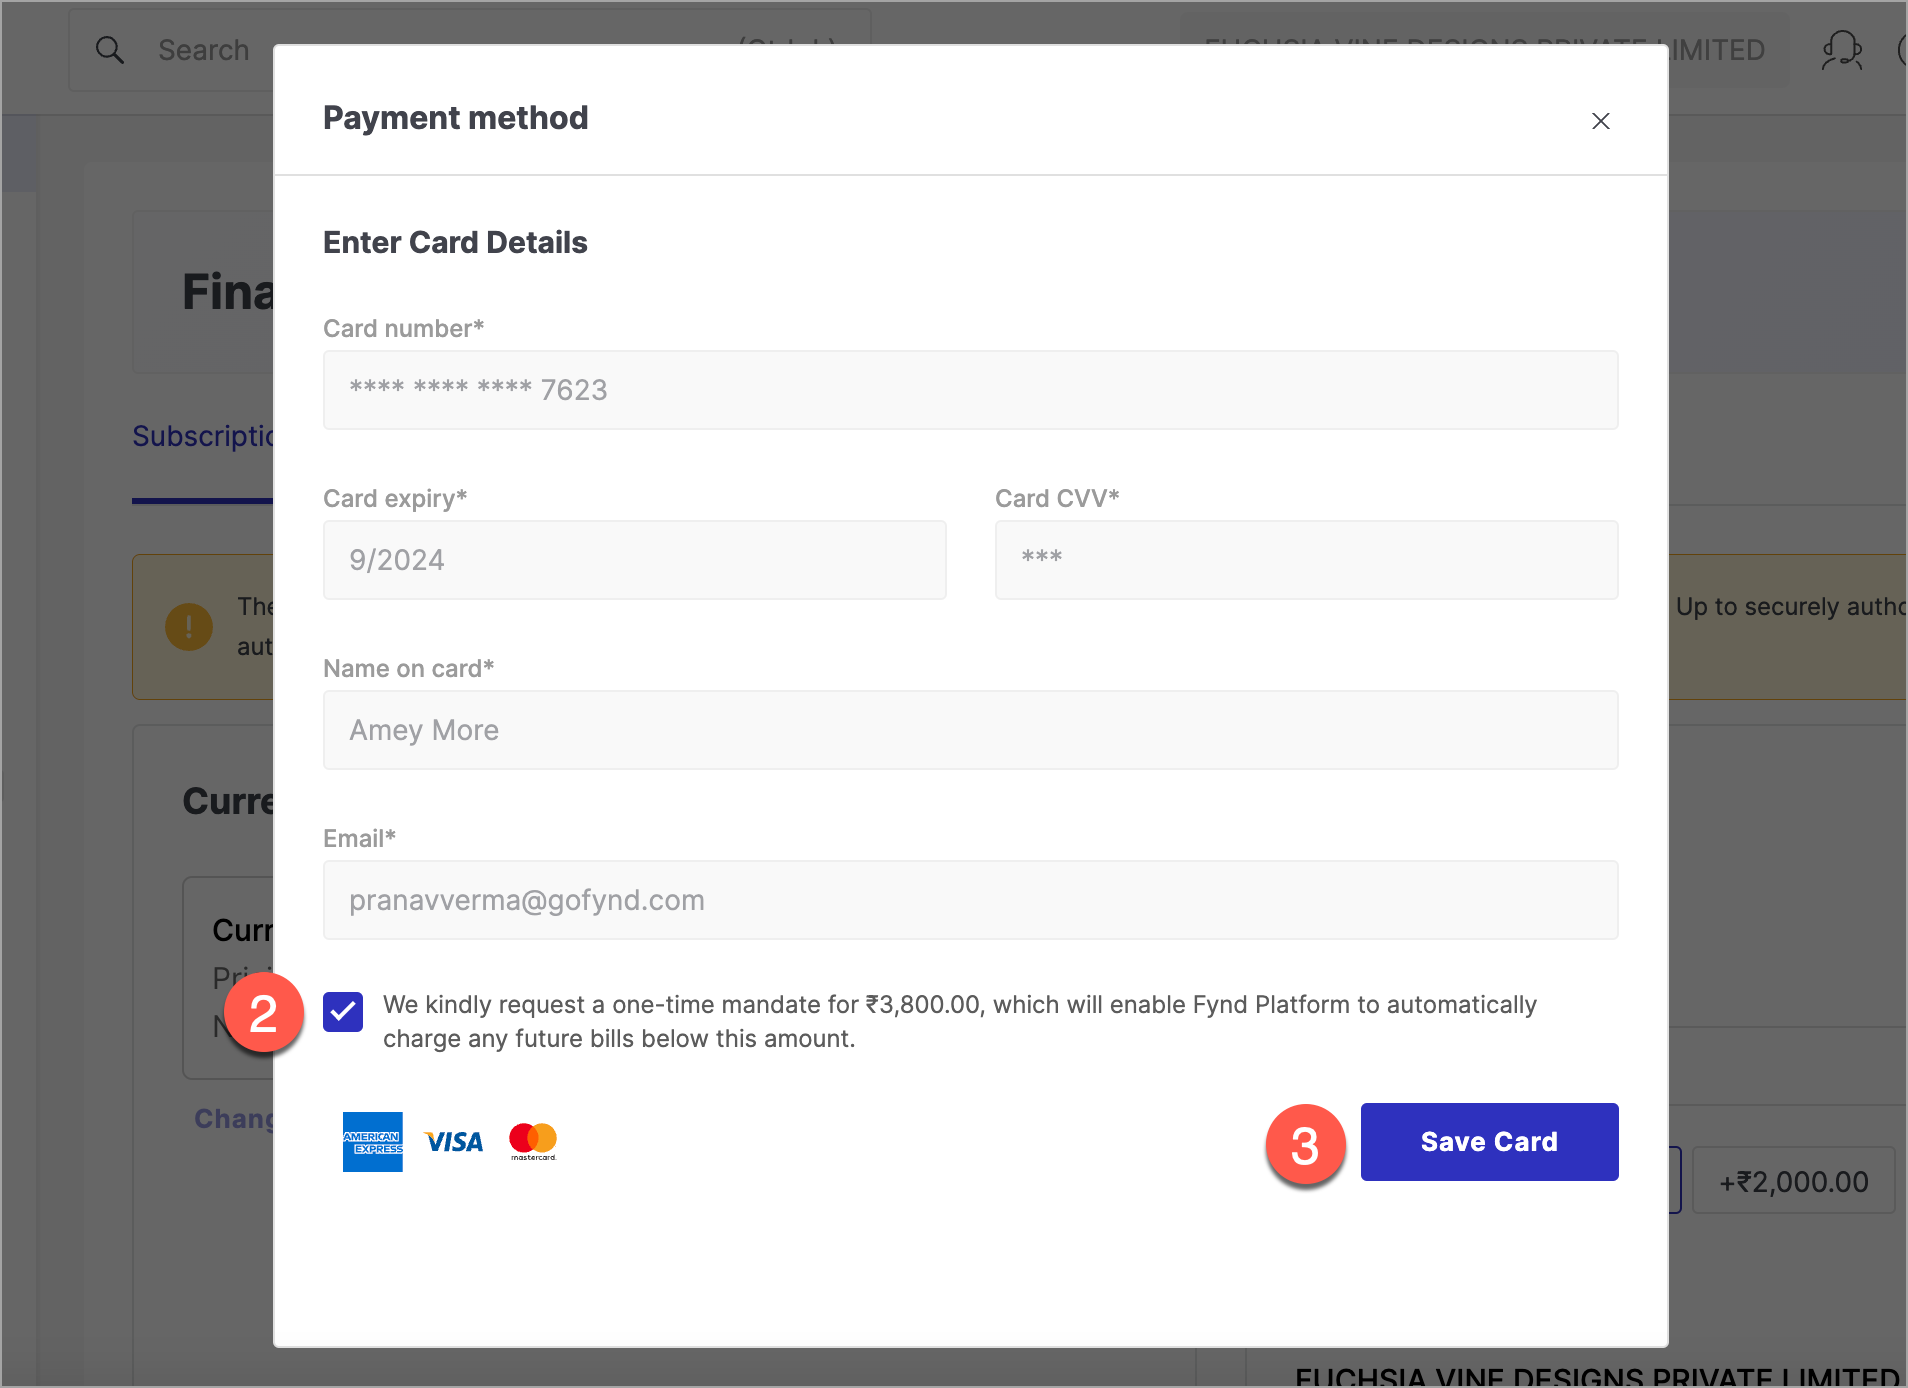
Figure 15: Clicking Add Card Enter your card details: 16-digit card number, expiry date, CVV, name on card, and email address.
Tick the checkbox to accept the e-mandate.
Review the details and click Save Card.
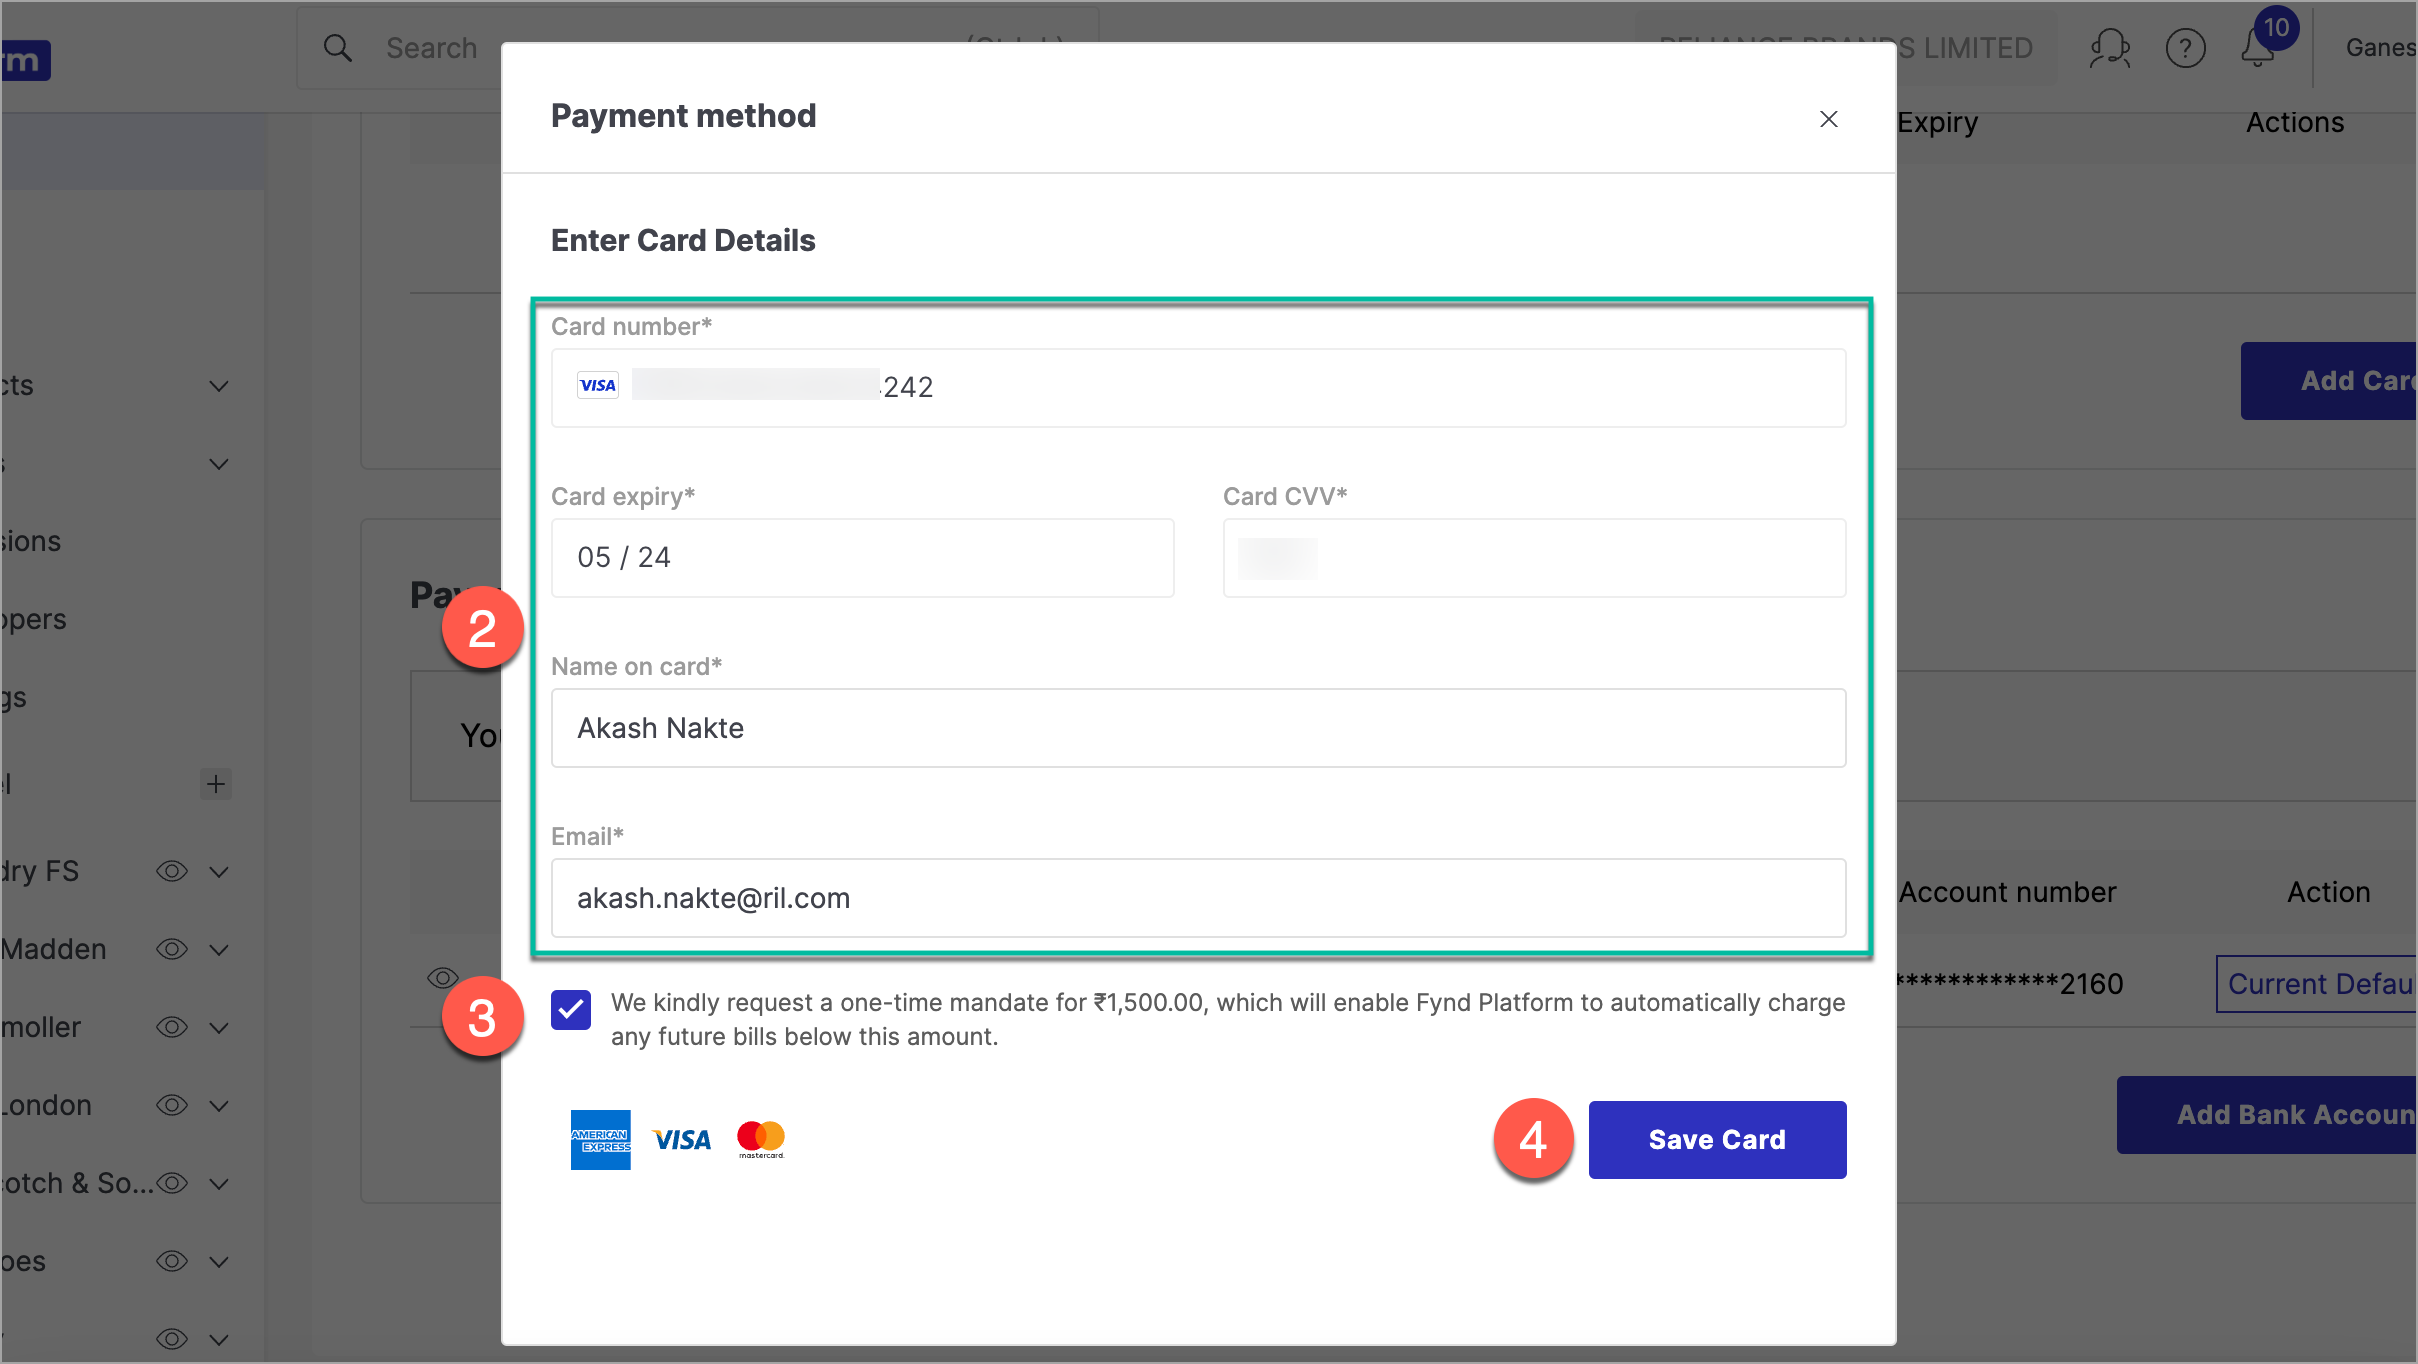
Figure 16: Adding Card Details
Add your bank account details to receive earnings from sales made through Fynd Commerce.
On the Subscription page, click Add Bank Account.

Figure 17: Clicking Add Bank Account Enter your bank details and click Add Bank Account to save.
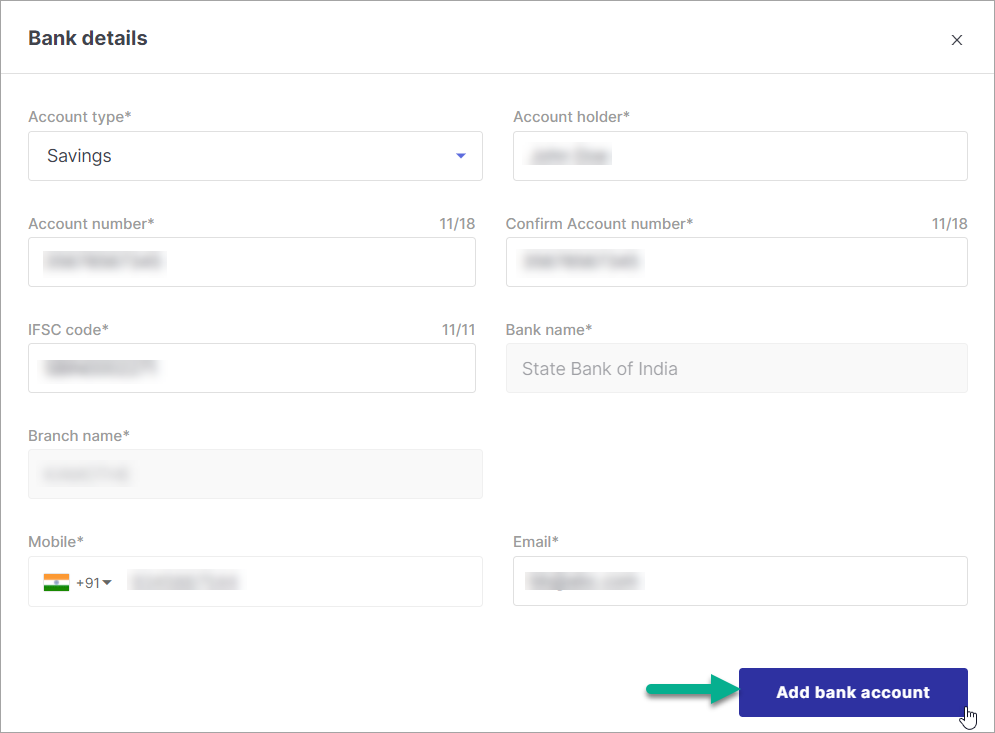
Figure 18: Adding Bank Account Details
If you add multiple bank accounts, you can designate one as the default account for receiving payouts.
- Go to the Reports tab on the Finance & Payments page.
- Select a Report Type from the dropdown menu.
- Optionally, filter by Brand and/or Channel.
- Click Generate to produce the report, which you can then download and save for your records.
Reconciliation is the process of comparing and matching financial data between you (as a seller) and Fynd Commerce to verify that all transactions and payments are accurately recorded.
Go to the Reconciliation tab on the Finance & Payments page.
Open the filter panel and apply your desired filters.
Click Apply. The reconciliation data matching your filters will appear on the page.
Click the Download icon to begin generating the reconciliation report.
Navigate to the Reports tab. Your recently generated report will appear in the list.
Click Download Report to save the reconciliation data file to your device.
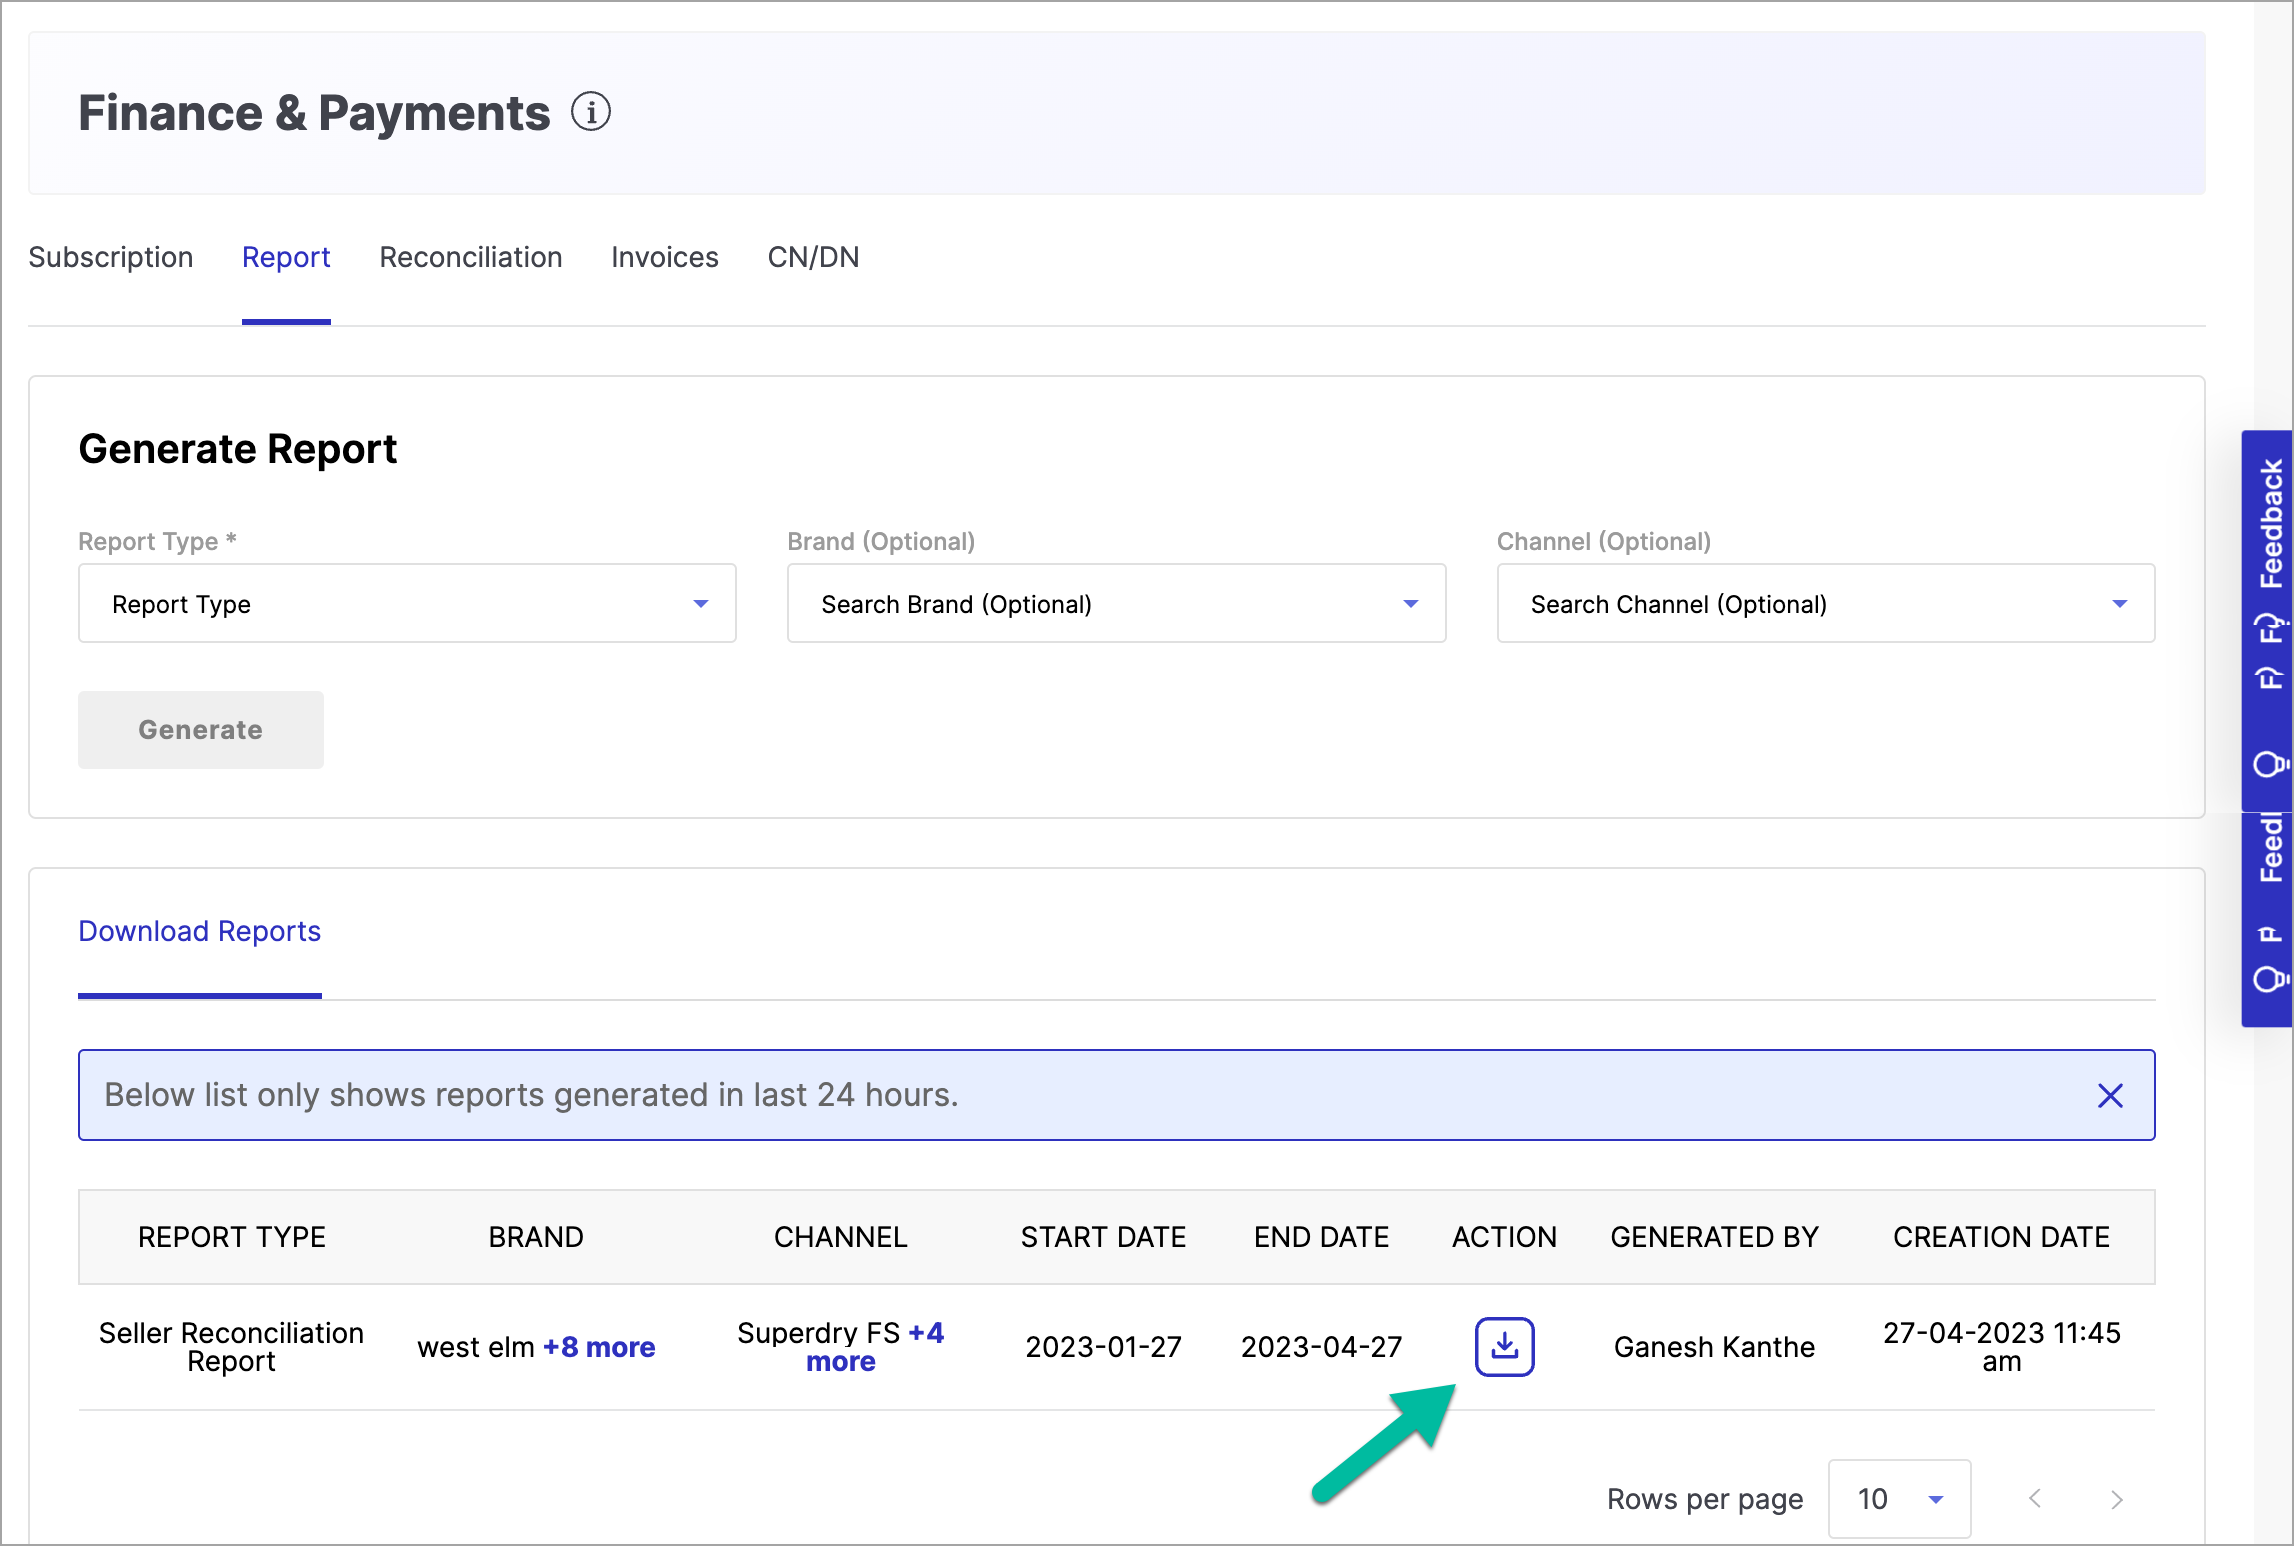
Figure 19: Clicking Download Report 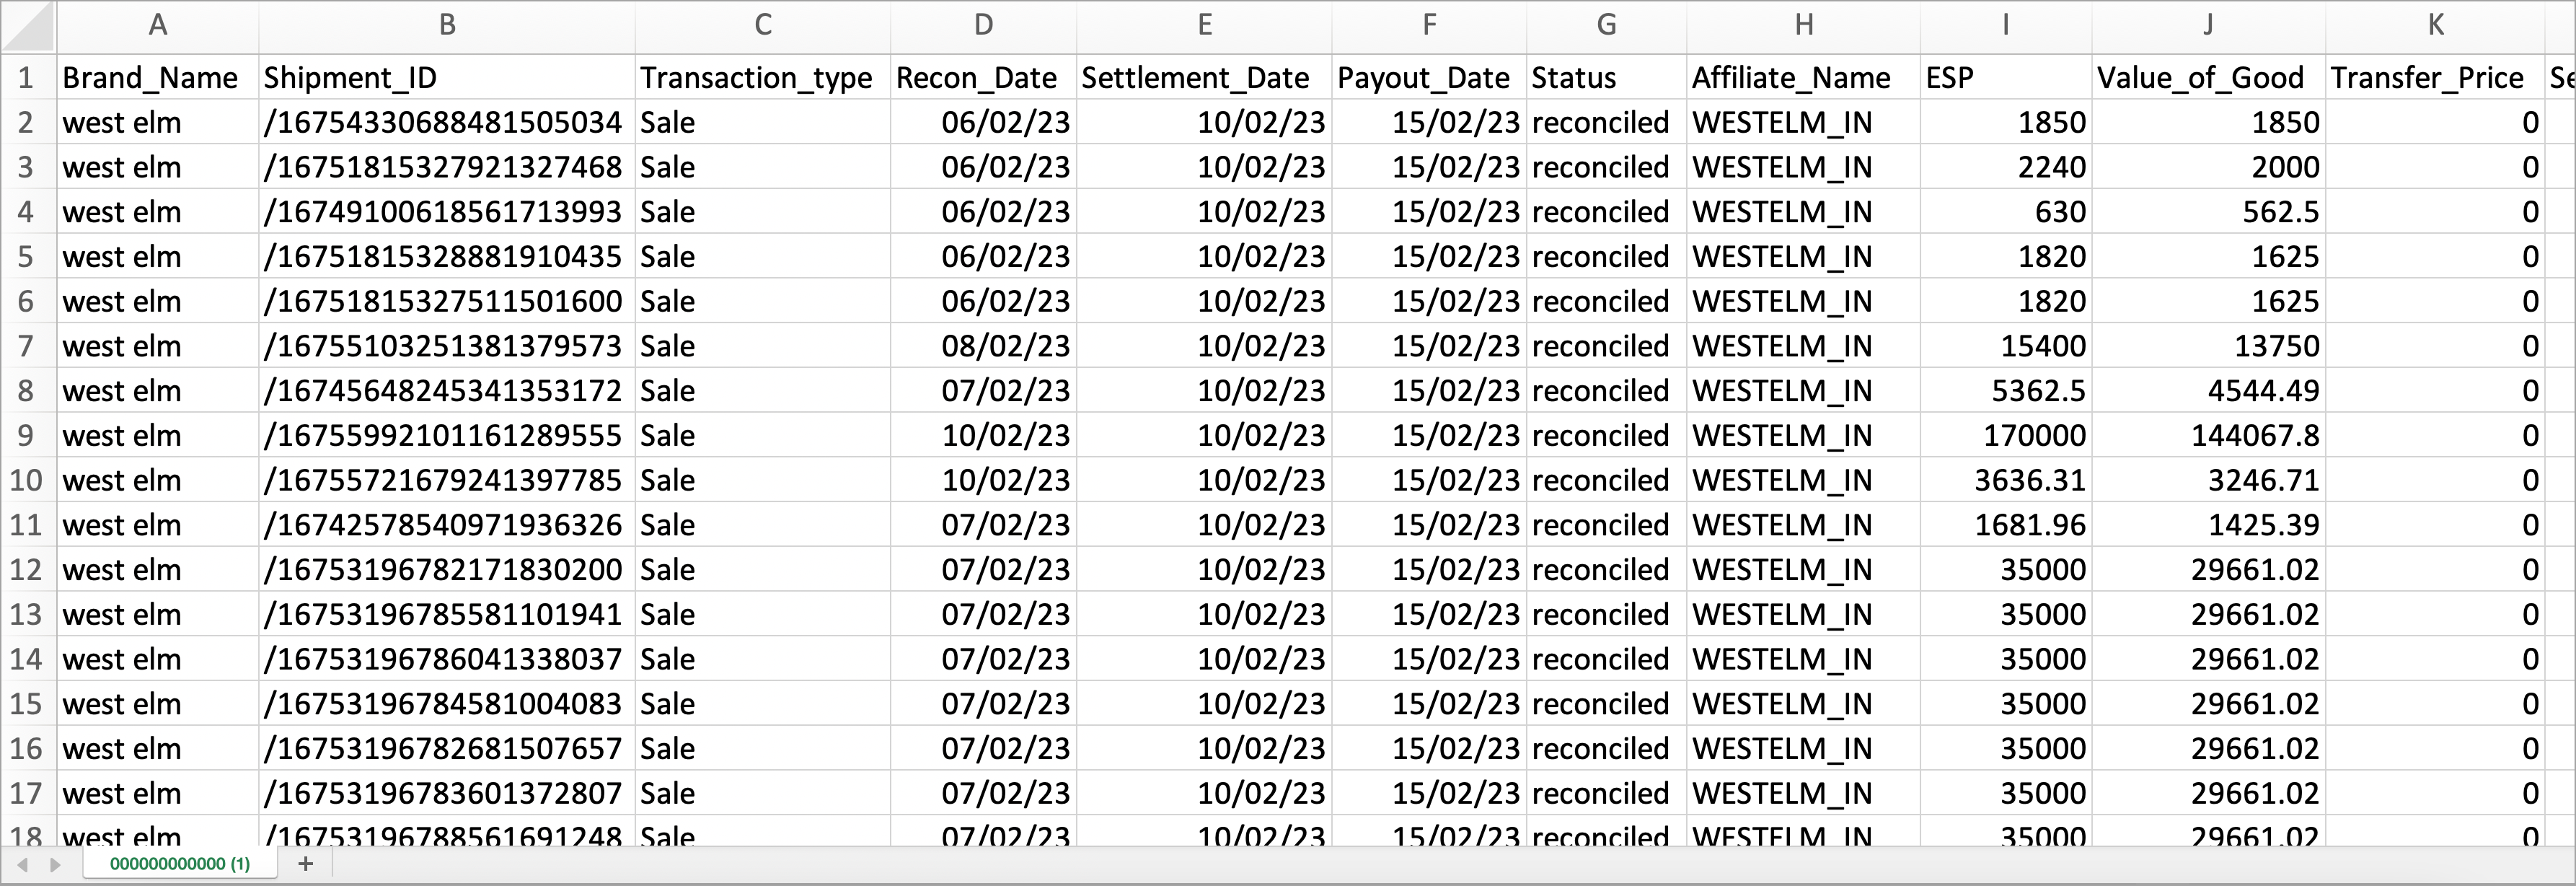
Figure 20: Downloaded Reconciliation Data
Go to the Invoices tab on the Finance & Payments page.
Click Download next to the invoice you want to save.
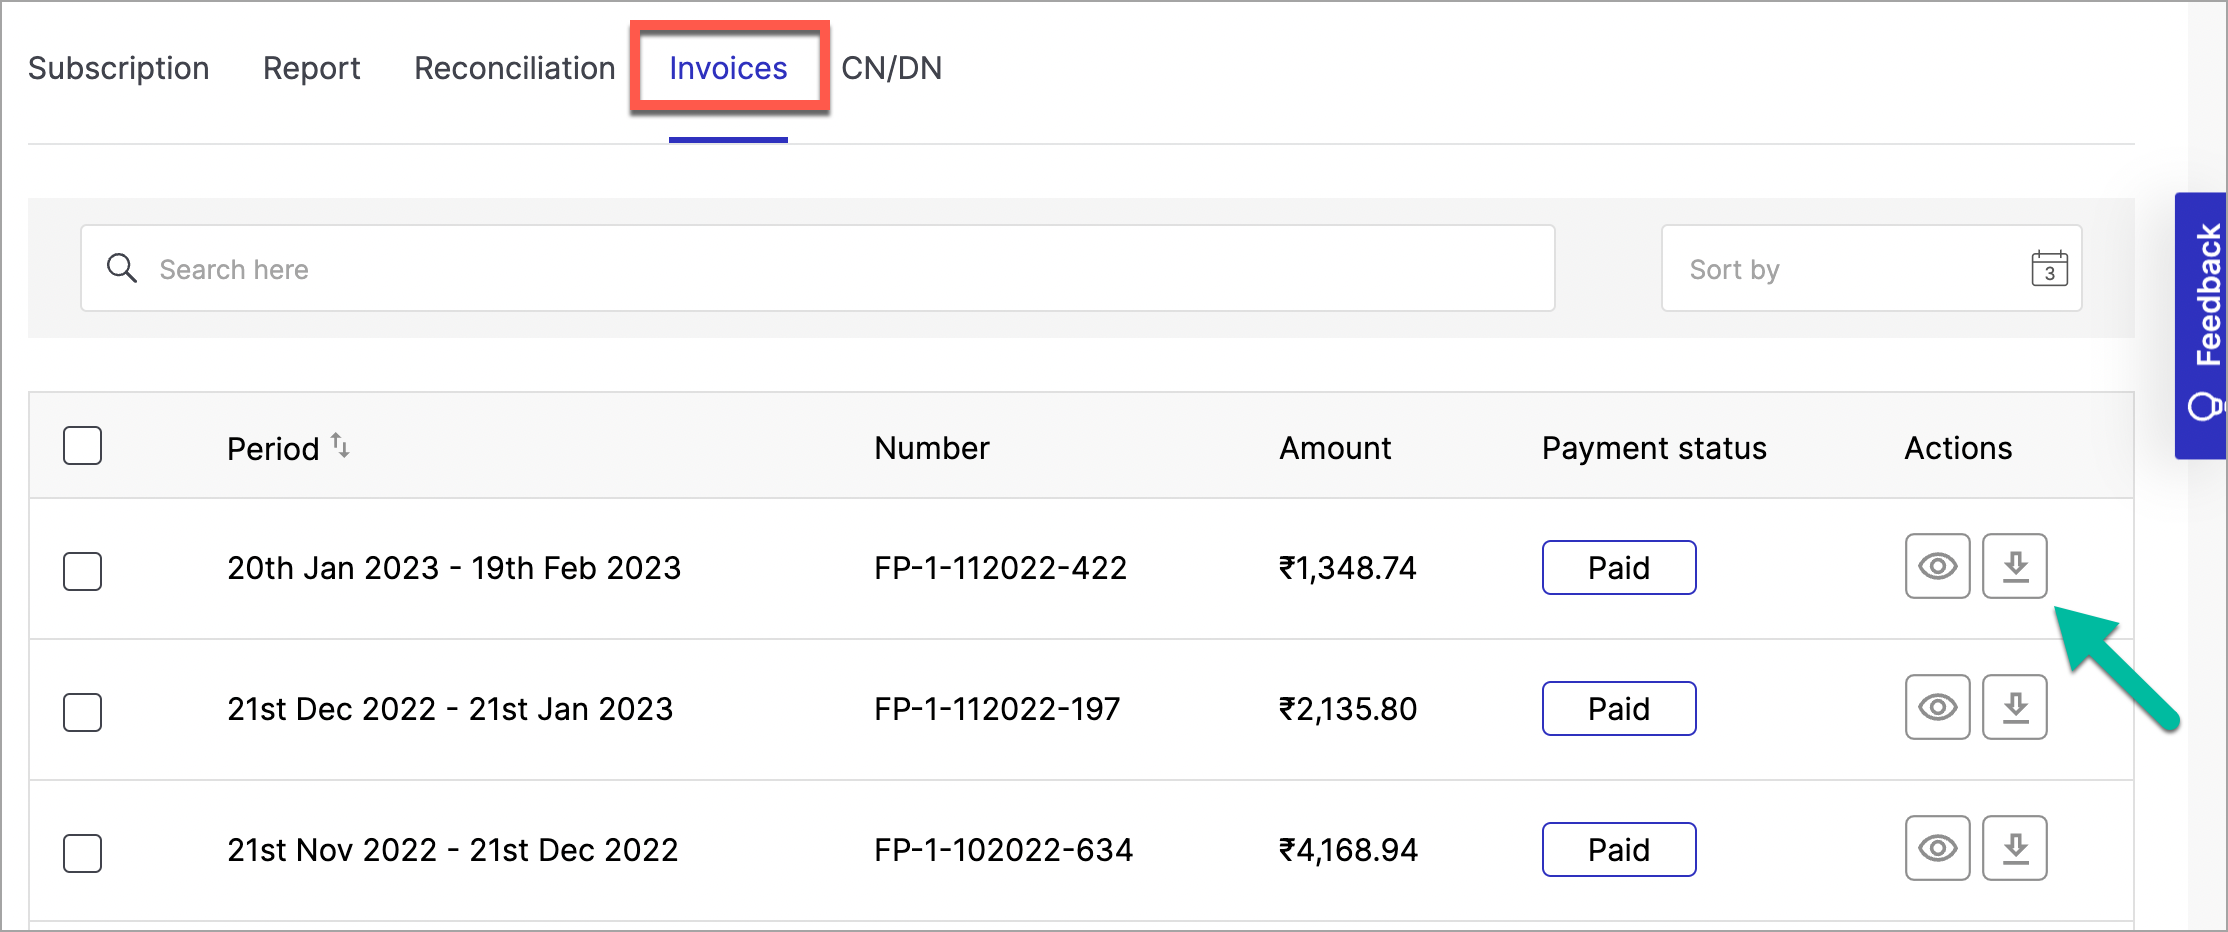
Figure 21: Clicking Download for a Single Invoice The invoice file will be saved to your device for future reference.
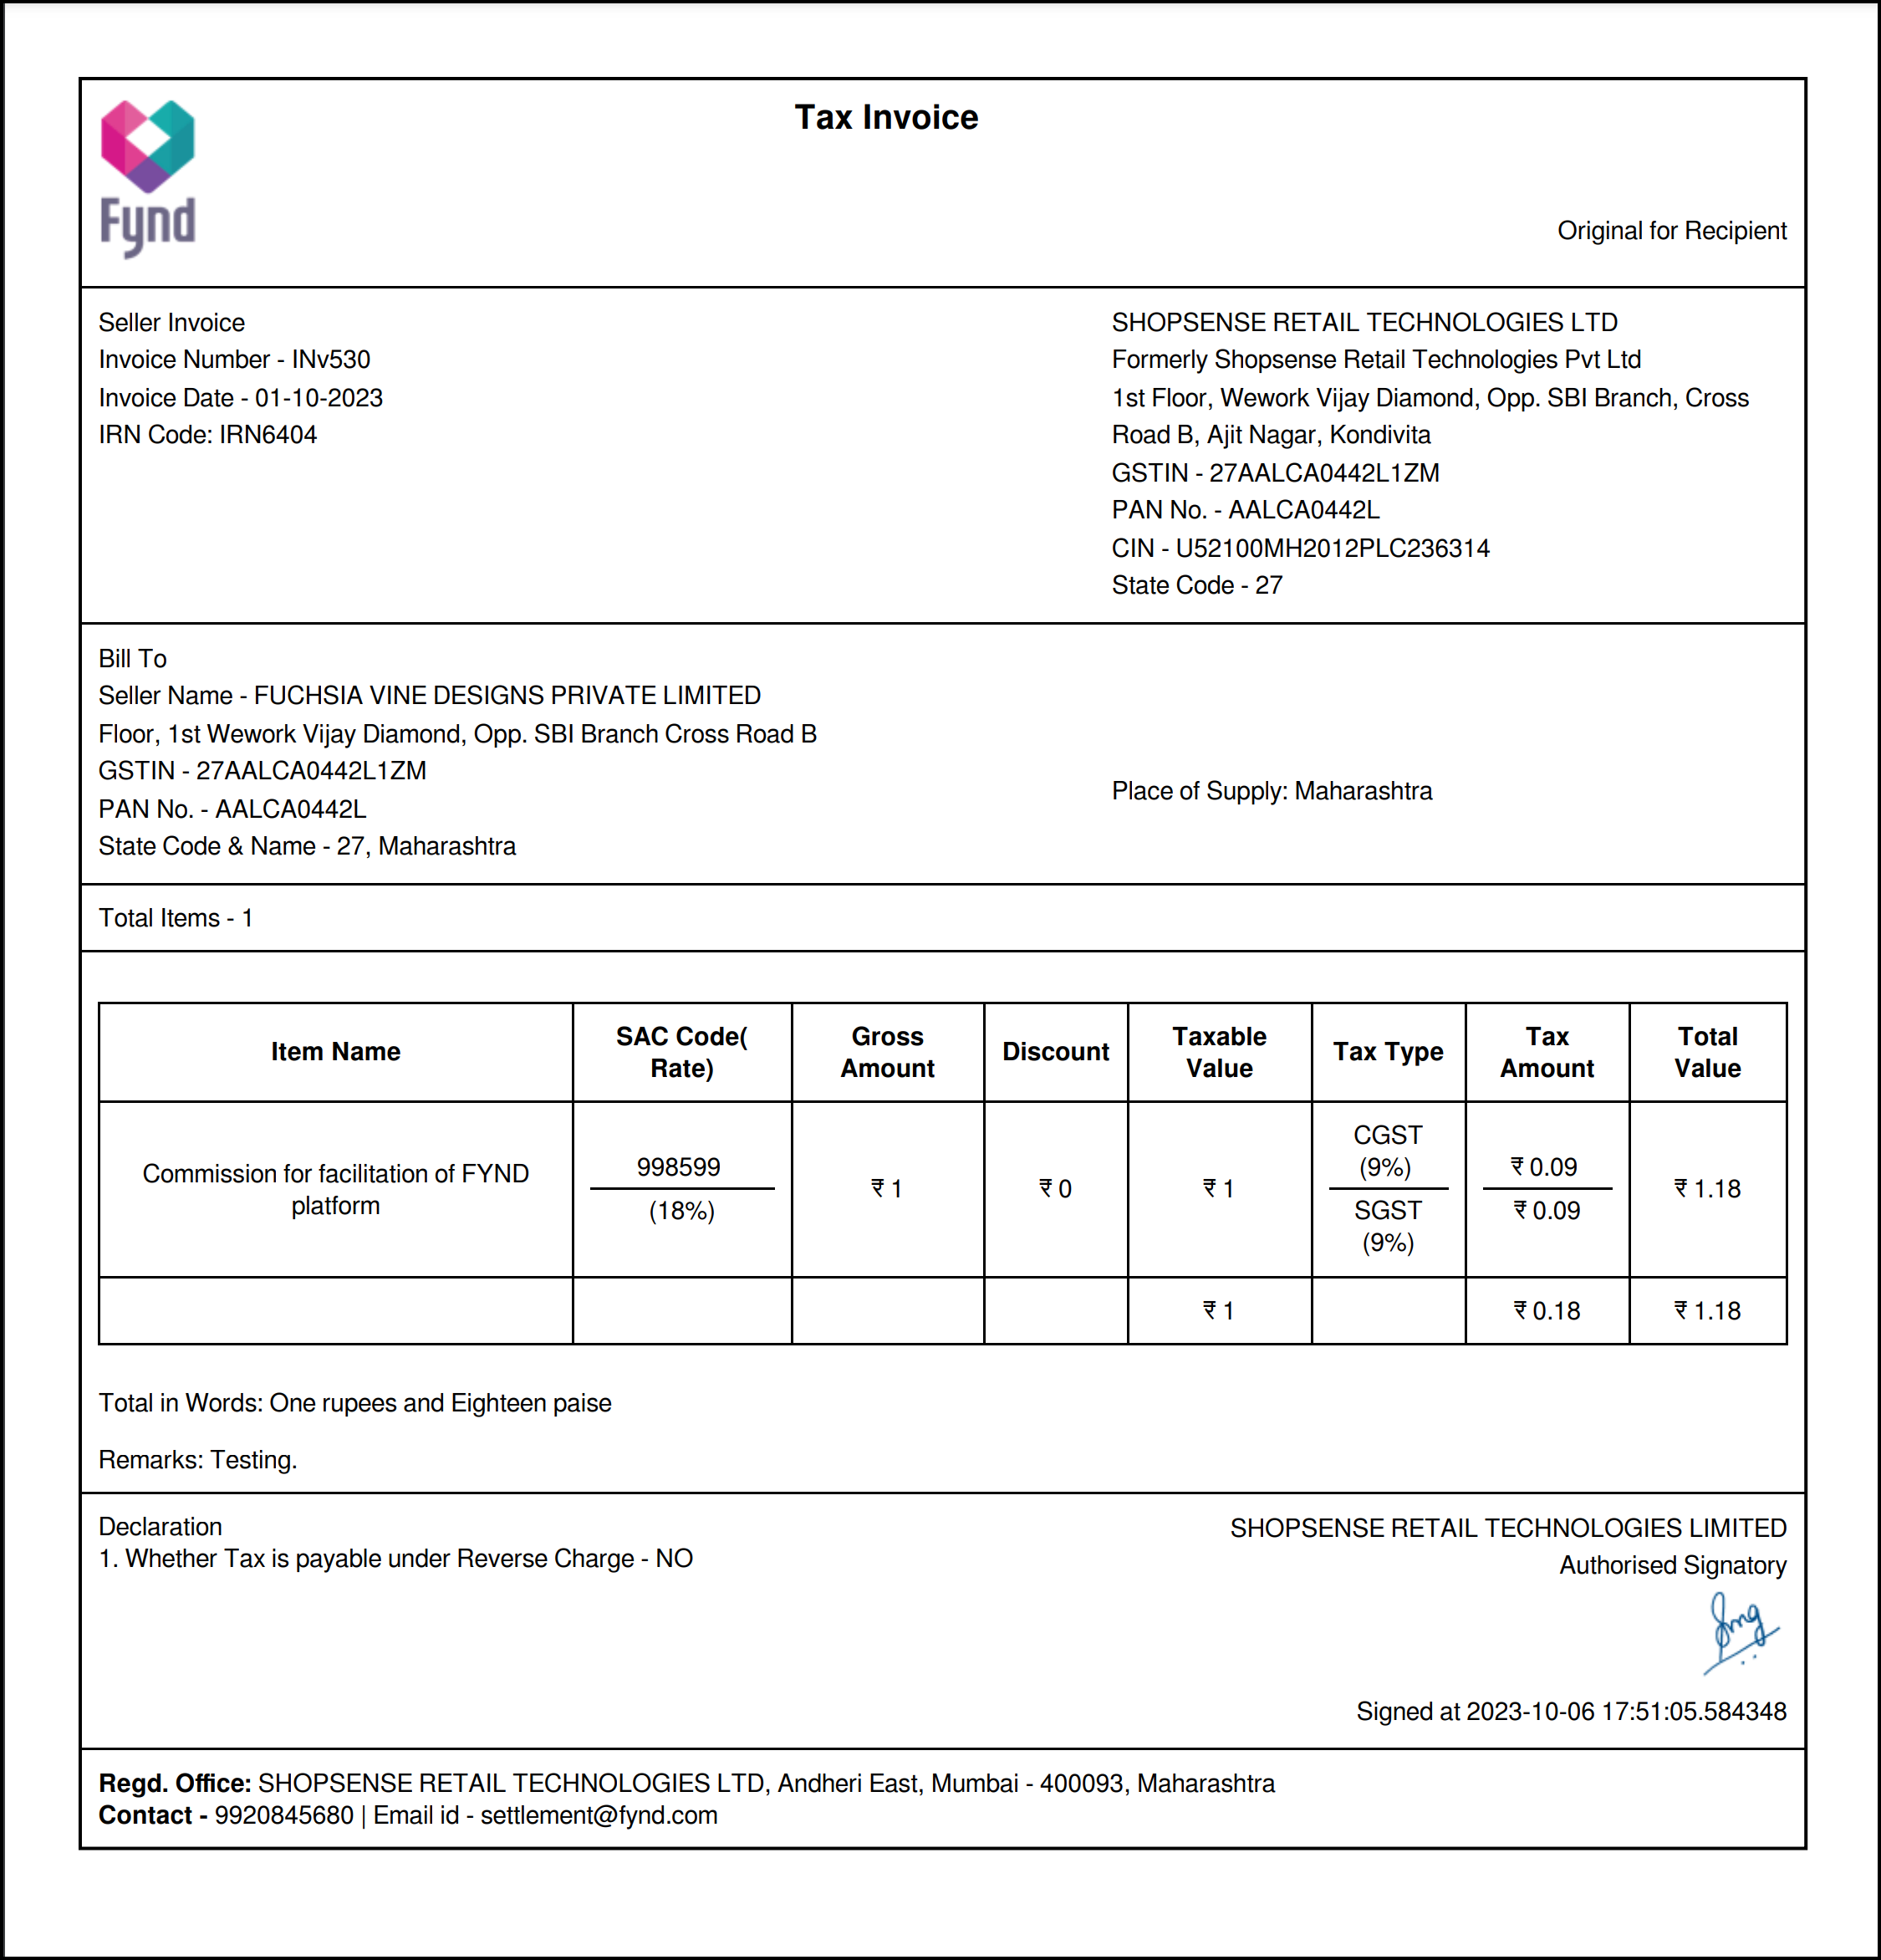
Figure 22: Downloaded Invoice Details
Tick the checkbox at the top of the invoice list to select all entries.
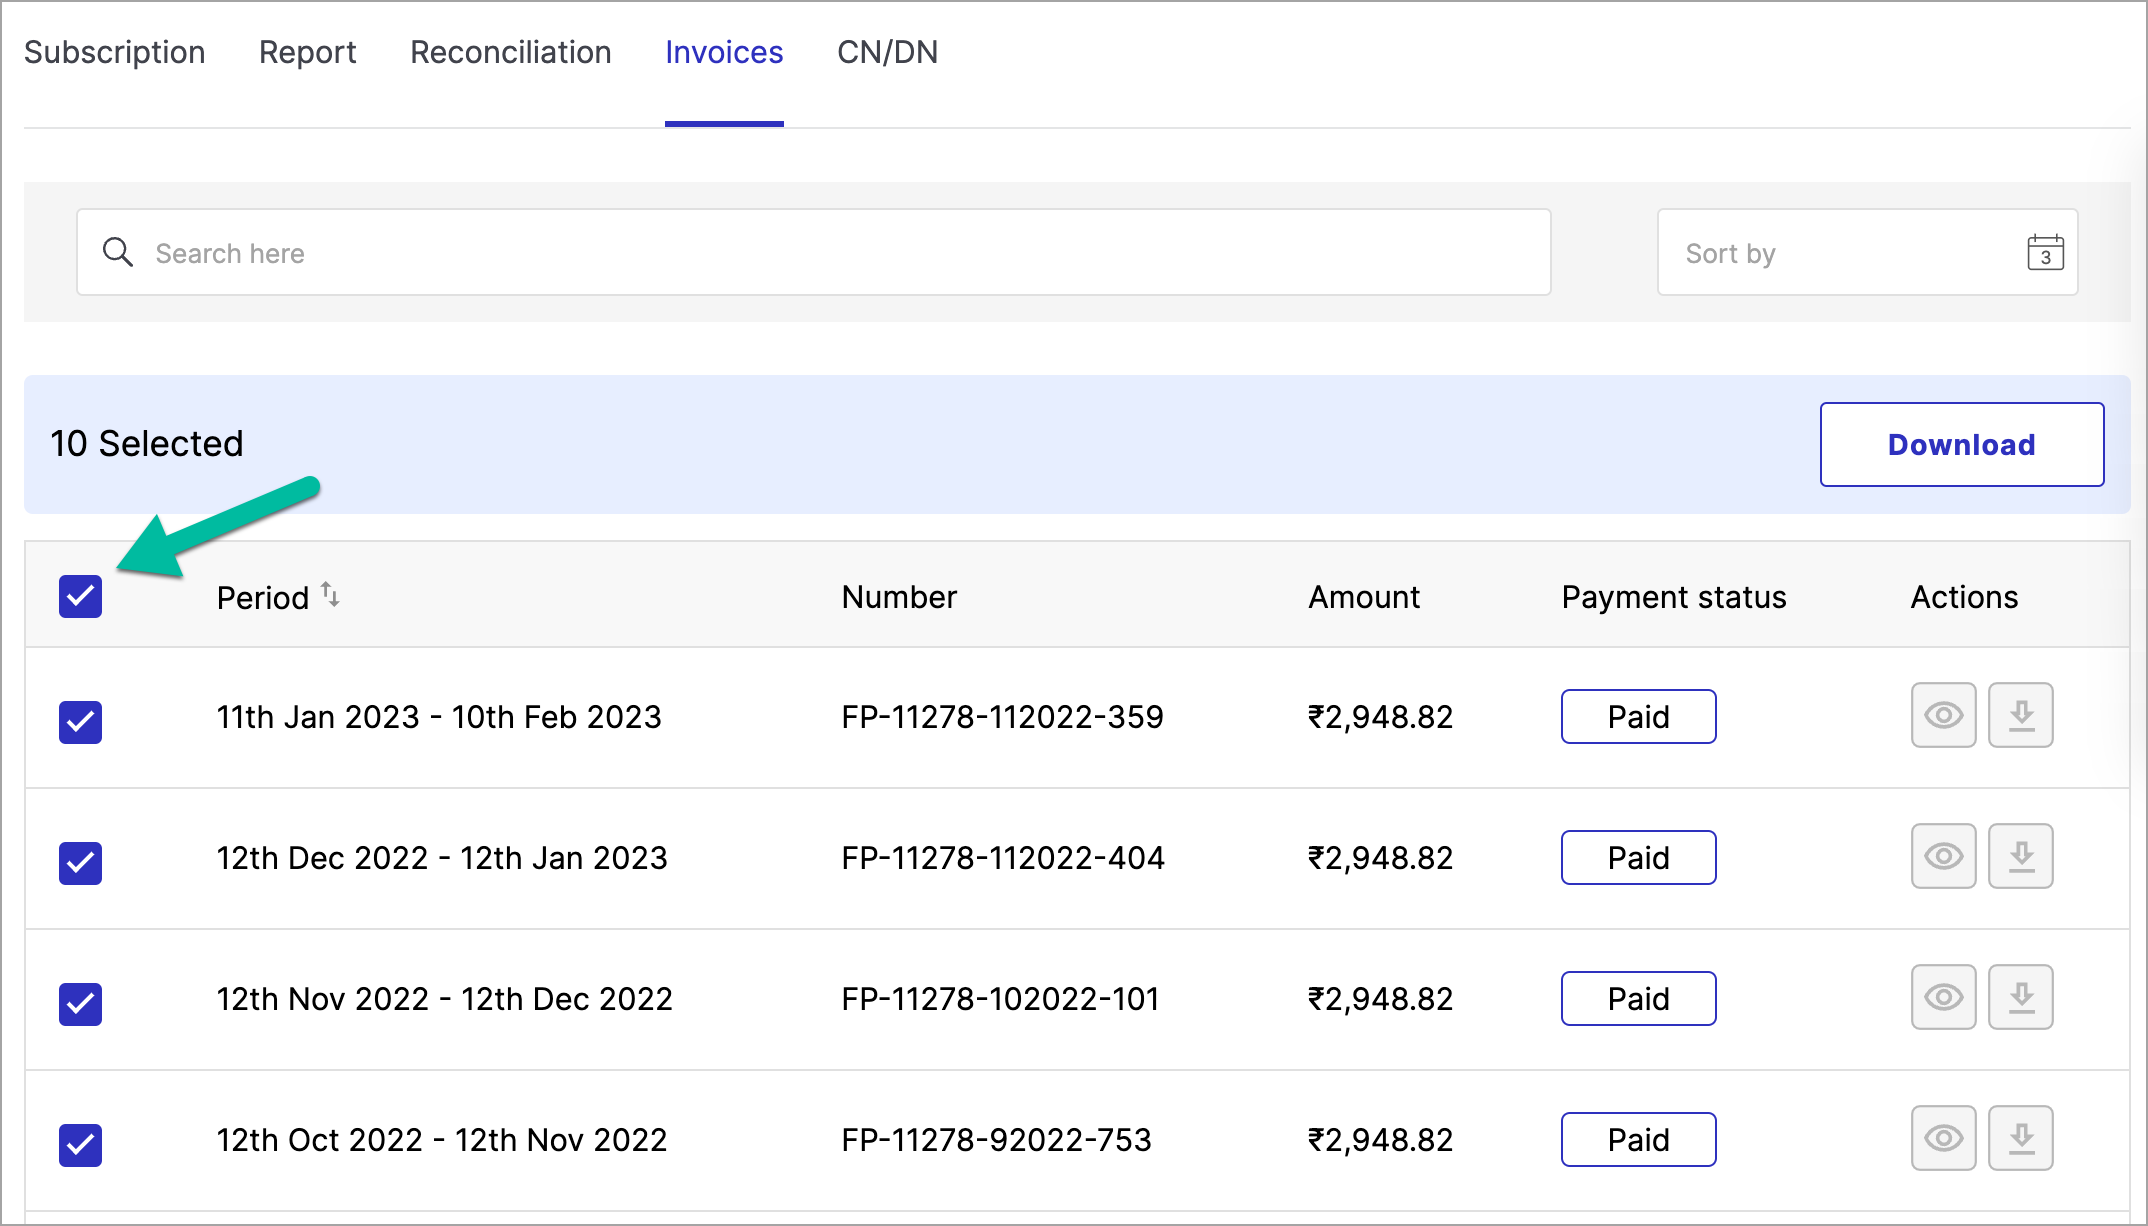
Figure 23: Selecting Bulk Invoices Click Download to download all selected invoices at once.
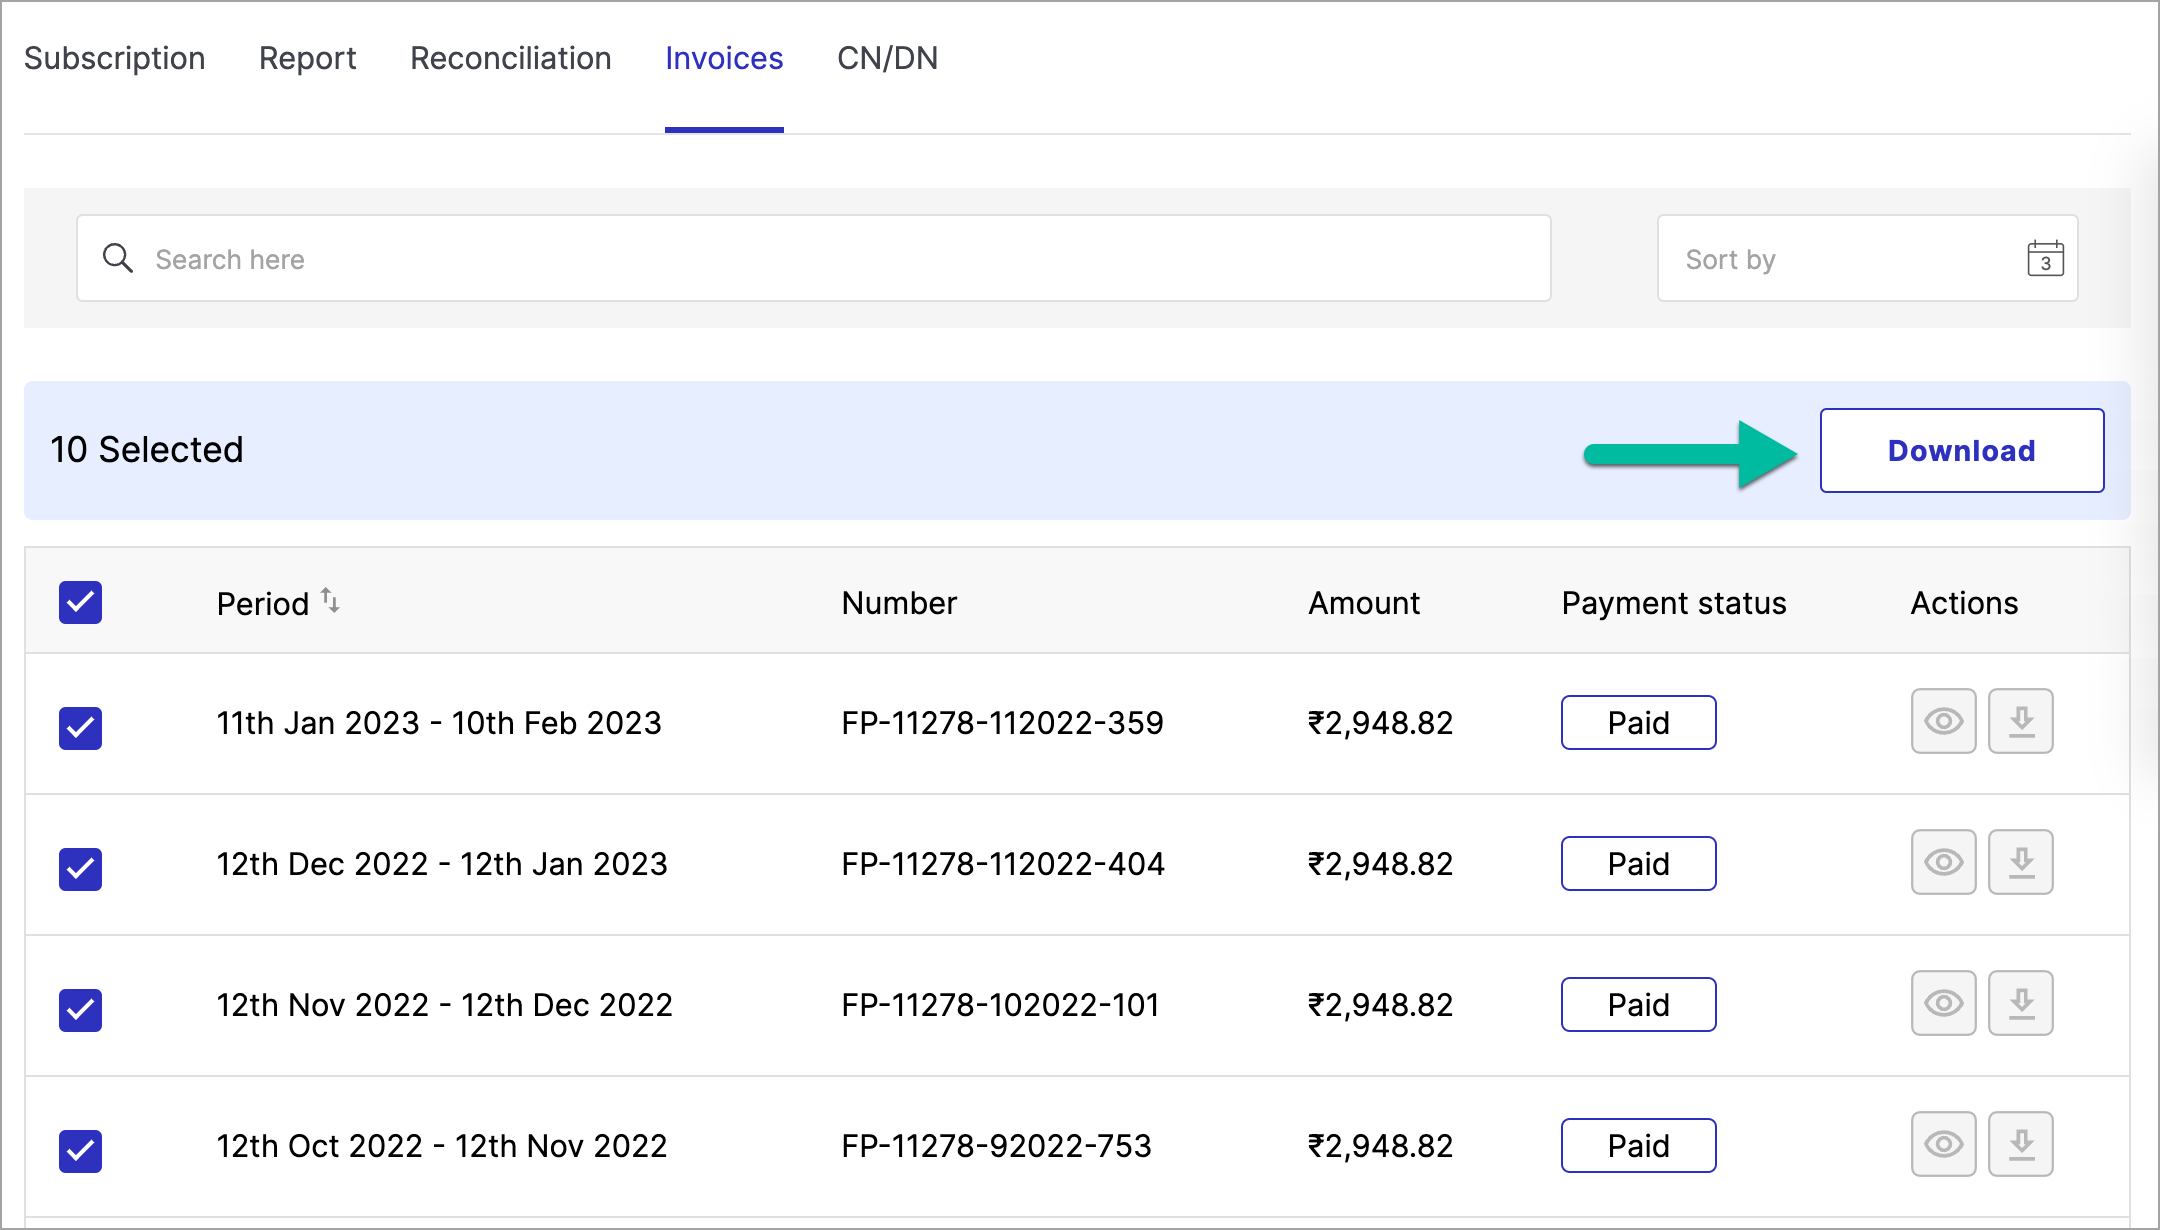
Figure 24: Clicking Bulk Download
Go to the Billing page and click the Invoices tab.
Use the checkboxes to select the invoices you wish to pay.
The Status column shows Unpaid for invoices that have not yet been paid. Ensure you select only the invoices you intend to pay.
Double-check your selection before proceeding to avoid billing errors.
Click Pay (Amount). The button displays the total for all selected invoices. The checkout page will open with the following payment options:
- Credit Balance – Pay using available credits in your account.
- UPI – Pay instantly through any UPI-enabled app.
- Credit/Debit Card – Enter your card details to pay by card.
- Net Banking – Log in to your bank's net banking portal to complete the payment.
Fill in the required details for your chosen payment method.
Click Pay Now to complete the transaction.
Once payment is processed successfully, a confirmation message will appear and the Status column will update to Paid for each settled invoice.
View a complete log of all activity on your credit balance, including top-ups, amounts applied to invoices, and other transactions.
Click Past Transactions in the Credit Balance section on the main Billing page.
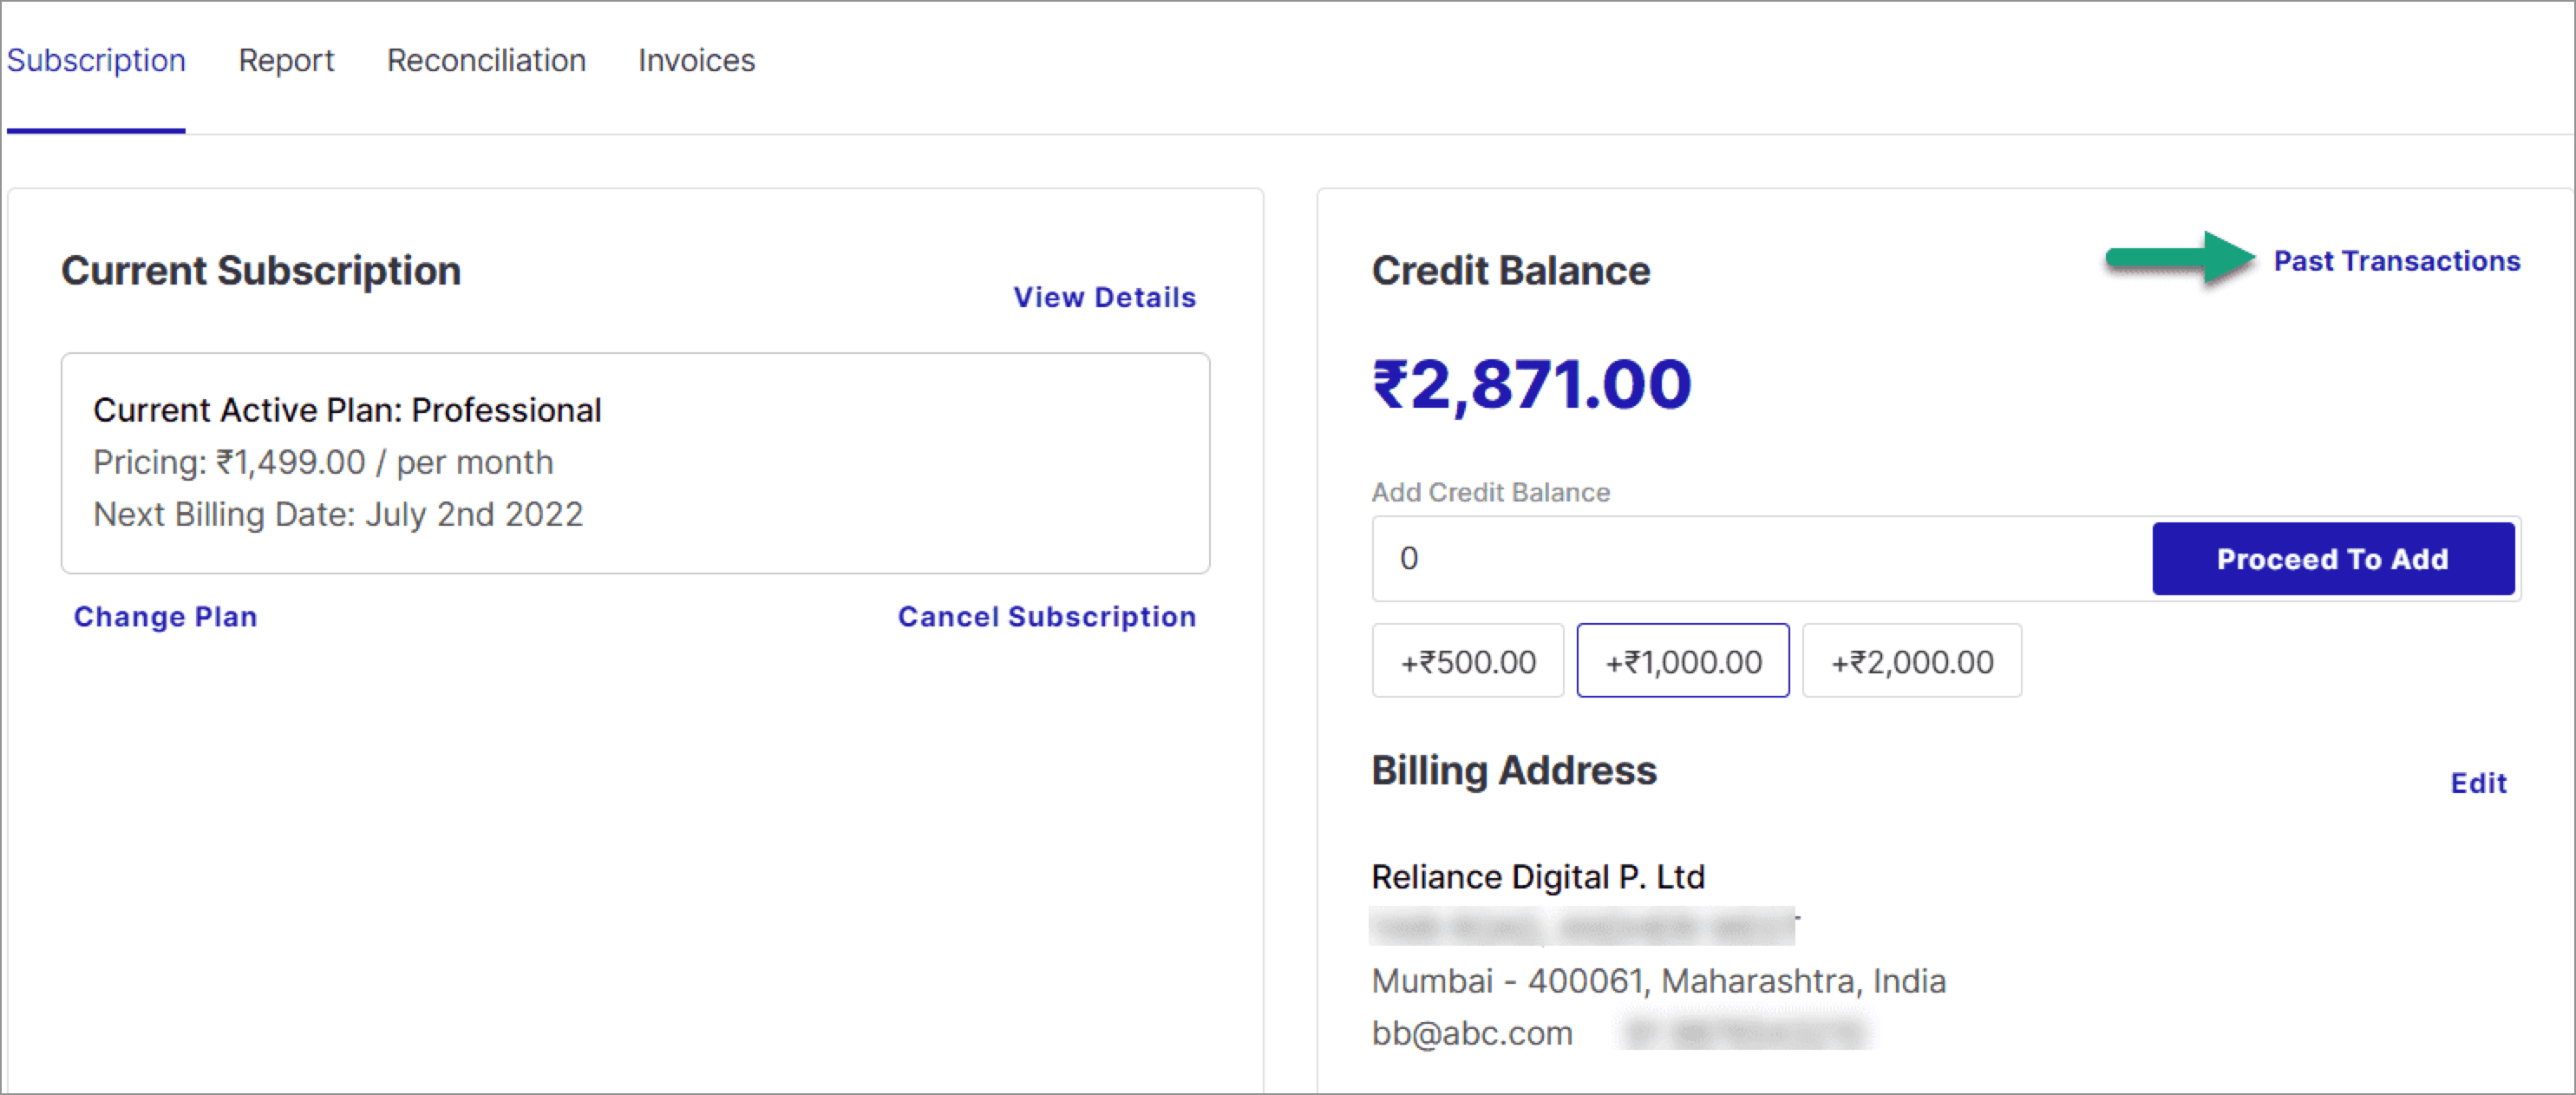
Figure 25: Clicking Past Transactions Search for a specific transaction using its Transaction ID, UTR, or Transaction Date.
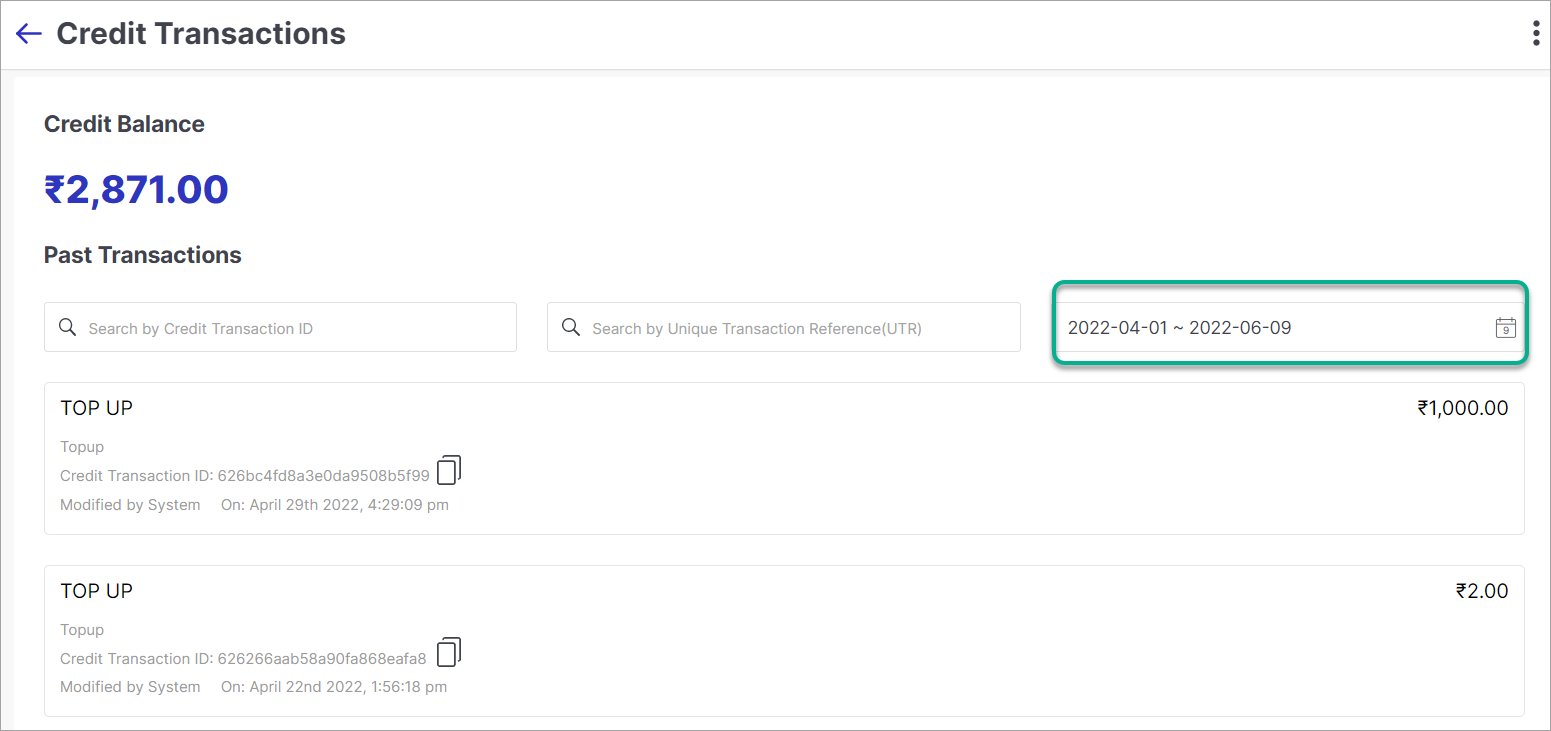
Figure 26: Searching Transactions
Keep your billing address up to date to ensure invoices and communications are directed correctly.
Click Edit in the Billing Address section on the main Billing page.
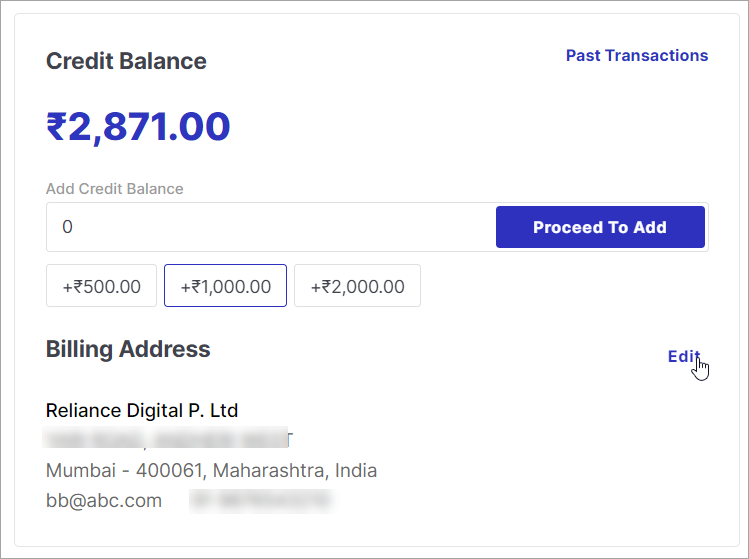
Figure 27: Clicking Edit for Billing Address Update your address details and click Update to save the changes.
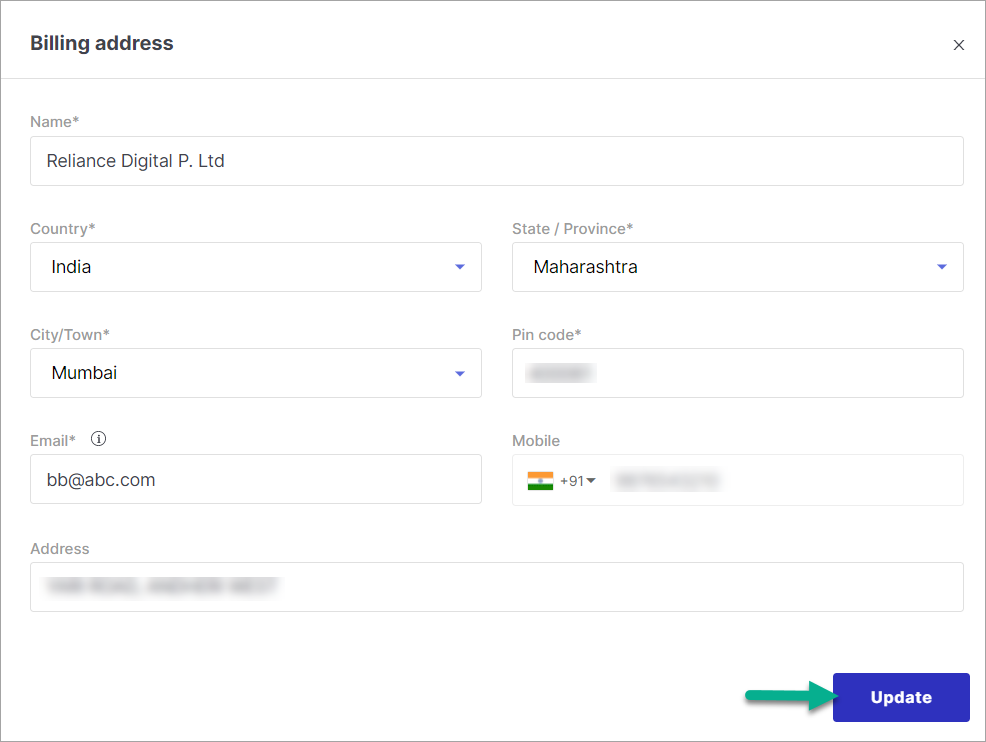
Figure 28: Updating Billing Address
Card tokenization is a security measure that replaces your card details with a unique digital token. This token is stored and used for transactions instead of your actual card information, keeping your data safe.
How it works: When you save a card, your card details are securely shared with the card network provider. In return, the provider issues a token linked to your card. For all future transactions, only this token is used — you do not need to re-enter your card details each time.
Tokenization is free of charge. As mandated by the RBI, card data is tokenized and protected by card networks, ensuring your card details are never exposed. You can choose to consent to tokenization for future transactions or opt out at any time.