Commerce Panel → Sales Channel (select application) → Customers → Profile
This section is for viewing the information of the registered customers and creating user groups. Contact details such as email ID and phone number are available to the staff for any correspondence. Additionally, individual staff can search their customers and view their date of registration, thus leading a pro-active customer service.
Main Screen
In this document, you will learn more about:
Create customers manually when you acquire them offline, through assisted selling, POS orders, events, or customer support interactions.
- Click Create Customer on the Profile page.
- Enter the following details:
- Name – Enter the customer’s full name. Example: Aarav Sharma
- Gender (optional) – Select from the dropdown.
- Phone – Enter the phone number with the country code. Example: +91 9876543210
- Email – Enter the email address. Example: aarav.sharma@example.com.
- Use the Active toggle to control whether the customer can log in and place orders.
- On – Customer can log in and transact.
- Off – Customer account exists but cannot transact.
- Click Create to save the profile.
Attention - If the phone number or email you are entering already exists in the system, an error message will appear indicating that the user already exists. You will need to correct the details or check if the customer already exists.
View and update customer information to ensure accurate records, correct payment permissions, and improved customer service. Search using phone number or email and open the profile.
- Name and gender
- Phone number
- Date of birth
- Sign-up date and time
Click Edit to update:
- First name
- Last name
- Gender
- Date of birth
Click Save to apply changes.
When you edit a customer’s profile details in the commerce panel, the updated information is also reflected in the customer’s storefront account.
For example, if you change the customer’s last name and save the changes, the customer will see the updated last name in their profile on the storefront (e-commerce website) the next time they view their account.
Control how a specific customer can pay across different sales channels. Select the relevant channel (POS or Storefront) before making changes.
Enable or disable COD for the selected customer.
- Enabled – Customer can place COD orders.
- Disabled – COD is restricted for this customer.
This is useful when managing high-risk accounts or credit control.
It is the total COD limit available for each user. Example: 100000 Rs. It is not manually editable from this screen.
Initially, its value is fetched from the field Total COD Limit Per User (Path: Commerce Panel → Sales Channel (select application) → Configuration → Payments → Payment Configuration → Offline Payments → Cash on Delivery) of your Fynd Commerce .
It varies whenever a user places an order and is calculated as Current Available Limit (post-delivery) = Current Available Limit (pre-delivery) - Total Order Value.
| Orders | Total Order Value | Current Available Limit (pre-delivery) | Current Available Limit (post-delivery) |
|---|---|---|---|
| Initially | - | ₹50,000 | - |
| Order 1 | ₹2,000 | ₹48,000 | ₹50,000 |
Let us assume that at present Current Available Limit for a particular customer is ₹50,000 then it gets updated depending upon the forward order journey as follows:
- If customer has placed an order of ₹2,000 then Current Available Limit will be ₹48,000 (depleted by ₹2,000 immediately).
- If the order delivery is done then Current Available Limit will be ₹50,000 (replenished by ₹2,000 immediately).
What will happen with Current Available Limit if you update Total COD Limit Per User when the order is in pre-delivery phase?
- Initially, Current Available Limit was ₹50,000 and a customer has placed an order of ₹2,000.
- You have updated Total COD Limit Per User to ₹70,000 from ₹50,000 in Payments section on Fynd Commerce .
- Now, Current Available Limit will be computed as ₹70,000 - ₹2,000 = ₹68,000 (depleted by ₹2,000 immediately).
- Once the order is delivered, Current Available Limit will be ₹70,000 (replenished by ₹2,000 immediately).
Return order journey does not affect the value of Current Available Limit.
Attention - There are other COD-related configuration present in Fynd Commerce . Refer this document: Where to configure Cash On Delivery (COD)
Store additional structured information about customers to support segmentation, reporting, and marketing workflows. The table shows:
- Attribute name
- Type
- Value
- Modified by
Use search to quickly find specific attributes. To update an attribute:
- Click the edit icon.
- Enter or select a value.
- Click Done.
Supported types:
- Date – Select from calendar.
- Number – Numeric values only.
- Boolean – True or False.
- Text – Free text entry.
Attributes allow merchants to build more precise user groups and campaigns.
- Temporarily restrict a customer’s access without deleting their account.
- Use the Session toggle to disable login access.
- When disabled, the customer cannot access their account until re-enabled.
The Bulk Action dropdown allows you to perform actions such as Import and Export for customer data in bulk.
The Import Customers page allows for bulk uploading of customer data via CSV or Excel file.
Download the sample file in either CSV or Excel format.
Enter Customer Details in the Downloaded File.
You can either drag and drop your file into the File Upload area or click to browse and select a file from your computer. After selecting a file, the file name will appear in the "File selected" field.
The commerce platform supports .csv, .xls, and .xlsx file formats. The maximum allowed file size is 2 MB.
While an import is in progress, the status will display as In Process until the operation is completed.
The Upload History section lists previously imported files along with their respective statuses. Each import entry is clickable to show more details.
There are three import statuses — Failed, Partial, and Complete — that merchants will encounter when importing customer data.
- Failed: The Failed status indicates that the import attempt has not been successful.
- Partial: The Partial status means that the import was only partially successful. Some records were imported successfully, while others encountered issues that prevented their processing.
For example, when the import shows a Partial status, you can open the error file to identify the specific reasons for the failure of one or more entries. The error file includes a column labeled ERROR that provides detailed explanations, such as "An account already exists with this phone number: [phone number]" or "An account already exists with this email: [email]." By reviewing the report, you can understand the exact issues—like duplicate entries or incorrect phone numbers—correct them, and re-upload the file.
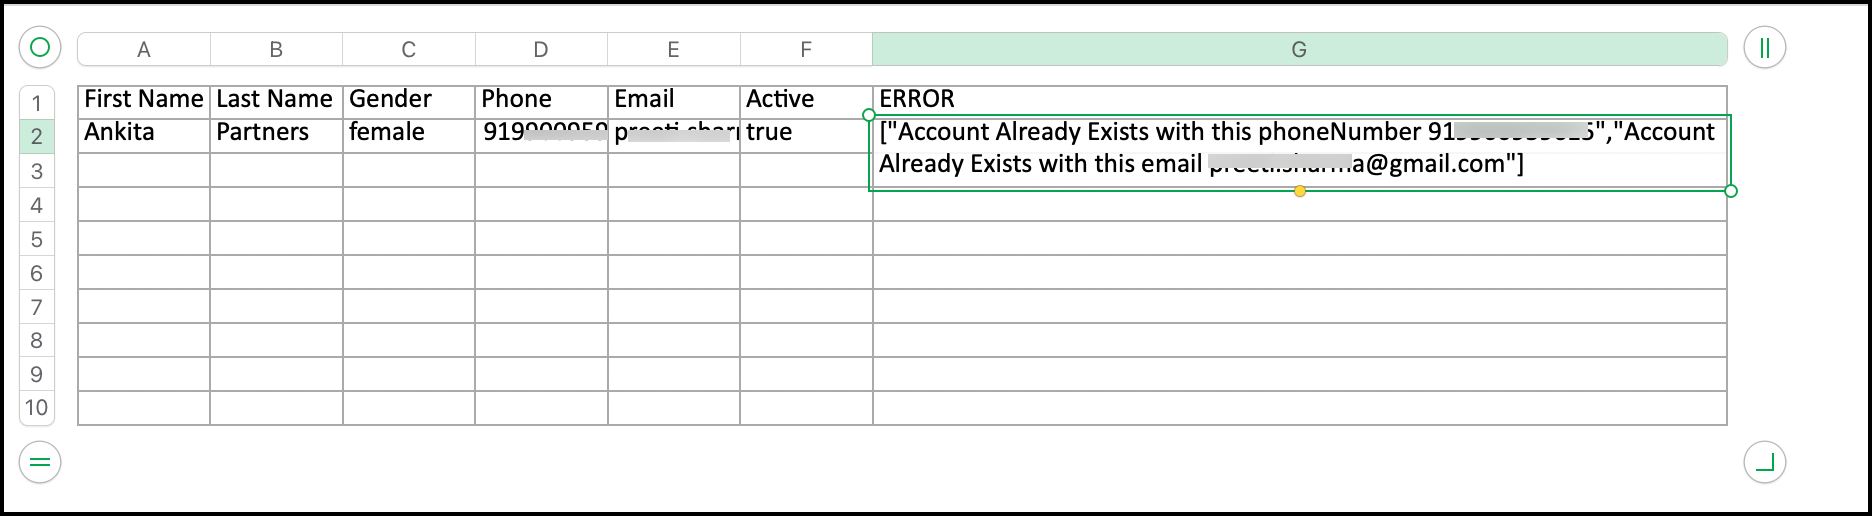
Complete: The Complete status indicates that the import was fully successful, with all records being processed correctly without any errors.
You can visit the Customer page to verify your entries.
The Export Customers page allows you to export customer data in either CSV or Excel format.
You can choose your preferred export format from the Export dropdown .i.e. either Excel (.xlsx) or CSV (.csv).
After initiating an export, you can view the status of respective export under the Export History section. Each export is listed with the respective export status.
When the export is in progress, it will show up with an In Process status. Refresh the page if needed to check the progress.
Once the export is completed, the status will update to Complete, and the file will be available for download.
You can click on the export file to view the batch details, which includes:
- Exported By: The user who initiated the export.
- Start Time and End Time: The duration it took to complete the export.
- Processing Time: How long the export took to process.
Once the export is complete, click the download icon next to the completed export to download the customer data file.
From the Customers page of the respective sales channel, find the customer whose data you wish to delete, and go to their profile.
In the customer’s profile, click the Erase Personal Data option. This will initiate the process of deleting their PII.
A confirmation pop-up will appear, showing what data will be erased. Review the data and proceed.
Once you confirm, the system will initiate the data deletion request.
The data is permanently deleted after a 45-days window, allowing merchants to cancel accidental deletions and check for ongoing transactions, while giving customers a chance to restore their accounts and prevent data loss.
Merchants can cancel the data deletion process at any time before the data is permanently deleted.
Enter the reason for restoring the customer data in the provided text field and click Restore to confirm the action.
Merchants can track the status of data deletion requests through the Timeline section in the customer profile.
The User Groups button is a feature that lets you create different groups of users based on certain characteristics.
For example:
- Premium Users: You can create a "Premium Users" group for customers who have subscribed to a premium service or made a specific purchase.
- Non-Premium Users: Another group called "Non-Premium Users" can include customers who haven't subscribed to any premium services.
- T-Shirt Economy: If you're running a clothing store, you could create a "T-Shirt Economy" group for customers who often buy t-shirts.
Once you've created these user groups, you can use them to apply special promotions or discounts to specific segments of your customers.
For instance:
- You could offer a 10% discount on all products to the "Premium Users" group as a loyalty reward.
- For the "T-Shirt Economy" group, you might run a "Buy One, Get One Free" promotion on selected t-shirt designs.
By using User Groups and targeted promotions, you can tailor your marketing strategies to different user segments, offering them personalised deals and enhancing their overall shopping experience.
User Groups allow you to segment customers using conditional rules or bulk user uploads. These groups can be later used for marketing campaigns, workflows, personalization, and more.
- Go to Customers → Group.
- Click Create User Group.
- At the top of the page, fill in:
- Group Name (required) : Example Premium Users, Birthday Shoppers, High-Value Customers.
- Description (required) : Explain the purpose of this group for future reference.
- Choose How You Want to Add Users : You can build the group in two ways:
A. Conditional Logic (Rule-Based Grouping) : Use this option to automatically include customers who match certain attributes or behaviors.
- Select Conditional Logic.
- Under Condition 1, choose a customer attribute from the dropdown.
- The platform supports multiple attribute types like text, number, dropdown, date, boolean, and others.
- Depending on the attribute type, relevant condition operators will appear automatically. For example, date attributes show date-based operators, number attributes show numeric operators, etc.
- Select the condition operator (e.g., Occurs this week, Equals, Greater than, Contains, etc.).
- Enter or select the value based on the operator.
- (If applicable) For date attributes, enable Recurring event (Ignore year) to target annual events such as birthdays or anniversaries.
- When enabled, the system ignores the year and matches only the day and month.
- To add more rules, click + AND.
- All conditions in a group use AND logic, meaning customers must meet every condition to qualify.
- Click View Users to preview how many customers match the rules.
- Save the user group once you're satisfied with the setup.
Examples Using Conditional LogicExample 1 - Birthday Shoppers
- Condition:
birthdate→ Occurs this week - Recurring event: Enabled (This selects customers who have a birthday in the current week.)
Example 2 — High-Value Customers in a City
- Condition 1:
total_spent→ Greater than →5000 - Condition 2:
city→ Equals →Mumbai
B. Bulk Import (Upload Users Manually), Use this option when you already have a list of specific customers you want to target.
- Select Bulk Import.
- Download the sample CSV file.
- Fill the file with customer identifiers.
- Supported fields (Bulk Import supports):
- Email ID
- Phone Number
- These values must match the customer profile for the user to be added successfully.
- Upload the CSV to import users into the group.
- Save the group.
You can edit any user group after it has been created. You can update the name, the description and the user selection method based on how the group was originally created.
- Update attributes, operators and values
- Add new conditions using + AND
- Delete conditions, but at least one condition must always remain
- Save changes to refresh the list of matching users
- Re-upload a new CSV file with updated customer email or phone
- Add new customers or replace the existing list
You can delete a user group from two places.
- Open Customers → Group
- Click the options menu (⋮) next to a group
- Select Delete and confirm
- Open the group
- Click the options menu (⋮)
- Select Delete and confirm
Deleting a group permanently removes it from all workflows and configurations.
- Conditions cannot be applied to encrypted attributes.
- At least one condition is required for any group created using Conditional Logic.
- Bulk Import supports only email and phone number.
- Conditional Logic groups update automatically as customer data changes.
- Bulk Import groups remain static unless you upload a new file.
- User Groups may be referenced in campaigns, automations or other modules, so deleting a group should be done with caution.
- The operators shown for each condition depend entirely on the attribute type selected.