This phase outlines the complete process to configure the Trendyol channel within Fynd Konnect. It includes detailed instructions on accessing the configuration dashboard, filling in account details, setting up store/warehouse credentials, enabling critical sync functionalities, and finalizing the channel to ensure a seamless connection between your system and Trendyol.
Log in to Fynd Konnect ↗.
Navigate to Channels → All Channels in the left-hand navigation menu.
Locate the Live or Configured channel (e.g., Trendyol) you wish to configure.
Click the Configure button next to the channel.
Alternatively, use the search bar to quickly find the channel by its exact name.
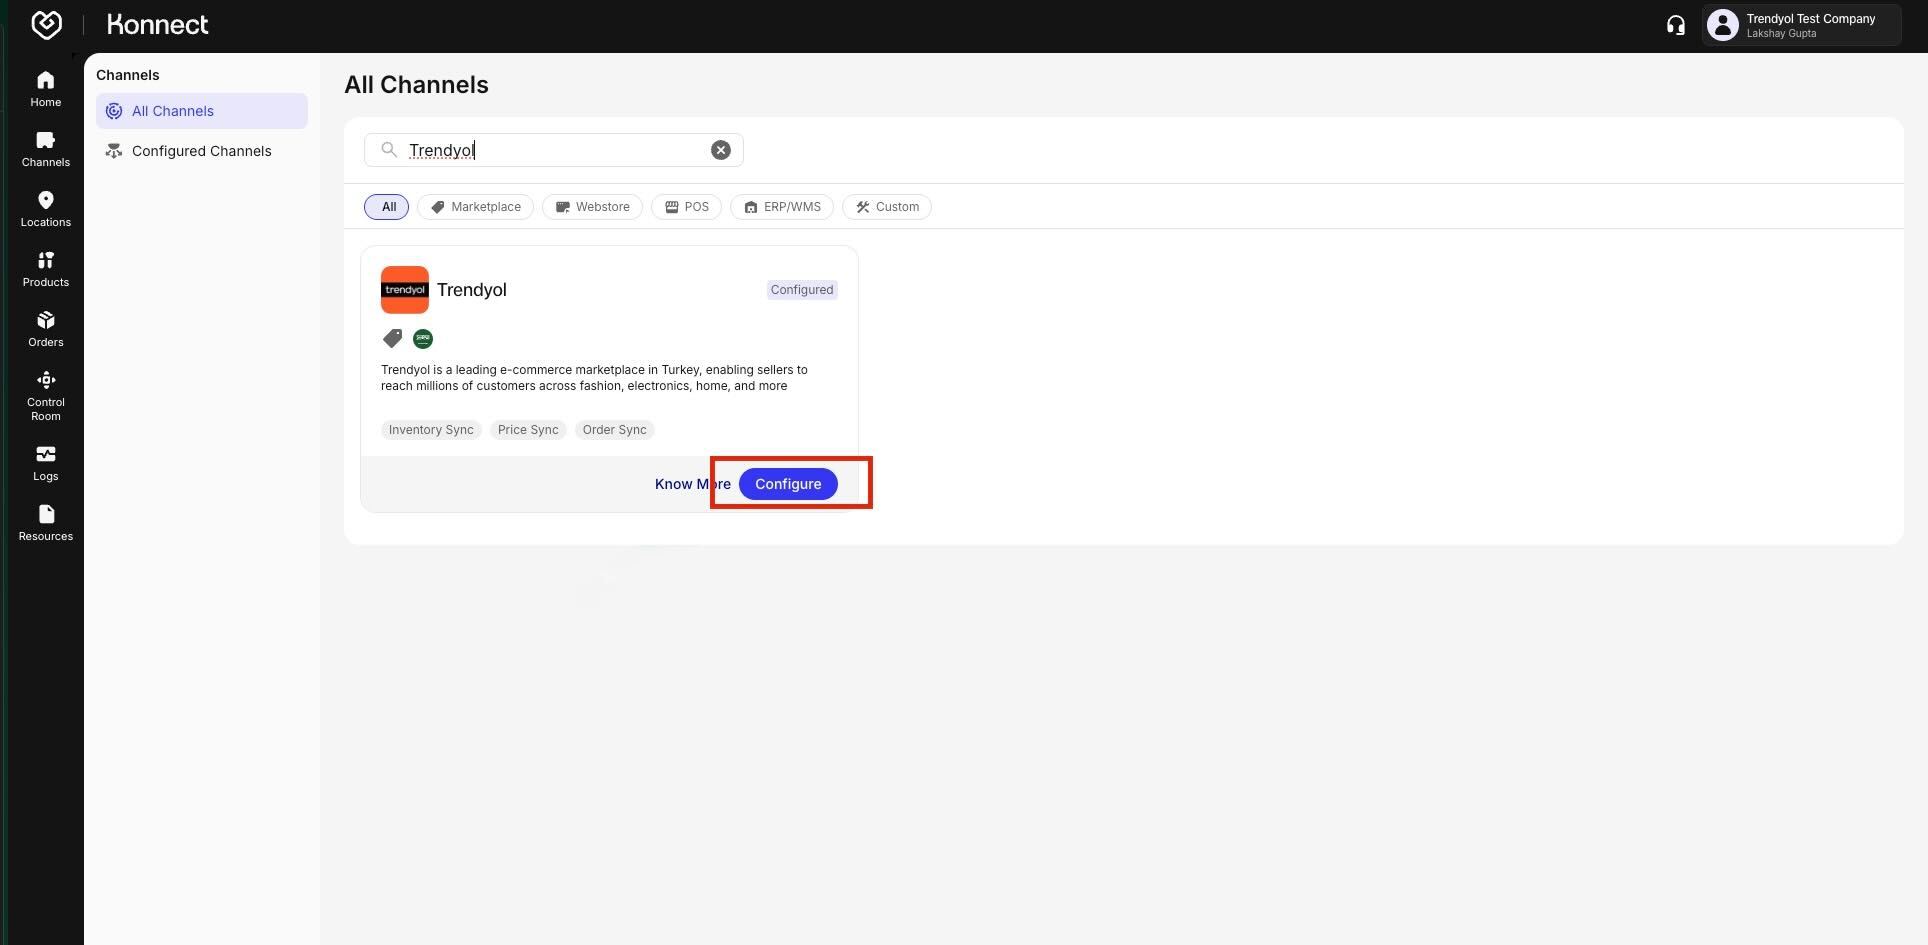
Figure 1: Trendyol Channel on Fynd Konnect
This section forms the base for channel configuration. Make selections carefully as some fields are not editable later. Know more about configuring the Account Details for a Company-Auth channel like Trendyol here
On the Account Details tab, enter the following:
- Account Name: Provide a unique name at the company level. Account Name cannot be modified once saved.
- Configuration Controls: Toggle the following options based on your requirements:
- Order Sync: Enable to auto-fetch all new orders from Trendyol.
- Order Sync From: Specify the date from which you want orders to be synced.
- Return Sync: Enable to manage returns from Trendyol.
- Return Sync From: Specify the date from which you want returns to be synced.
- Product Mapping: Enable to map/update product mapping, i.e., mapping of Fynd SKU Code or Seller Identifier with Trendyol Product ID.
- Inventory Sync: Enable to send real-time inventory updates to Trendyol.
- Master toggle: At the top of the configuration window, there is a toggle to Activate/Deactivate the entire channel.

Figure 2: Account Details Configuration
Know more about configuring Locations for a Company-Auth channel like Trendyol here
After completing Account Details, proceed to the Locations tab.
Enter the following Trendyol seller-account credentials:
- Username (API Key)
- Password (API Secret)
- Seller ID
- Storefront Code (SA or AE)
Locations List:
- Each row represents a store or warehouse with columns for Location Name, Location Code, Channel Location ID, and Status.
- Use the search bar or filters (All, Active, Inactive) to quickly find locations.
Activating Locations
- Toggle the Status for each location:
- On: Activates the location, allowing data synchronization (orders and inventory).
- Off: Disables synchronization temporarily.
- For multiple locations, use Bulk Edit:
- Update credentials, channel identifiers, or statuses in bulk.
- Click Done or Update to apply changes.
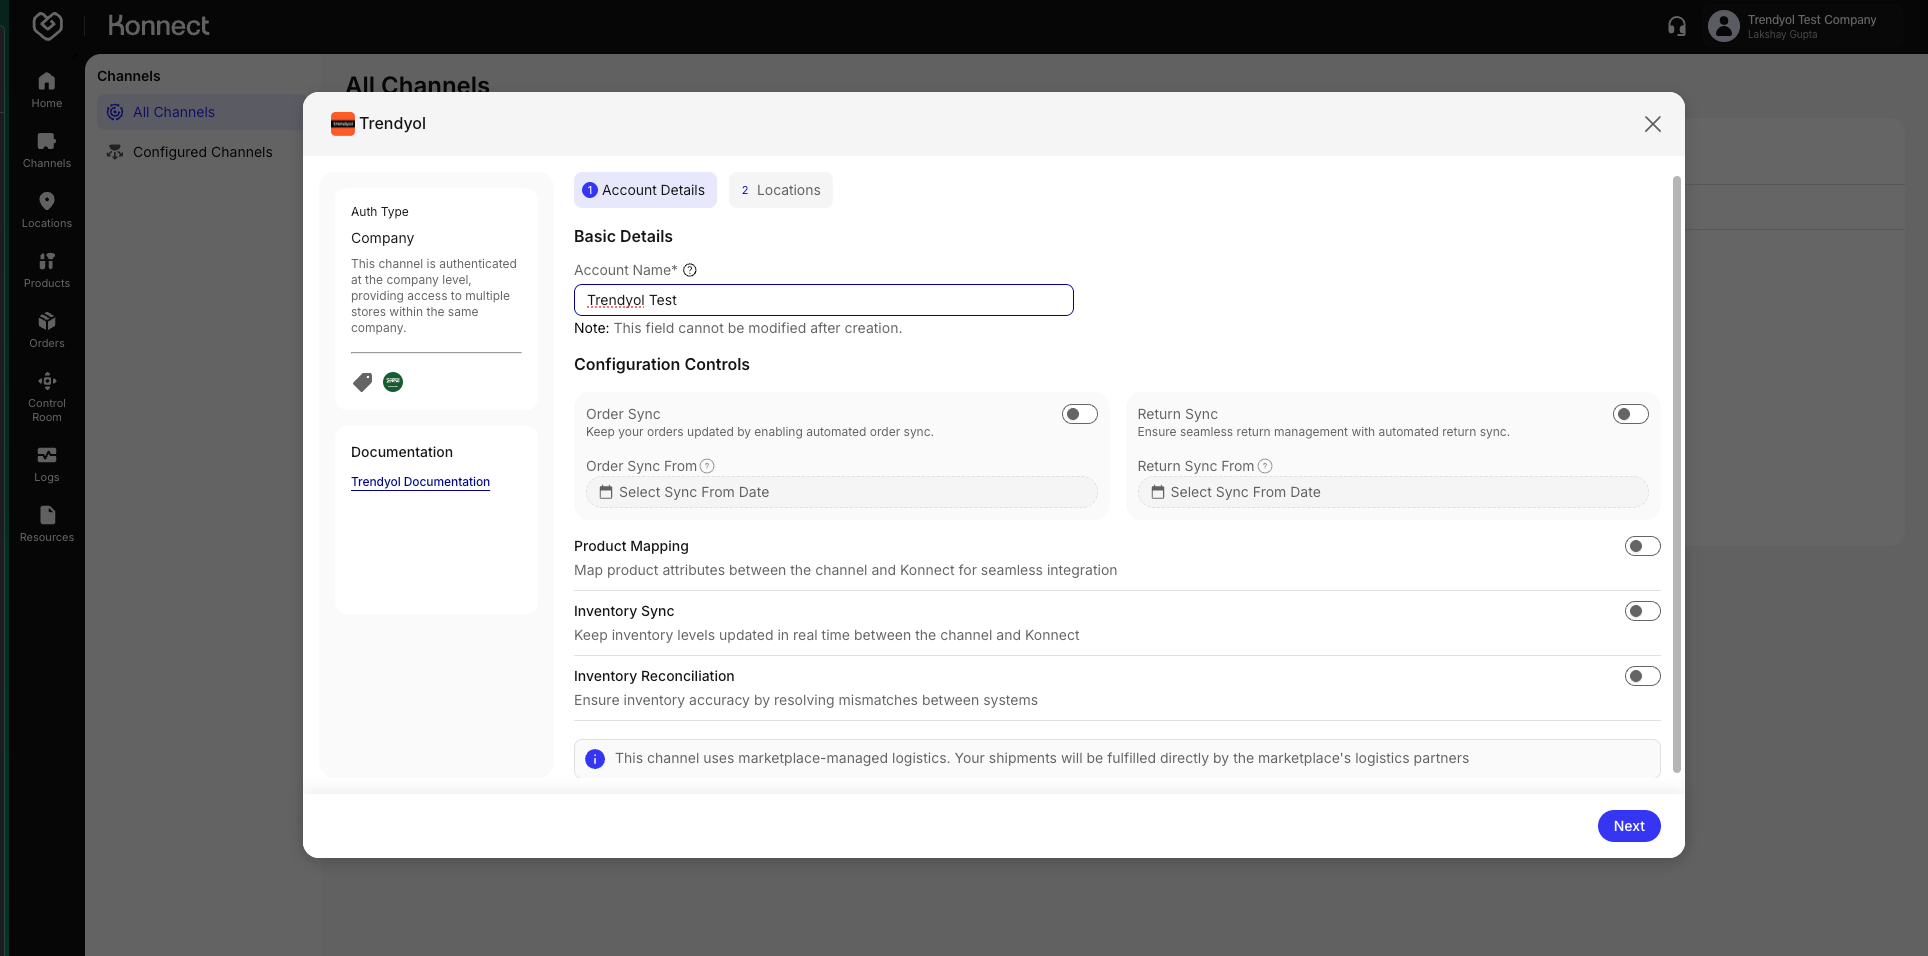
Figure 3: Location and Credentials Setup - Toggle the Status for each location:
Pre-Submission Checklist
- Account name is accurate and unique.
- All necessary toggles are enabled.
- Order and Return sync dates are correctly set.
- Location credentials are saved and validated.
- Channel Location IDs are present.
- Master toggle is ON.
Submit Configuration
- Click Submit in the bottom-right corner.
- Look for a success popup: “Account created successfully.”
Post-Submission Verification
- Go to the Configured Channels tab.
- Confirm Trendyol is listed with status Active.
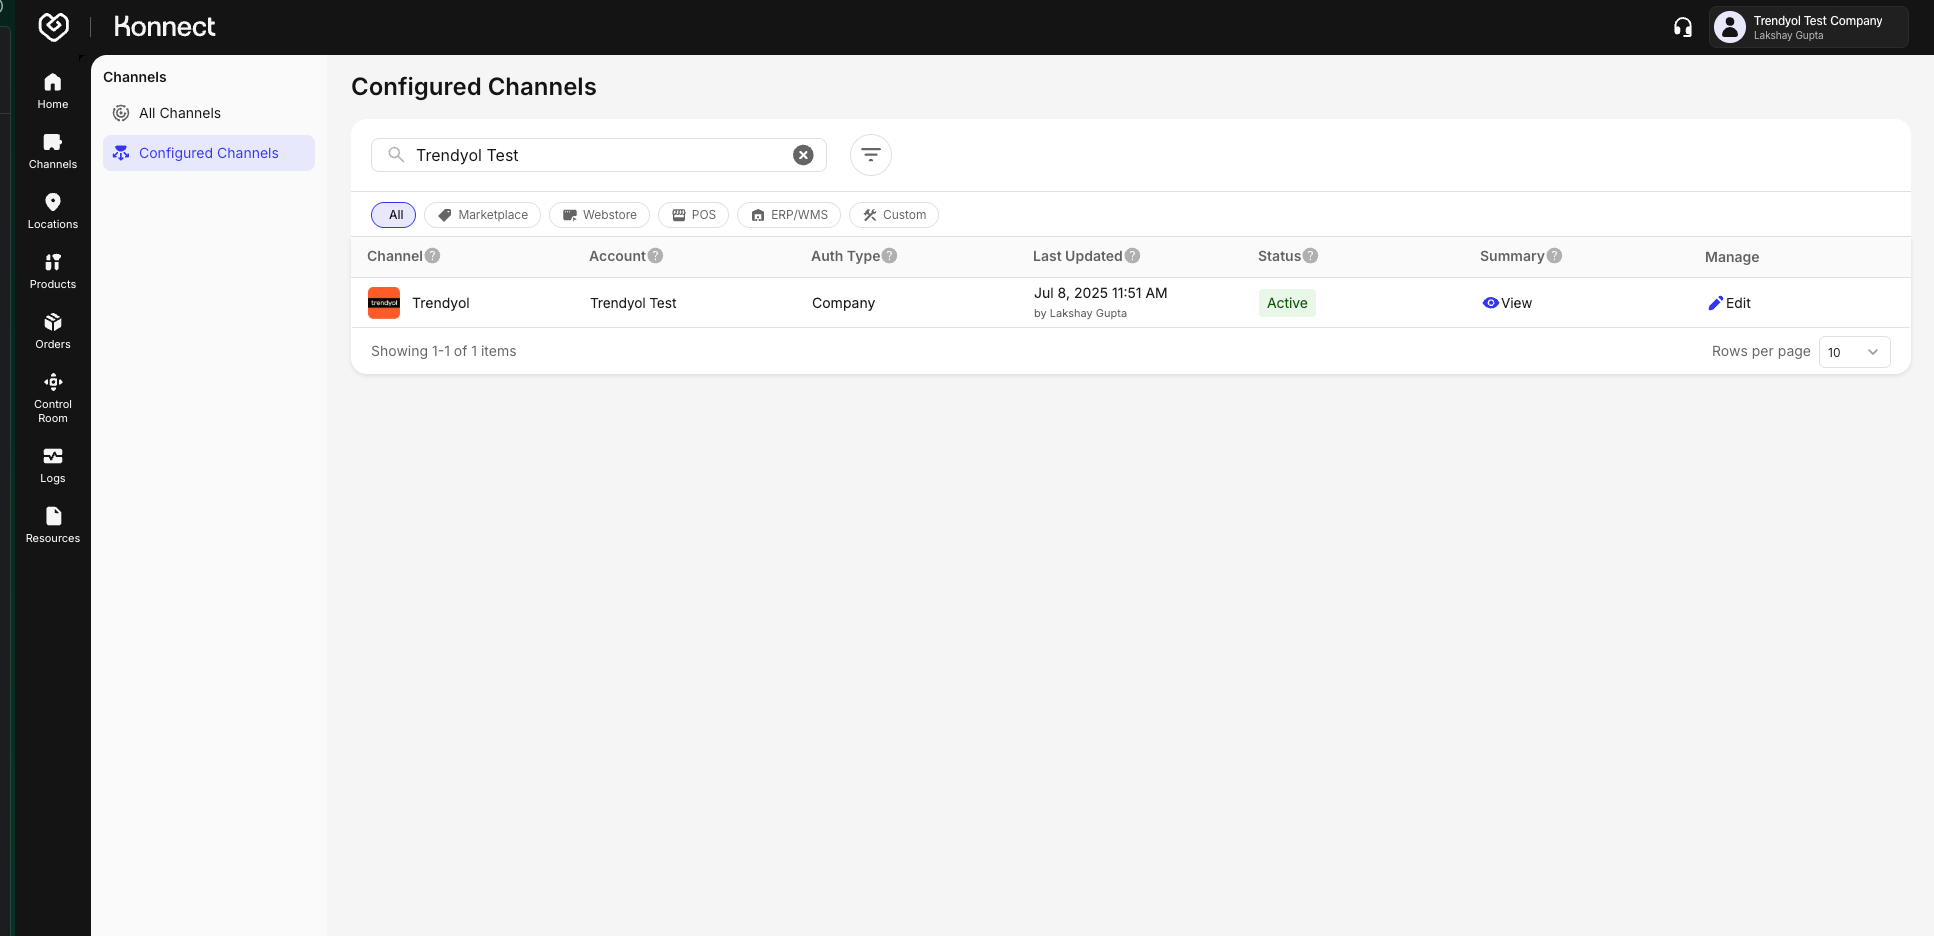
Figure 4: Post-submission Verification
| Setting | When Enabled | When Disabled |
|---|---|---|
| Order Sync | Orders auto-synced | No orders will be synced automatically. |
| Return Sync | Automated return created and updated | Manual return handling |
| Product Mapping | Product linkage allowed | Orders & inventory would not sync |
| Inventory Sync | Real-time stock updates | No inventory update. Risk of overselling |
Want to track your channel’s performance or get a consolidated view of your operations? Head over to Konnect’s Channel Summary feature. Learn more →