The Product Subscription extension on the Fynd Commerce allows the customer to maintain ongoing access to the product or service for as long as they continue to pay a subscription fee. Subscribers pay a recurring fee at regular intervals (such as weekly, monthly or annually) based on the subscription plan to access a product or service provided by a sales channel, rather than making a one-time purchase.
Before activating the Product Subscription extension for any sales channel, ensure that the following configurations are completely set up. Failure to do so will disrupt the subscription lifecycle and payment processing flows.
Customers will need a direct channel to reach out regarding modifications, billing issues, or cancellations of their subscriptions. Ensure your support contact channels are live:
- Navigate to Sales Channel menu → Configuration → Customer Support.
- Fill in all required fields, ensuring a valid customer-facing Email and Phone Number are provided.
- Click Save.
Subscription renewal payments are automatically handled by dispatching a secure billing link directly to the customer. This infrastructure must be enabled before turning on the extension:
- Navigate to Sales Channel menu → Configuration → Payments → Payment Configuration.
- Add a new payment gateway or select an already configured provider.
- Switch over to the Store OS tab.
- Locate the Payment Link section and toggle the payment option to Enabled.
- Click Save.
Ensure your theme is upgraded to the latest production release of the Turbo Theme to preserve UI performance, email notifications, and payment link functionality.
- Go to the Extensions section in the Fynd Commerce.
- Select Product Subscription extension.
Once you have installed this extension, it will be available in the Extensions section on the Fynd Commerce. Upon opening the extension, you will see a Sales Channel overview page listing all sales channels where the extension is active or inactive.
- Click the arrow (→) on the desired sales channel for which you wish to configure the extension.
- Activate the extension by toggling the master button located at the top-right corner.
Enabling the extension on a sales channel will result in a corresponding status update of "Active" or "Inactive" on the sales channel card.
The Product Subscription extension has been successfully enabled. Once inside a sales channel, the extension offers the following sections, accessible from the left sidebar:
The Dashboard is the first screen you land on after entering a sales channel in the extension. It provides an analytics overview of subscription activity, including charts for Subscribers, Orders, and Amount - all filterable by date range.
In this section, sellers can create subscription plans for their products and offer a discount on recurring purchases to subscribers. All available plans are displayed as a list showing the Plan Title, Plan Type, Start Date, Status, and Actions. Sellers can filter the plan list by Frequency or Status using the dropdowns at the top. From the Action dropdown against each plan, sellers can:
- View - review and edit the plan details.
- Inactive - deactivate the plan so it no longer appears on the storefront.
Click Create Plan in the top-right corner to set up a new subscription plan. The Create Plan form includes the following fields:
Plan Name: Provide a clear, descriptive, and unique plan name as it is essential for easy identification and management. The name should effectively communicate the plan's purpose and objectives. This is for the seller's reference and is not shown to the customer. For instance, if you're creating a subscription plan where customers can receive monthly tea bag deliveries at a 20% discount on MRP, you can name the plan "Tea Bag Subscription: Enjoy 20% Off!".
Frequency: Select the right frequency for the subscription plan — whether it's Daily, Weekly, Monthly, or another supported interval. Choosing the appropriate frequency ensures recurring orders are created as expected for your customers. For a monthly plan, customers are required to renew their subscription every month. Therefore, the frequency would be set to "Monthly".
Reminder Before Order Day: Choose when reminder emails should be sent before the actual subscription order day. You can select one or multiple reminder thresholds — 1 day before, 2 days before, or 3 days before. The system will automatically dispatch reminder emails on the selected days ahead of the scheduled order generation.
Promotion: Include a promotion to maximize impact. Create a flat off or percentage (% OFF) discount offer for customers availing the subscription. This discount will be applied to all recurring orders under this plan. For example, offering a 20% discount on every recurring order.
Discount Applied On: Choose the base price on which the subscription discount is calculated. This applies to the first order and all renewal orders for this plan. Select one of the following:
- Actual Price (MRP) - the discount is applied on the product's MRP. This is the default for new plans.
- Selling Price - the discount is applied on the product's current selling price.
Plan Schedule: Add a start date for when the plan will be enabled on the storefront. You can also add an end date, after which the subscription will be removed from the storefront. If no end date is entered, the subscription will continue indefinitely.
- New customers can only subscribe during this active window.
- Existing customers who have already subscribed will continue to receive orders even after the end date passes.
Select Product: Add all the products which are required to be part of the plan. The subscription plan will be visible on the storefront for all such products. Click the Select Product field to open a product picker panel, where you can search and select products, then click Add Products to confirm.
Click Save to create the plan.
Once saved, the plan will appear in the Manage Plans list and will be visible on the storefront for the selected products within the defined schedule.
This section provides sellers with a clear overview of subscriber details and purchase activity. It enables sellers to track subscriber history and take action to adjust subscription status as required. The list displays the following details for each subscriber:
- Name
- Phone
- Subscribed On - the date the customer subscribed.
- Frequency - the subscription frequency (e.g., Weekly, Monthly).
- Status - the current state of the subscription.
- Actions - available actions the seller can take.
- History - an eye icon (👁) to view detailed order history.
Sellers can filter the list by customer name, email, or phone number, Frequency, or Status using the controls at the top.
Subscribers can have any of the following statuses:
- Active: The subscription is currently active for the customer. The payment link will be sent to the customer as per the frequency. Post successful payment, an order will be placed for the customer.
- Paused: The subscription has been temporarily paused because the customer failed to make a payment for an upcoming order. An email reminder is sent to the customer regarding the subscription renewal. If the customer makes the payment within 48 hours, the subscription is kept active. The seller can Resume the subscription from the Action dropdown, after which the payment link will be re-sent to the customer.
- Inactive: The subscription has been closed by the seller. This state cannot be undone. If the same customer purchases the subscription again, a new subscription row entry will be created.
From the Action dropdown against each subscriber:
- When a subscription is Active, the seller can mark it as Inactive.
- When a subscription is Paused, the seller can Resume it.
Sellers can click the eye icon (👁) in the History column to open a detailed side panel — Customer Details and Order History - for the respective subscriber. This panel displays:
- Customer details - name, phone number, email, and current subscription status.
- Plan ID - the identification number assigned to the subscription plan.
- Product - the product code and amount associated with the subscription.
- Quantity - the quantity selected by the customer at the time of subscribing. All future renewal orders will be placed for this same quantity.
- Upcoming Order - the scheduled date and time of the next order, along with a progress tracker showing the current stage: Payment Link → Payment Pending → Order Placed.
- Order History - a searchable table of past orders showing Order ID, Date, and Status.
The Manage Emails section lists all email templates that are sent to customers regarding their product subscription. Each template can be toggled on or off using the switch on the right, and edited by clicking the pencil icon (✏). The available email templates are:
- First Order / Welcome Email: This email is sent to customers upon successful purchase of a subscription to a product.
- Subscription Cancelled Email: This email is sent to customers to inform them that their subscription has been cancelled.
- Subscription Paused Email: This email is sent to inform the customer that their subscription has been temporarily paused.
- Subscription Resumed Email: This email is sent to inform the customer that their subscription has been resumed.
- Subscription Pre Reminder Email: This email is sent to customers before the upcoming subscription order day, based on the Reminder Before Order Day days configured in the plan. It reminds customers of their upcoming recurring order commitments.
- Subscription Payment Link Email: This email is sent to customers for upcoming subscription payment. It contains a secure, clickable payment link for the customer to fulfill their renewal. The generated payment link remains valid for 10 minutes.
- Subscription Re-Payment Link Email: This email is sent to customers when a fresh payment link is required - i.e., when the original 10-minute payment link has expired. Customers can use the regenerated link to complete their payment. Regenerated links are valid for 48 hours (and 24 hours for daily plans).
When a seller clicks the pencil icon (✏) to edit a template, they are taken to the template's settings page. Here, the seller can:
- Sender - configure the sender identity.
- Choose Default Provider - select the email provider from all available providers configured for the respective sales channel.
- Subject - customise the subject line of the email to align with their business need (up to 100 characters).
- Send Test Email - send a sample email to verify the template looks correct.
- Edit Test Email - make changes to the template body.
- Click Save to apply changes.
A live Preview of the email is shown on the right side of the screen as changes are made.
To display the subscription option on the product page for customers, the extension wrapper must be added to your storefront theme.
- Go to Sales Channel. Here we have selected test-pages.
- Click Appearance.
- Click Theme.
- Click Edit. The Theme editor will appear.
Now, add the product subscription extension wrapper in your theme:
- Select Product Description from the page dropdown.
- Go to the Page tab under Sections.
- Select Extension as Product Subscription in the delivery location field.
- Select the wrapper as Product Subscription.
- Click Save.
To help sellers stay on top of subscription activity without needing to log into the platform every day, the extension automatically sends a Daily Subscription Digest email to the seller's support team every day at 11:00 AM IST.
The digest is sent to all email addresses configured under:
Sales Channel → Configuration → Customer Support → Email
If no support email is configured, the digest will not be sent. This is another reason why setting up Customer Support details during the mandatory setup steps is important.
.png)
Each digest covers a 7-day rolling window and includes five sections:
| Section | Description |
|---|---|
| Upcoming Renewal Orders | Subscriptions scheduled to renew in the next 7 days — helps the team anticipate order volume. |
| Ongoing Orders | Orders where a payment link has been sent or payment is pending — highlights customers who still need to complete payment. |
| Skipped Renewal Orders | Orders that were skipped, including paused subscriptions and orders with a skipped status. |
| Completed Renewal Orders | Orders successfully placed — confirms successful renewals. |
| Failed Renewal Orders | Orders that failed due to payment issues. |
If the customer is not logged on the storefront, they will be prompted to log in on the product display page of the sales channel saying LOGIN TO SUBSCRIBE.
-mg5SB154h.png)
Once logged in, customers will be able to see the SUBSCRIBE AND SAVE button on the Product Description Page (PDP).
-gNzVBBUtx.png)
Upon clicking SUBSCRIBE AND SAVE, customers will be prompted to select the plan along with an email ID in case email is not available for the logged in customer. This email ID will be used to send all subscription related communication.
When a customer subscribes to a product via the subscription binding/popup on the product page:
- The selected quantity is displayed in the binding popup at the time of subscription.
- All future renewal orders for that subscription will be placed for the same quantity as selected during the initial subscription.
- Customers should ensure the correct quantity is selected before confirming the subscription, as it determines all subsequent order quantities.
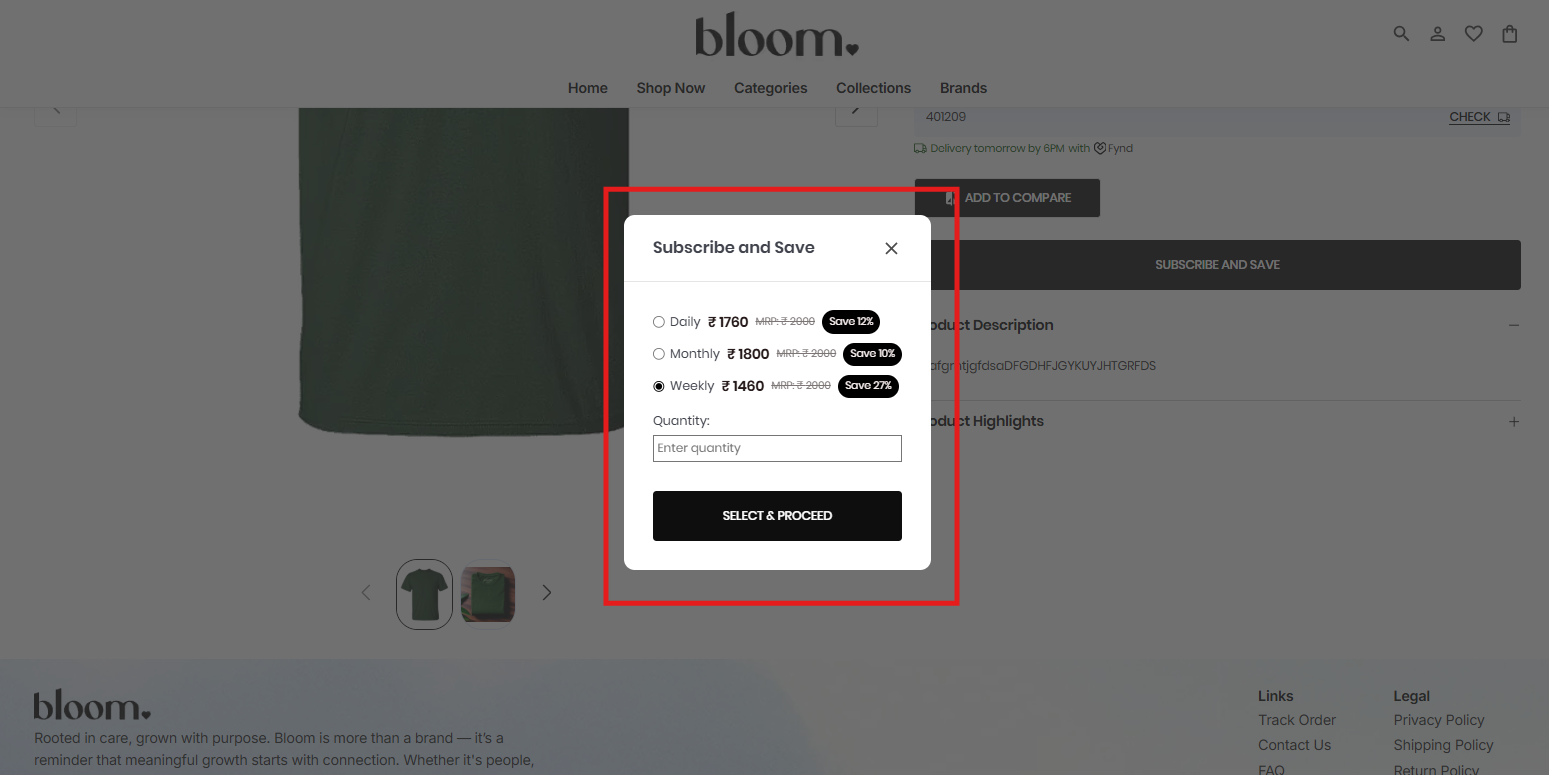
Click SELECT & PROCEED.
Customers will provide delivery details similar to checkout journey. The subscription discount will be added in the price summary during checkout as shown below.
-A0Tu_44sM.png)
The customer can pay the remaining amount with any mode of payment to buy the selected product on subscription.
After successful payment, the order will be created for the customer.
-Fsudli6Tx.png)
-R6lahizrW.png)
Once the subscription order is successful, customer receives a welcome email.
-2sKwRWVFq.png)
Customers can manage their active subscriptions directly from the storefront without needing to contact the seller. This self-service experience is available via a dedicated Manage My Subscription page.
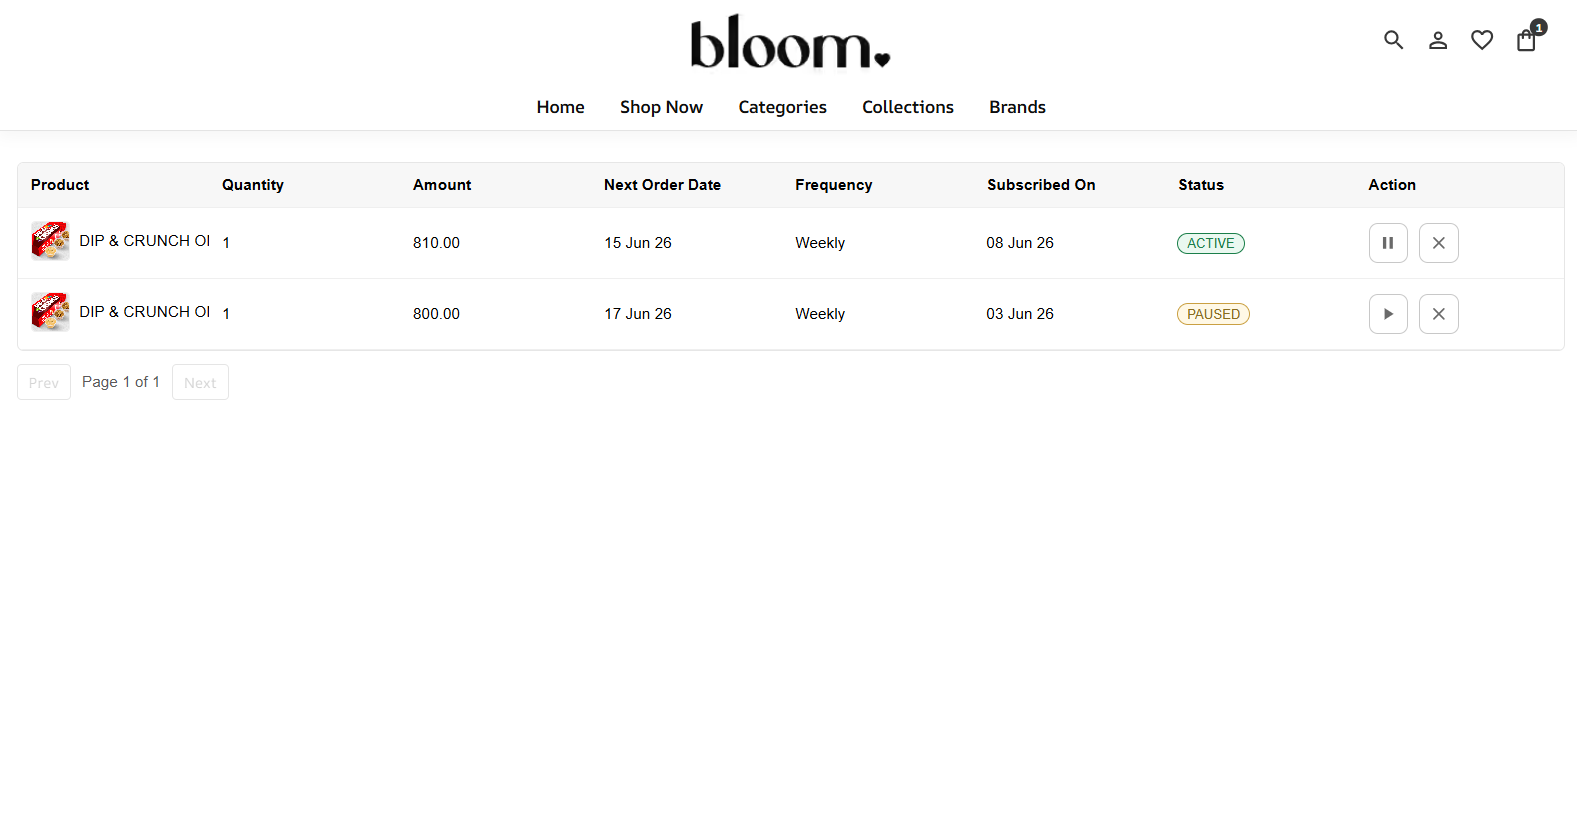
From this page, customers can:
| Action | What Happens |
|---|---|
| View Active Subscriptions | See all current subscriptions with plan details, frequency, next order date, and status. |
| Pause Subscription | Temporarily pause a subscription. No orders will be placed during the pause period. |
| Resume Subscription | Resume a previously paused subscription. Orders will resume on the next scheduled date. |
| Cancel Subscription | Permanently cancel a subscription. A cancellation confirmation email is sent automatically. |
Once the seller creates the subscription plan from the Manage Plan section, the customer will be able to see the subscription on the product description page.
Additionally, the details of the customer subscription are reflected in the Manage Customer section, where the status of the subscriber is active, which is available in the History section.
For the next upcoming order due date, the customer receives a Pay Now email. This email contains a payment link that is valid for 10 minutes.
.png)
If the customer successfully completes the payment within the 10-minute, the order is marked as placed and can be processed ahead.
If the payment is not completed within the 10-minute window, a payment regenerate link email is sent to the customer. This regenerate link is valid for 48 hours. The customer can click on the same to generate a new payment link which will again be valid for 10 mins. If the customer completes the payment using the link, the order is marked as placed and can be processed ahead.
.png)
If the payment is not completed within the 48-hour window, The subscription is paused and a subscription pause email is sent to the customer.
The status of the customer remains paused. If the seller wishes to deactivate the paused customer from the platform, he can change the status of the subscriber to Inactive and a subscription cancellation email is sent to the customer.
Once the customer is marked inactive, it cannot be marked active again with the same subscriber ID. In case, the customer makes the same purchase using subscription, it will be treated as a new customer.
.png)