Commerce Panel → Orders → My Orders
In the list of orders, these are the columns present:
- Channel - The sales channel website on which the customer placed an order
- Order ID/Shipment ID - ID of the customer's order/shipment
The column can be either Order ID or Shipment based on the chosen view.
- Price - Value of the entire order. Hovering over the tooltip provides a breakdown of the product price after the coupon is applied.
- Shipments - For ease of shipping, an order might get divided into multiple shipments. It shows the number of shipments in the order.
- Tags - Shows tags such as Standard Delivery, Express Delivery, One Day Delivery, Made to Order, Awaiting, Scheduled and many more
- Items - Total sum of products present in all the shipments
At the top menu, you will find several selections to help you filter and manage your orders:
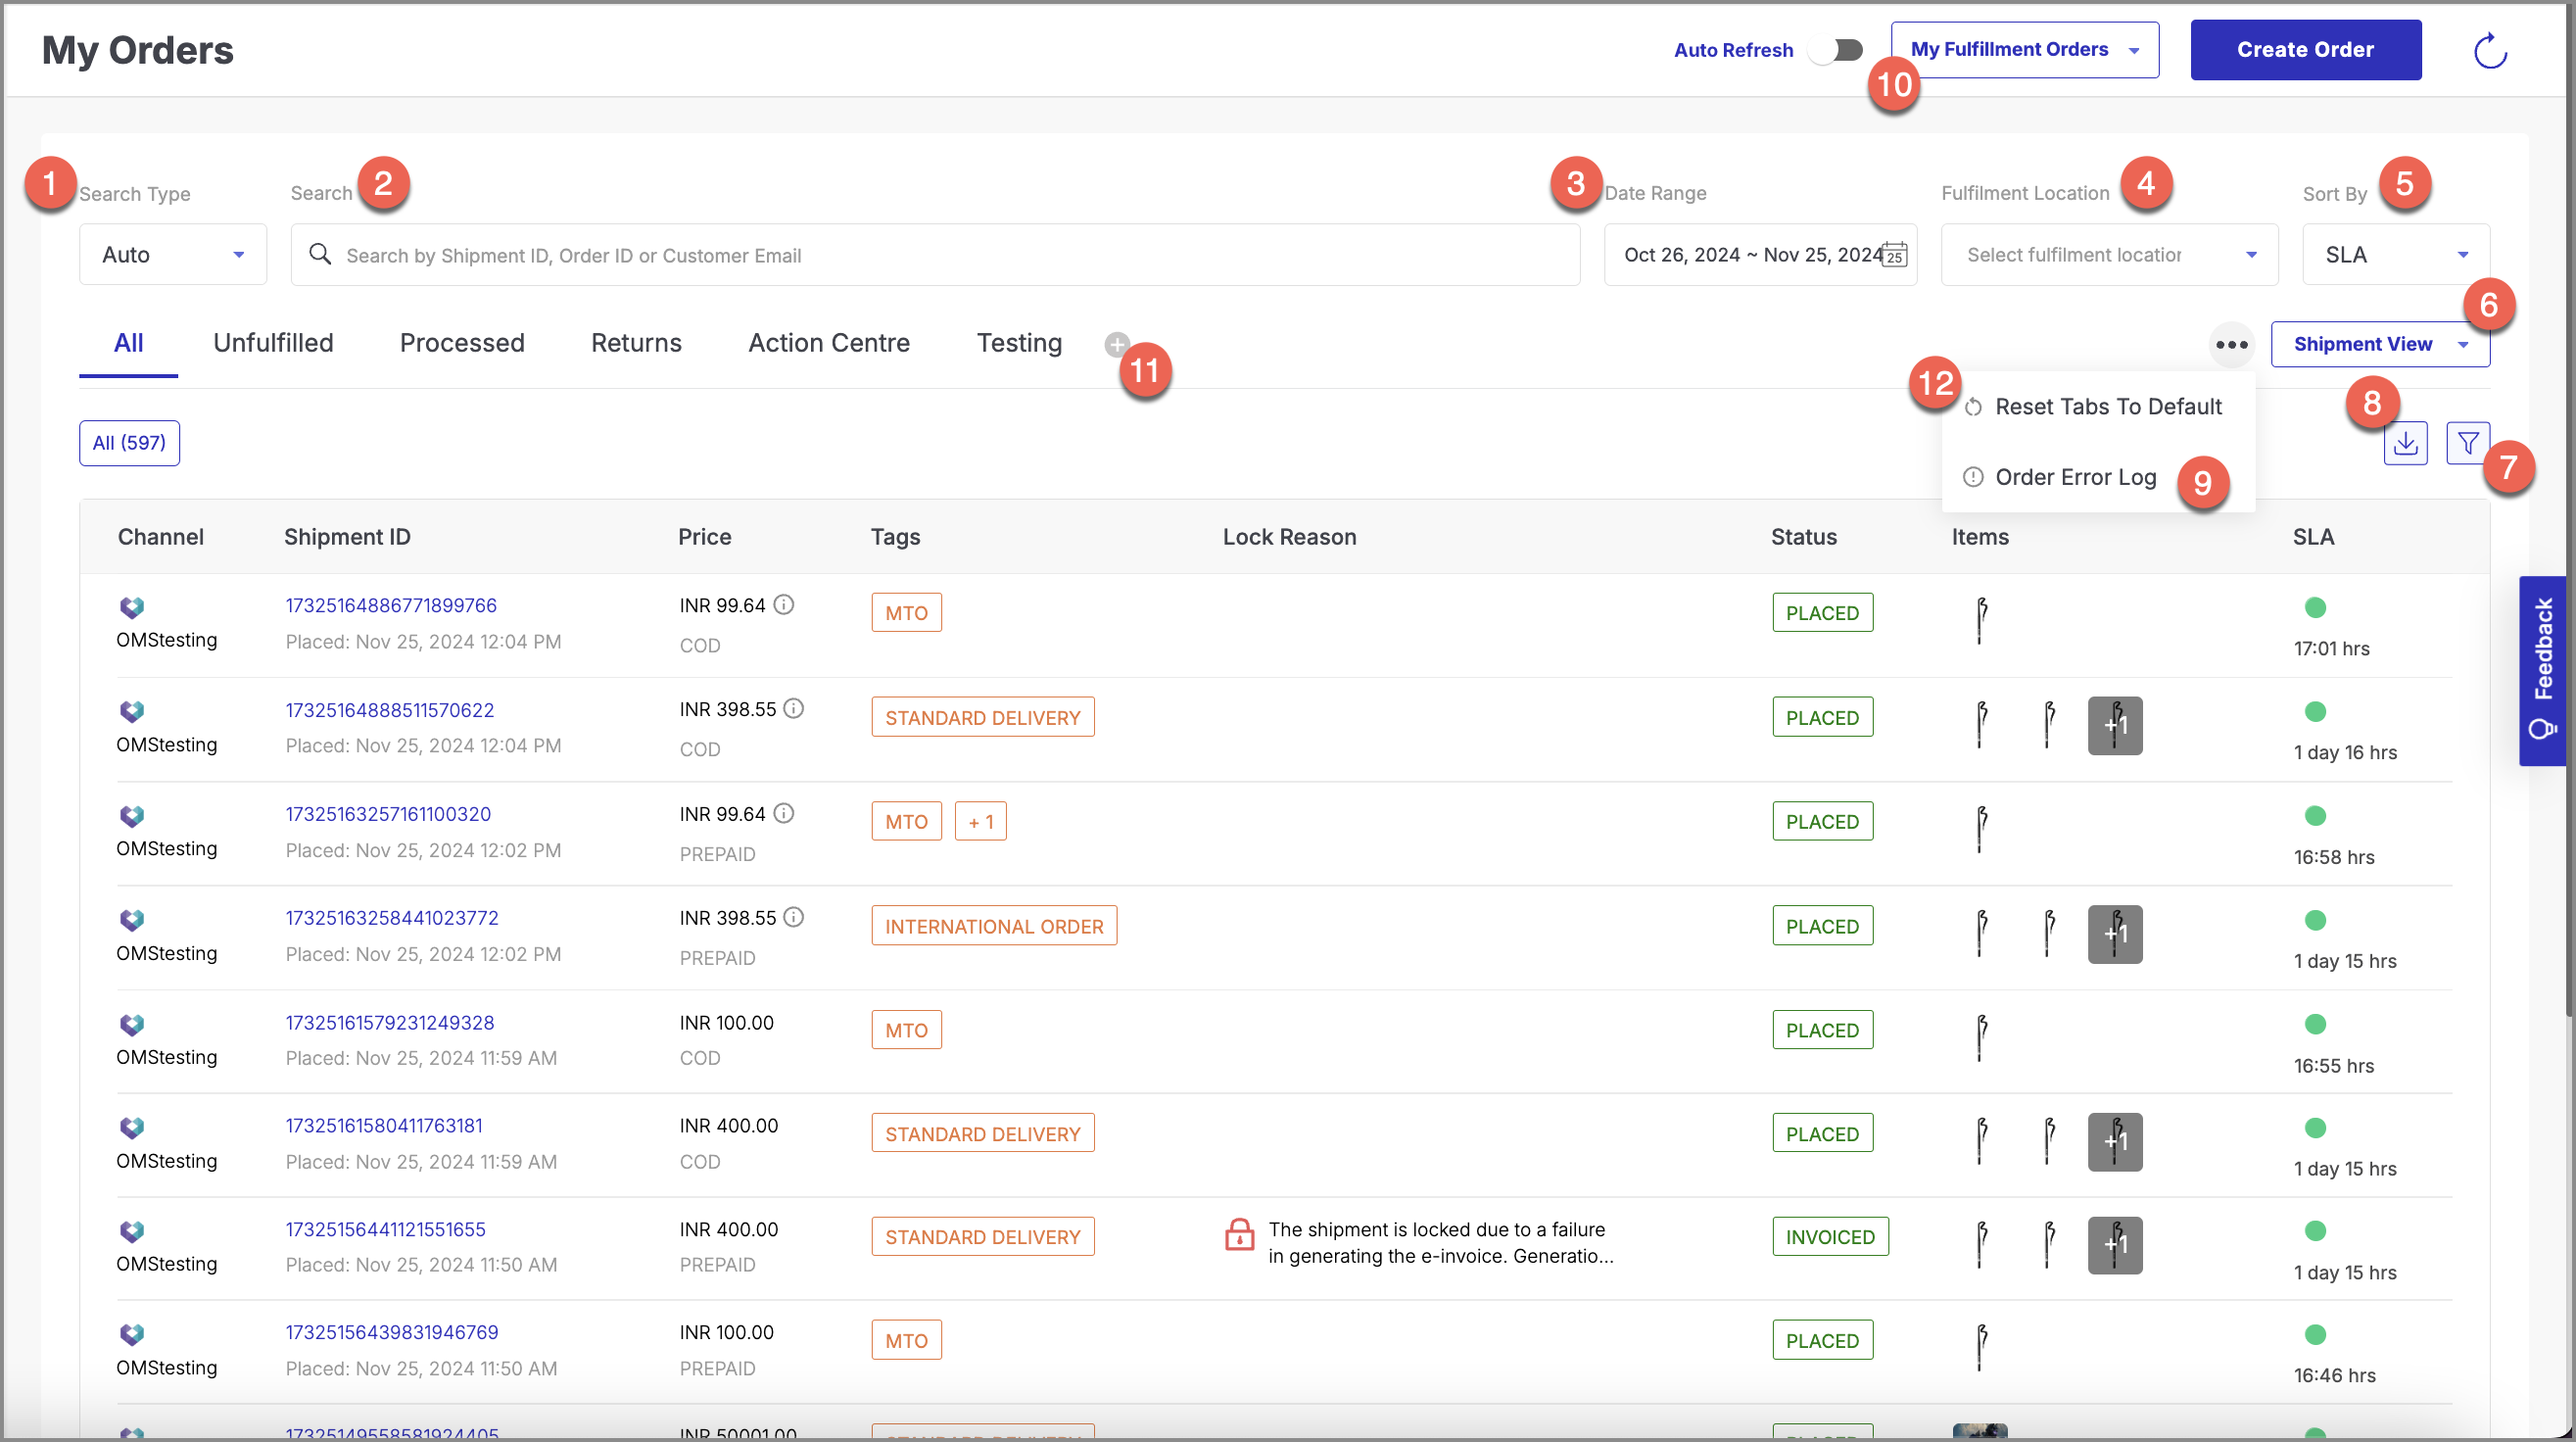
- Search Type: Choose the filter type you wish to use for searching through your orders.
- Search by: Enter the relevant number or name for your search.
Seller can conduct searches using the last six digits of both order IDs and shipment IDs
- Date Range: Specify the timeframe within which orders were placed.
- Fulfillment Location: Select the location to view orders fulfilled from that location.
- Sort by: Select the criterion by which you wish to arrange your orders. Orders can be sorted based on either Service Level Agreements (SLAs) or Order dates.
- View: Choose a particular view type.
- Filter: Apply primary filters to refine your order list.
- Download: You can download the filtered list of orders for reference or analysis. Note: You can select a date range of up to three months to download the list.
- Order Error Log: The error log table contains columns displaying the associated sales channel, order ID, its total value, and a user-friendly response message. To access the complete log, click the Order Error Log button. This action will display the payload for the error, providing additional information.
- Order Management Views: The "My Fulfillment Orders" dropdown allow merchants to manage different types of orders based on their access level and operational responsibilities. The dropdown contains following options:
- My Fulfillment Orders: This view help sellers focus on orders they are actively fulfilling. It displays orders for which the seller has full responsibility from processing to dispatch.
- Cross Store Orders: This view includes orders involving multiple stores where the seller's store interacts with other stores during the order process. However, actions on these orders are restricted to view only and cannot be modified directly by the seller.
- Cross Company Orders: This view provides a consolidated list of orders placed on the seller's marketplace but fulfilled by partner companies. Sellers can view these orders but cannot take direct action, as the fulfillment responsibility lies with the partner companies.
- How to use the customizable OMS lane:
- Access the OMS Lane: To get started, go to the Orders section in your OMS. By default, you will see tabs like All, Unfulfilled, Processed, Return, and Action Center, each with its respective sub-tabs (e.g., Upcoming, New, Confirmed, etc.).
- Adding a New Tab: To add a new custom tab follow the instructions below.
- Click on the plus icon (+) located on the right side of the existing tabs.
- A window will pop up prompting you to Enter a name for your tab. Type in the desired name (e.g., "MTO Orders", "High Priority Orders").
- Click on the Add Tab button.
- After clicking add tab, a sub-tab window will open, prompting you to enter details for the sub-tabs that will be linked to the new tab.
- Creating Sub-Tabs: Once you've added your new tab, the system will immediately ask you to configure the sub-tabs for that tab. Here's how you can create sub-tabs:
- Enter a name for your sub-tab (e.g., "Cancelled Orders", "Pending Returns") to create a custom sub-tab by applying specific filters or.
- Choose from system default sub-tabs. We are creating custom sub-tab here.
- Apply filters to refine your sub-tab's content. Following filters are given for the sub-tab configuration:
- Shipment Status: Select the Shipment Status to show the orders belonging to those statuses from the dropdown.
- Time to Dispatch: Select the Time to Dispatch status to filter orders based on their dispatch status.
- Payment Methods: Select the Payment Method to filter orders based on the payment type.
- Delivery Partner: Select the Delivery Partner to show orders that are assigned to the selected delivery service.
- Sales Channel: Select the Sales Channel to show orders from a specific sales channel.
- Tags: Select the Tags to filter orders based on specific characteristics.
- Lock Status: Select the Lock Status to filter orders based on whether they are locked or unlocked.
- Click Add Sub-Tab to save it.
- Your tab will now have a custom sub-tab showing the filtered orders according to your configuration.
- Editing and Managing Tabs & Sub-Tabs: You can manage your tabs and sub-tabs in various ways. On any tab or sub-tab, click on the dropdown to open following options:
- Rename: Change the name of the tab or sub-tab.
- Duplicate: Create a copy of the selected tab or sub-tab.
- Delete: Remove the tab or sub-tab.
- Reset Tabs to Default: If you want to restore your OMS Lane to its original settings, click the three horizontal dots on the tab lane and select Reset Tabs To Default. This will revert all tabs and sub-tabs to their initial configurations as they were set up originally.
- Adding More Tabs and Sub-Tabs:
- To add another tab, repeat the process by clicking the plus icon on the right side of the existing tabs and entering a new name.
- To add a new sub-tab under any existing tab, click the plus icon next to the sub-tab and follow the same steps as before.
The table provides the following details about each order:
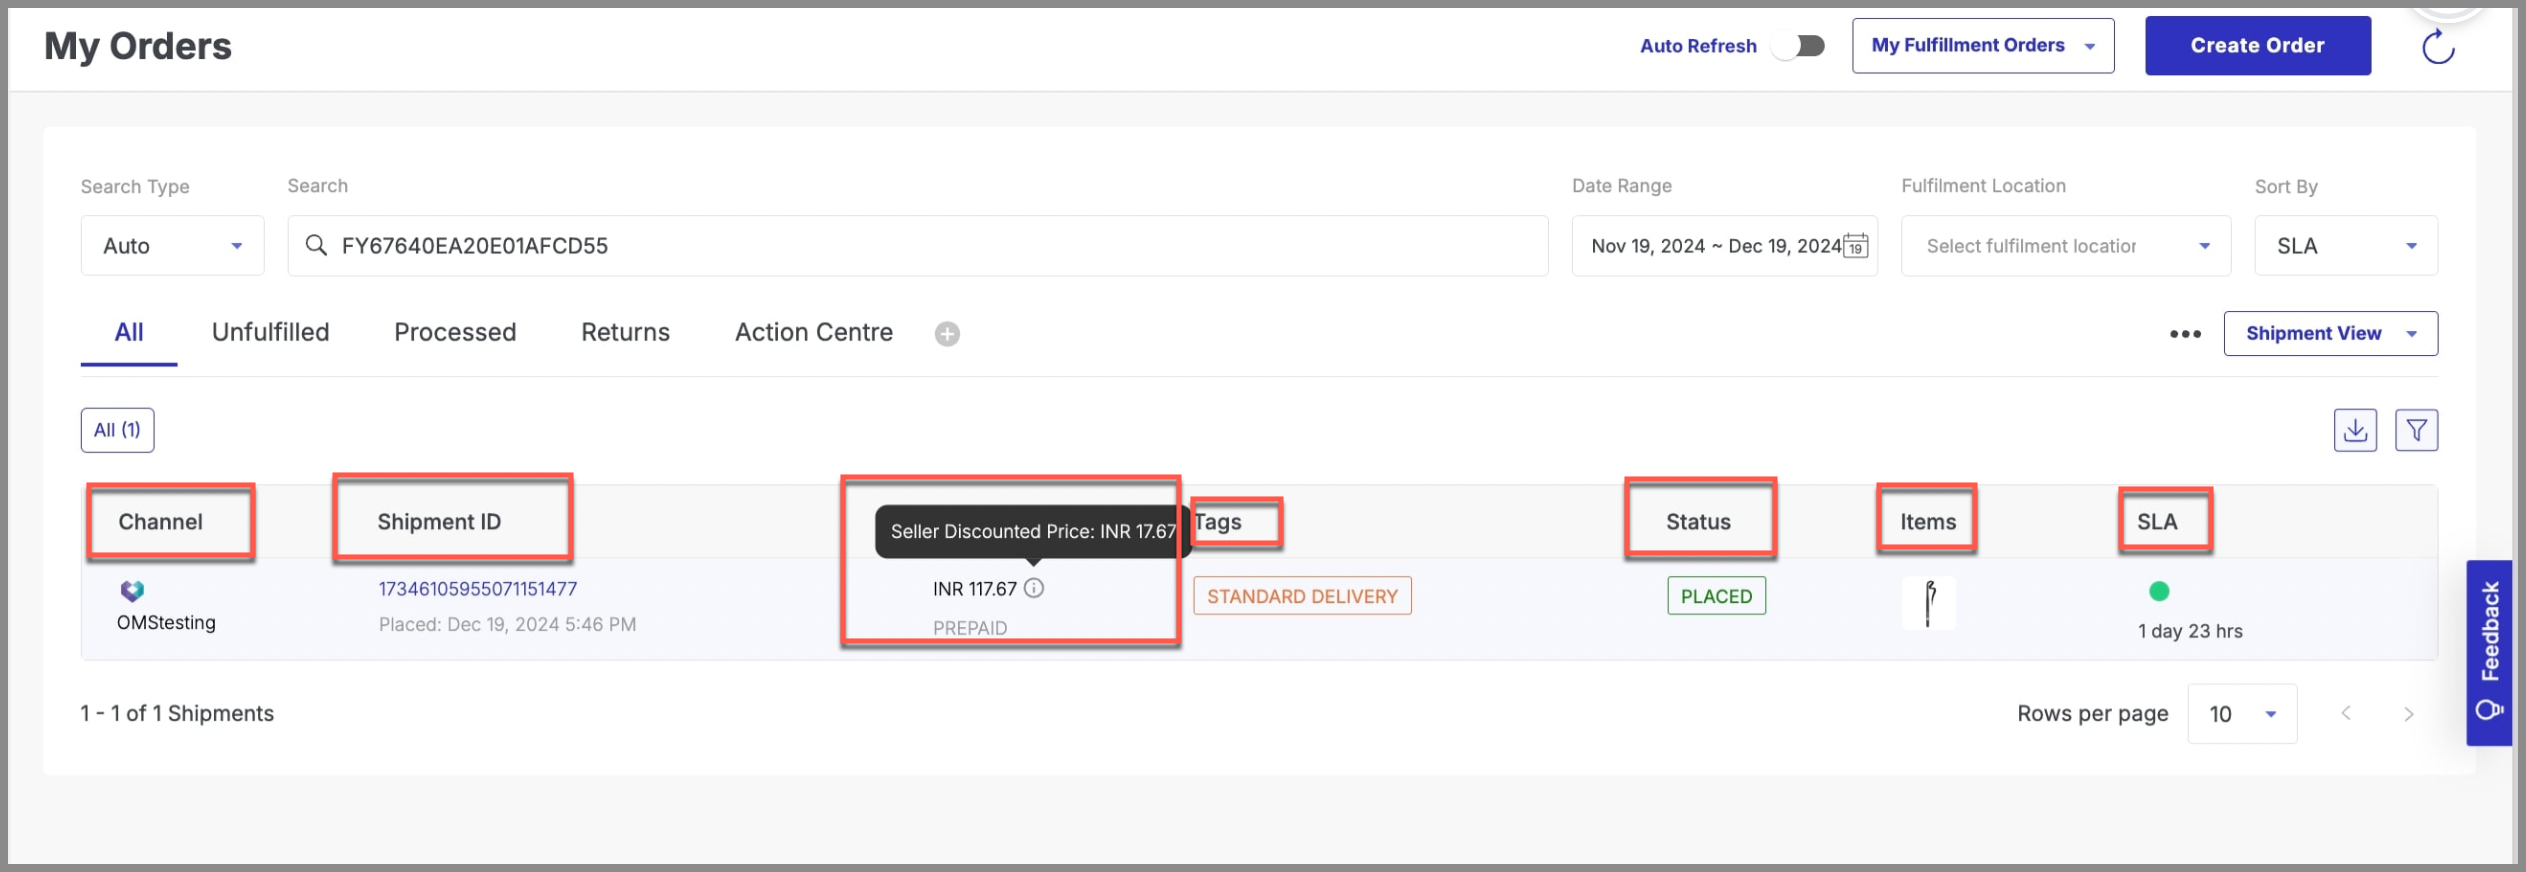
Channel: Displays the sales channel or company from which the order was placed.
Shipment ID: Represents the unique ID associated with the shipment of the order.
Price: Here, you can see the total order value displayed. Hovering over the tooltip provides a breakdown of the product price after the coupon is applied.
For global orders, both the merchant's currency used on the sales channel and the amount paid by the customer are shown.
Tags: This column contains labels related to the delivery method or other order specifics.
Status: Shows the current status of the order.
Items: Shows the image or description of the items included in the order.
SLA: Displays the expected processing time, showing how long until the order is supposed to be processed.
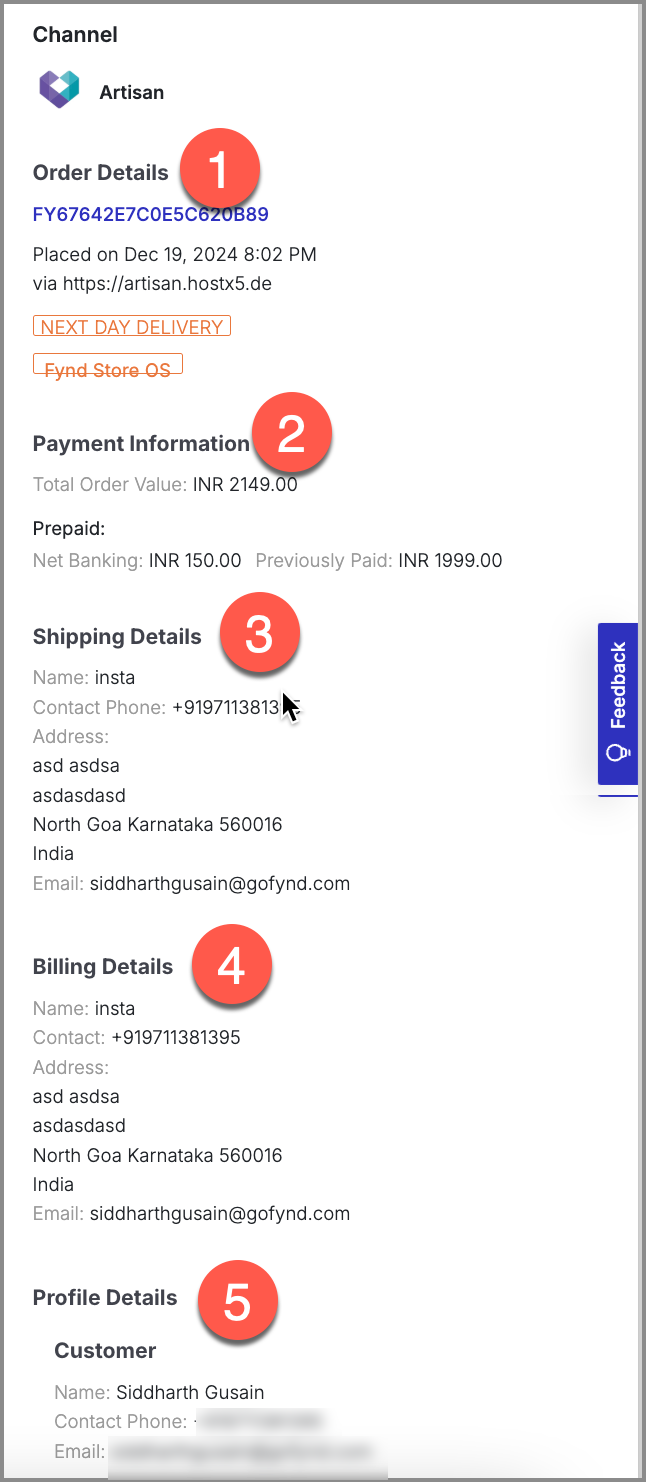
Once you open an order from the list, you can see the shipments on the left-hand side and full information about the order on the right-hand side. It includes:
- Order Details - Shows the order ID, date on which the customer placed the order, website URL, and order value
- Payment Information - Shows the payment methods chosen by the customer, including the amount paid using a single or multiple payment modes.
- Shipping Details - Address of the recipient of the order
- Billing Details - Address of the person who placed the order (generally same as shipping details)
- Profile Details - The name, contact number, and email ID of the person who placed the order
.jpg)
Fulfillment Details - Shows the details of your company's location from where the shipment is fulfilled for both forward and reverse.
Customer Details - Shows the details of the customer who has placed the order.
Invoice Details - Shows details of shipment invoice.
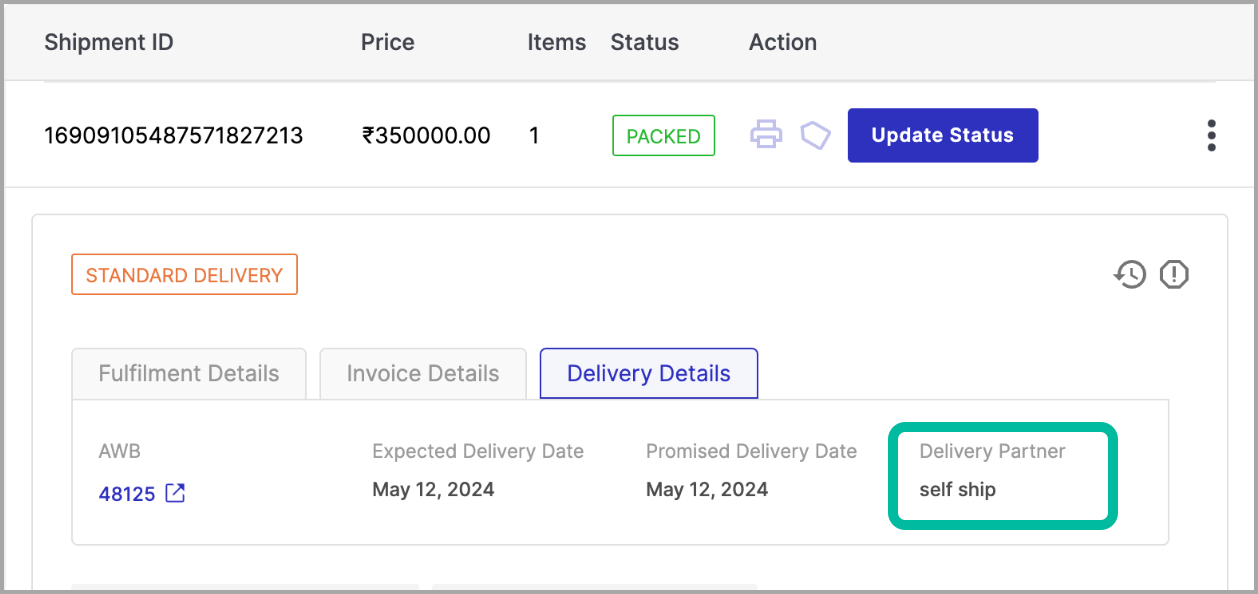
Delivery Details - Shows delivery details of your shipment such as AWB, tracking URL, delivery partner name, delivery partner account and turn around time.
Shipment Details for Home Delivery
For home delivery orders, the OMS provides clear visibility into shipment details during both forward and return journeys. During the forward journey, you can find dispatch information under the Fulfillment Details tab, which includes the dispatch location and timing. The Customer Details tab provides the delivery details, such as the customer’s address and contact information. This setup ensures all critical information for fulfilling the order is easily accessible.
For the return journey, additional details become visible. Under the Fulfillment Details tab, the return process is outlined in the Return Details section, along with dispatch information in the Dispatch Details section. The Customer Details tab includes the customer’s address and contact information for the return pickup under Return Pickup Details, while the original delivery address remains visible under Delivery Details. This ensures complete transparency for both the forward and return shipment processes.
Shipment Details for Takeaway/Store Pickup
For store pickup orders, the information varies depending on the journey and return process. During the forward journey, the Fulfillment Details tab displays the store location and pickup details under Pickup Details, while the Customer Details tab includes only the customer’s name and contact information, as no delivery address is required. This structure simplifies the process for sellers handling store pickup orders.
For the return journey, details depend on how the return is handled. If the return store is different from the pickup store, the Fulfillment Details tab includes Return Details for the process and Pickup Details for the return store. If the return store is the same as the pickup store, the Return Details and Pickup Details both reflect the same store. In cases where the return is picked up from the customer’s location, the Return Pickup Details in the Customer Details tab provide the customer’s address and contact information, ensuring smooth coordination for all return scenarios.
You can update the delivery partner for both delivery (forward) and return orders from the Order Details page. This helps you choose a different delivery partner when you want to change the current preference for a shipment. You can update the delivery partner only when the order is in one of the following stages:
- Placed
- Confirmed
- Invoiced
- Store reassigned
Keep the following in mind before updating the delivery partner:
- You can update the delivery partner for both forward and return journeys.
- In the forward journey, the panel shows a Promise Date, which helps you compare expected delivery timelines.
- In the return journey, the Promise Date is not shown.
- Some delivery partners may appear only for reference and may not be selectable.
- After you update the delivery partner, the change is reflected in the order details and activity logs.
To update the delivery partner for a shipment:
- Go to Orders.
- Open the required order.
- In the shipment row, click the three-dot menu.
- Click Update Delivery Partner.
This opens the Update Delivery Partner panel on the right side of the page.
The Update Delivery Partner panel helps you review the current delivery partner, compare available options, and select a new one.
At the top of the panel, you can see the currently selected delivery partner under Estimated Delivery Partner.
- For delivery (forward) orders, a Promise Date is shown. This indicates the expected delivery timeline.
- For return orders, the Promise Date is not shown.
The Eligible Delivery Partners tab shows the delivery partners that are available for selection for the shipment. This is the primary tab that you use when changing the delivery partner. Each delivery partner card can include details such as:
- the delivery partner name
- supported service tags, such as COD, Fragile, or other shipment-related capabilities
- the estimated date or timeline, where applicable
In the forward journey, the eligible partners can include the expected timeline so that you can compare them before making a selection.
In the return journey, the list is shown without the promise date. You can also use the search bar in this section to find a specific delivery partner from the available list.
To select a delivery partner,
- Click the required partner from the list. Once selected, the card is highlighted.
- Click Save.
The Promise Date helps you understand the expected delivery timeline for a partner. In the forward journey:
- the top section shows the promise date for the currently selected delivery partner
- eligible delivery partners may also show their expected timeline
- this helps you compare partners before you save the change
In the return journey:
- the promise date is not shown in the panel
This means the timeline comparison is available only when you are updating the delivery partner for a forward shipment.
While selecting a delivery partner in the forward journey, you may see a warning message for some options. For example, the panel can show a message such as:
“The selected delivery partner may miss the expected delivery.”
This warning appears when the selected partner may not meet the expected delivery timeline. You can still review the option and decide whether to continue.
The Other Delivery Partners tab shows additional delivery partners that are not part of the main eligible list.
You can open this tab to explore more options. This is useful when you want to review other available partners beyond the recommended or eligible ones shown in the first tab.
- Some partners in this tab may be marked as Non Serviceable. This means they are shown for visibility, but they are not available for selection for that shipment at that time.
If there are no selectable delivery partners for the shipment, the panel shows an empty state with the message: “No delivery partner available.” When this message appears, you cannot update the delivery partner for that shipment from the panel.
At the bottom of the panel, you can enter a remark before saving the change.
This field is optional, but it can be useful when you want to record the reason for the update. For example, you might add a note such as changing to self-delivery or switching to another preferred partner.
The remark is recorded along with the delivery partner update and can help your team understand why the change was made.
After selecting a delivery partner, you can complete or discard the change:
- Click Save to update the delivery partner.
- Click Cancel to close the panel without saving the change.
The Save button remains disabled until you select a delivery partner.
After you save the change:
- the selected delivery partner is updated for the shipment
- the updated partner appears in the order’s Fulfillment Details
- the change is recorded in the shipment’s Activity Logs
This helps you verify that the update has been applied successfully.
Once the update is saved, go to the Fulfillment Details section in the order view. In this section, you can review shipment-related information, including the updated Estimated Delivery Partner. This allows you to confirm which delivery partner is currently selected for the shipment.
The delivery partner update is also captured in Activity Logs. In the activity log, you can see details such as:
- the updated delivery partner preference
- the remark entered during the update, if any
- the time of the update
- the user who made the change
This helps maintain a clear record of shipment updates.
The experience of updating the delivery partner is similar for both forward and return journeys, but there is one important difference.
When you update the delivery partner for a forward shipment:
- the Promise Date is shown in the top section
- eligible delivery partners can also show delivery timelines
- you may see a warning if a selected partner may miss the expected delivery
When you update the delivery partner for a return shipment:
- the Promise Date is not shown
- you can still view and select available delivery partners
- the rest of the update flow remains the same
The Update Delivery Partner action is available to supported merchant roles, such as:
- Store Manager
- Company Operation
- Company Admin
If you do not see this option in the shipment action menu, it may not be available for your role or for that shipment stage.
When self-shipment is permissible for a sales channel, the delivery partner option for self-shipment is automatically selected as self ship.