A Stock Audit is the process of checking physical stock in the store against the inventory shown in the system. It is a regular activity carried out based on business needs to ensure inventory accuracy. Stock Audits help identify any differences between actual stock and system records, allowing merchants to understand gaps and decide whether inventory adjustments are required. Stock Audit helps correct these differences so that your inventory data reflects the real situation in the store.
Stock Audit ensures:
- Accurate inventory levels for sales and records
- Correct availability across online and offline channels
- Visibility into losses, damages, or operational issues
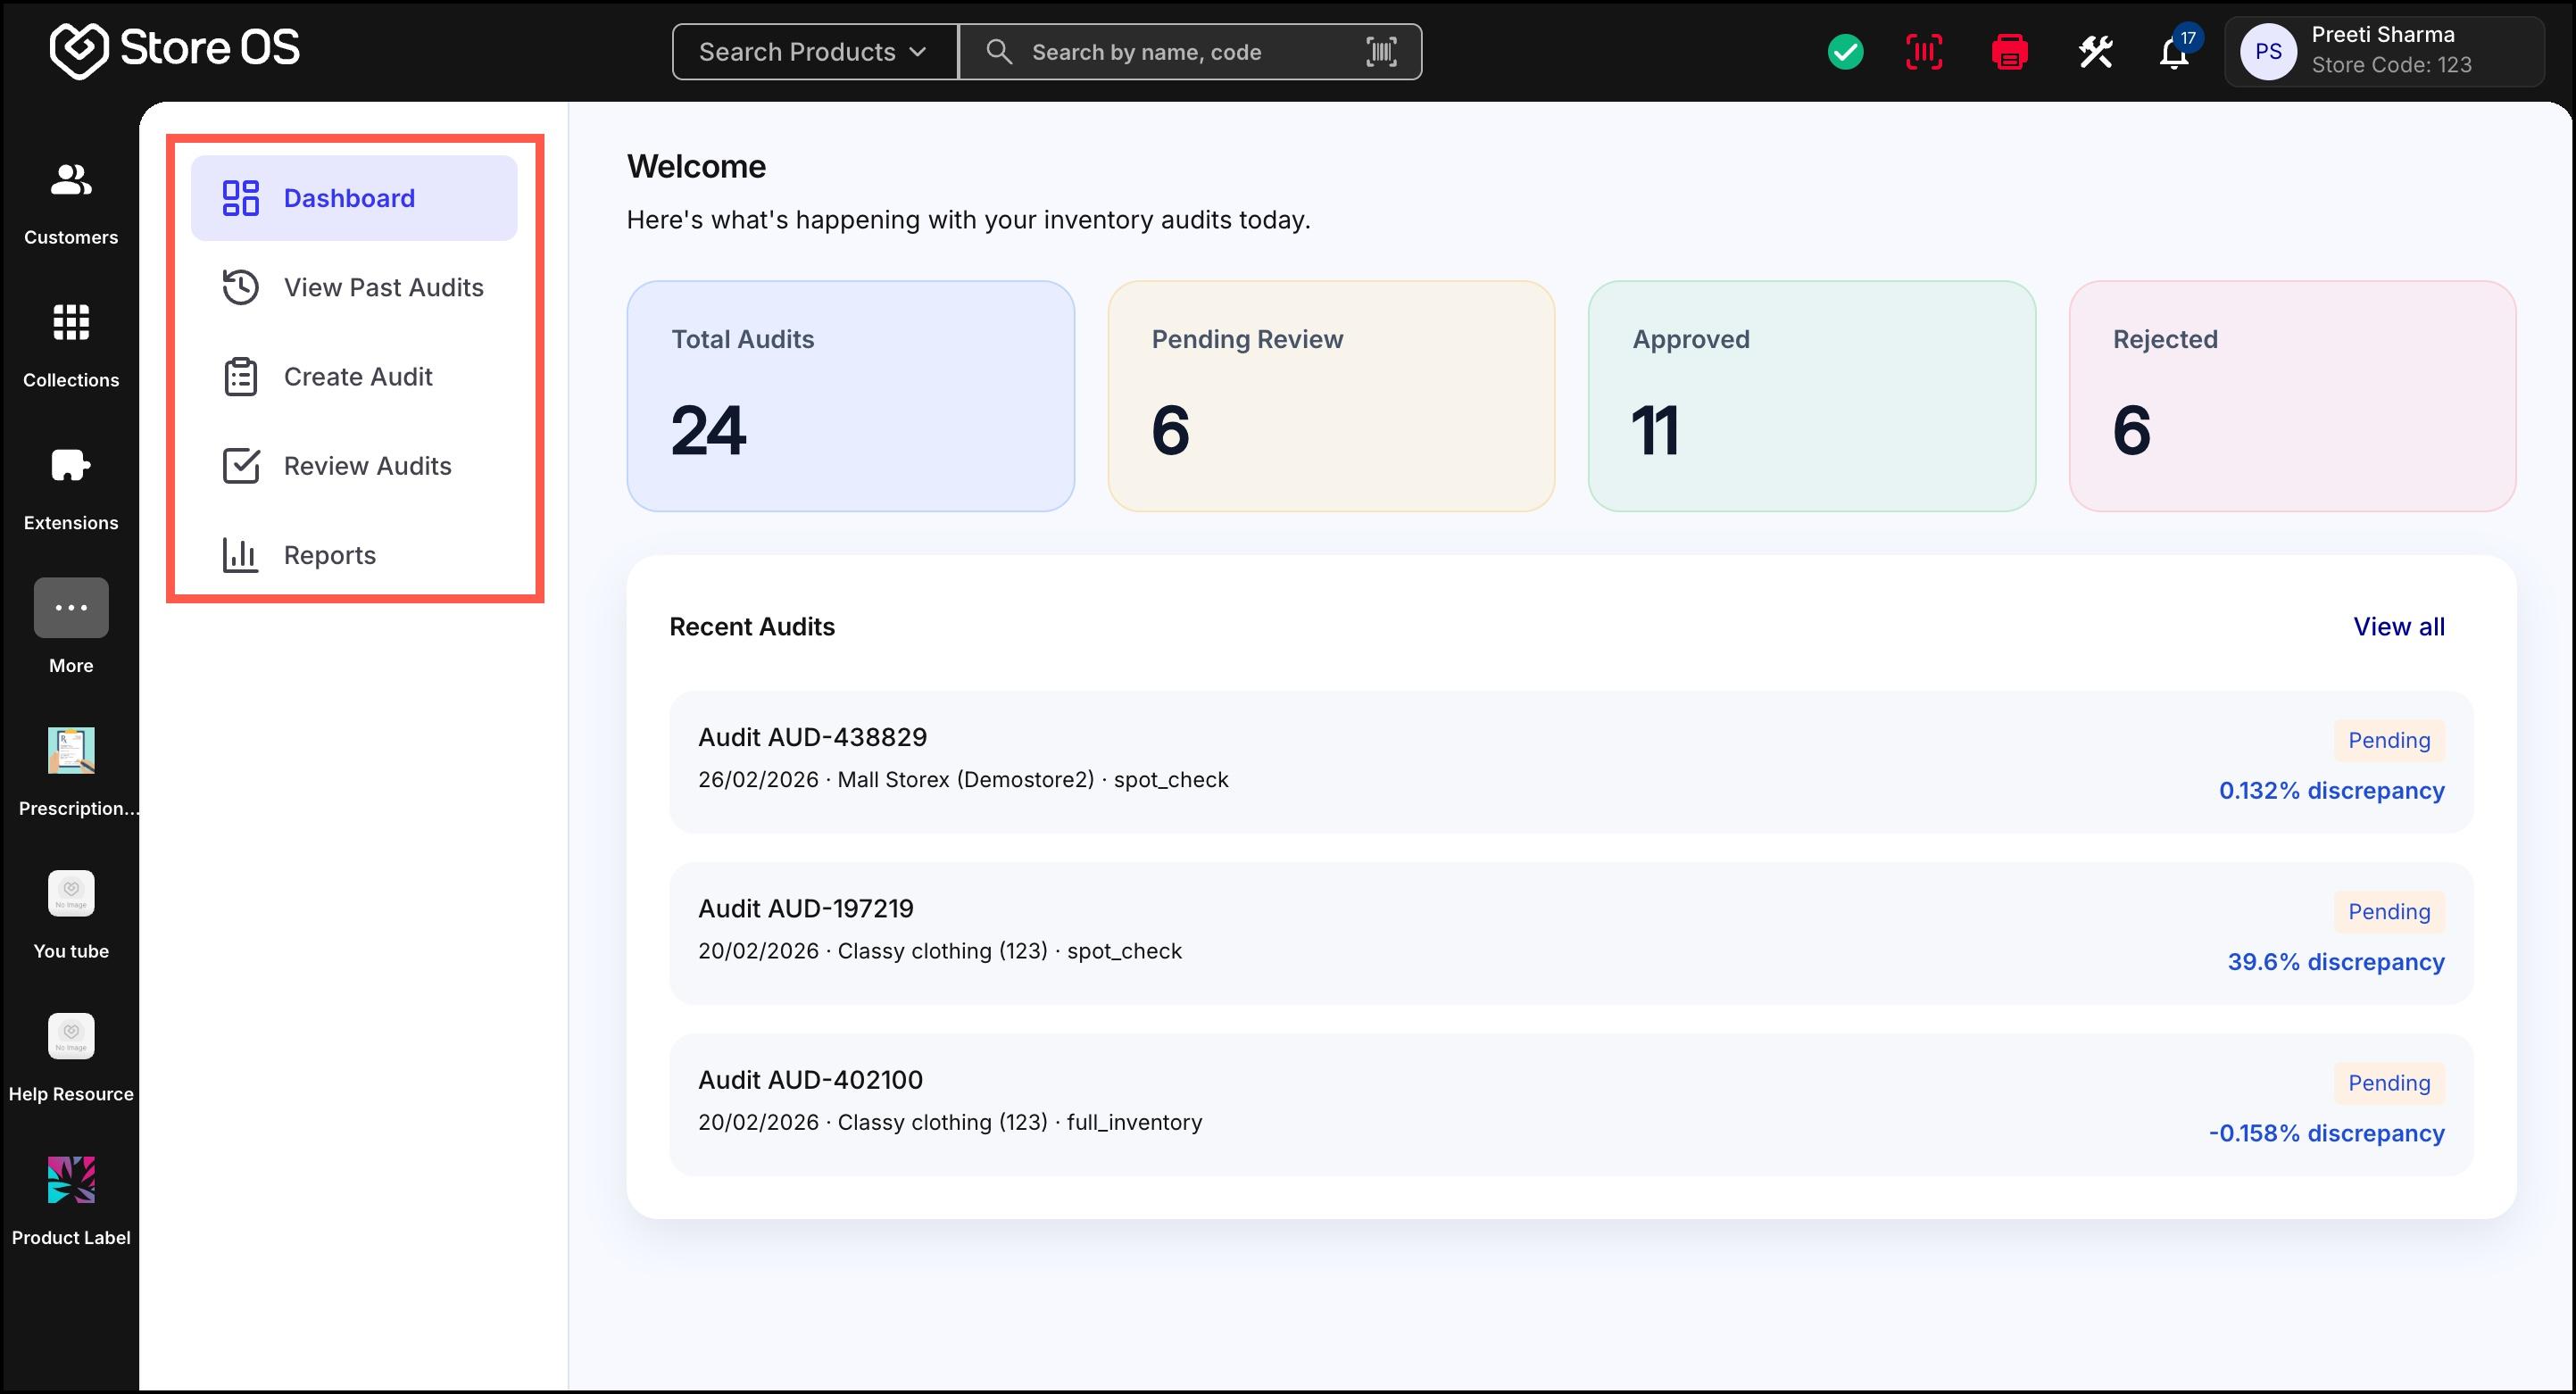
The Stock Audit section in Store OS includes the following areas:
- Dashboard – Overview of audits and their current status
- View Past Audits – List of all created audits
- Create Audit – Start a new stock audit
- Review Audits – Approve or reject submitted audits
- Reports – Analytics and insights across audits
A stock audit in Store OS follows a clear lifecycle:
- Audit overview (Dashboard)
- Create audit
- Perform physical counting
- Submit audit
- Review and approve/reject
- Update inventory (on approval)
- Track insights through reports
Stock Audit access depends on the role assigned to the user.
Admins are company admin who has Fynd Commerce admin access. They can:
- Create audits
- View and edit draft audits
- Delete draft audits
- Review and approve/reject audits
- View all audits across stores
- Access full reports and analytics
Store Staff can:
- Create audits for themselves
- Add or scan product quantities
- Save audits as drafts
- Submit audits for review
- Access full reports and analytics for their assigned audits only
They can only view:
- Audits assigned to them
- Their own draft and submitted audits
They cannot delete audits or view audits not assigned to them.
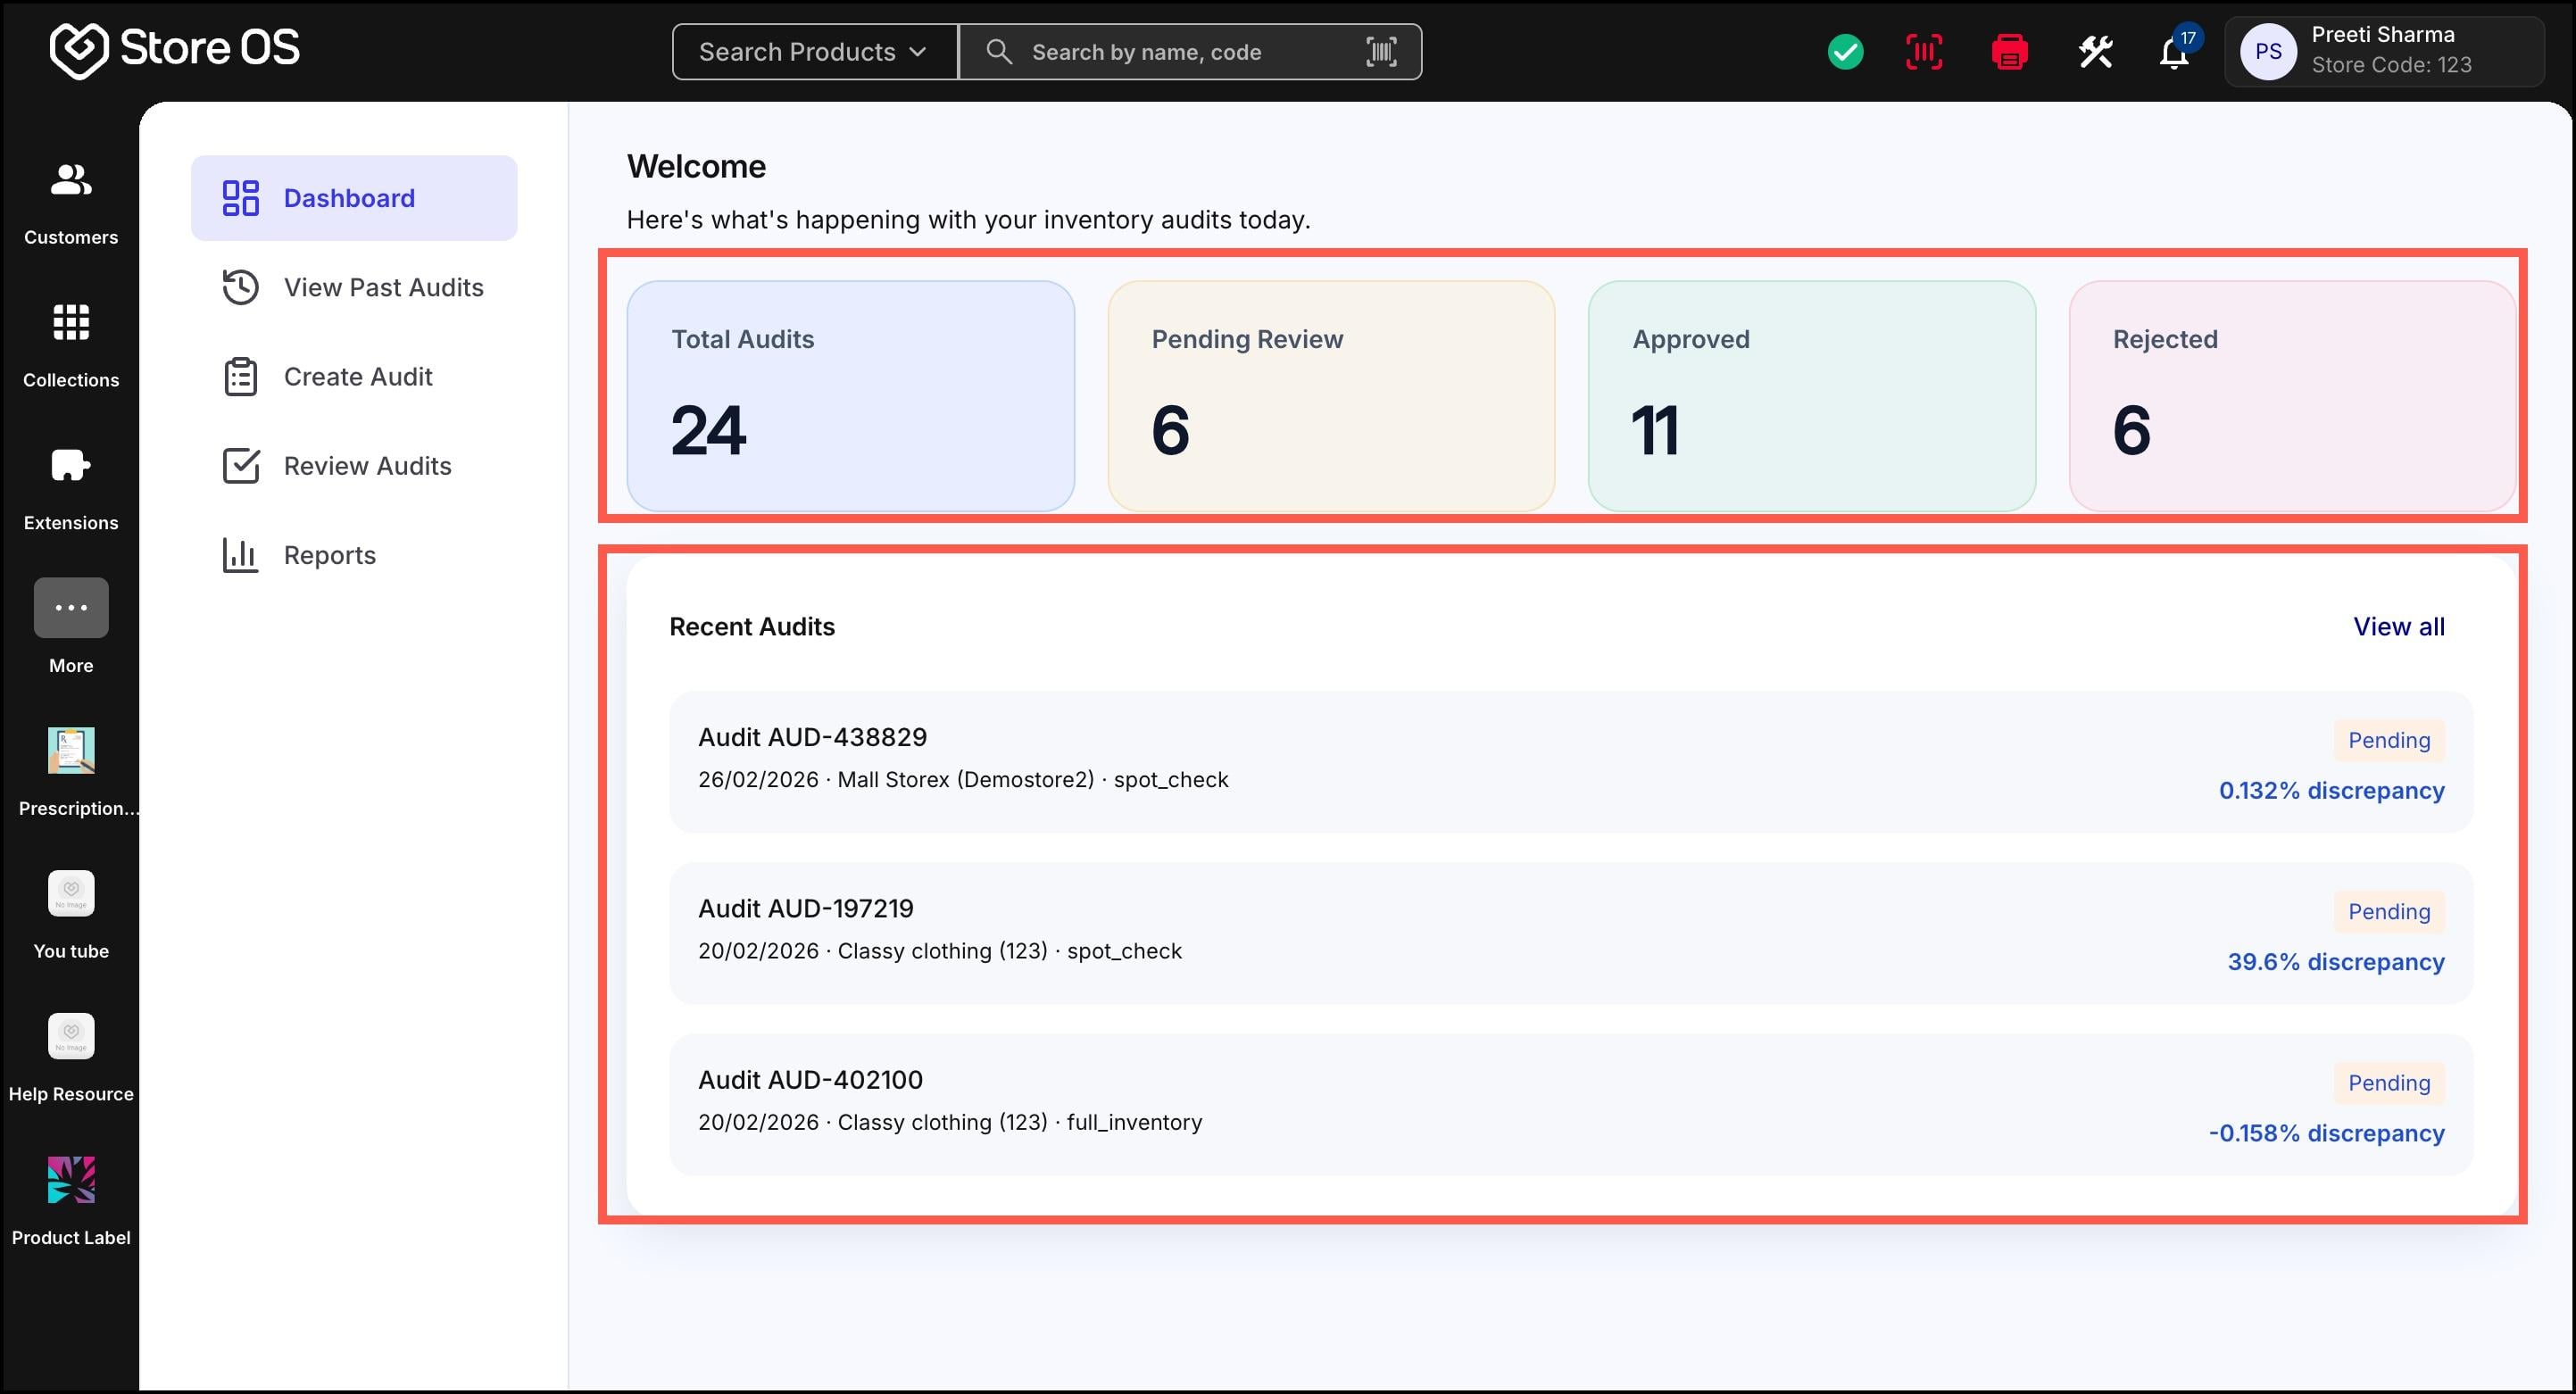
The Dashboard provides a quick summary of audit activity, including:
- Total audits created
- Audits pending review
- Approved audits
- Rejected audits
- Recent audits are listed with key details such as audit ID, store, audit type, status, and number of discrepancies.
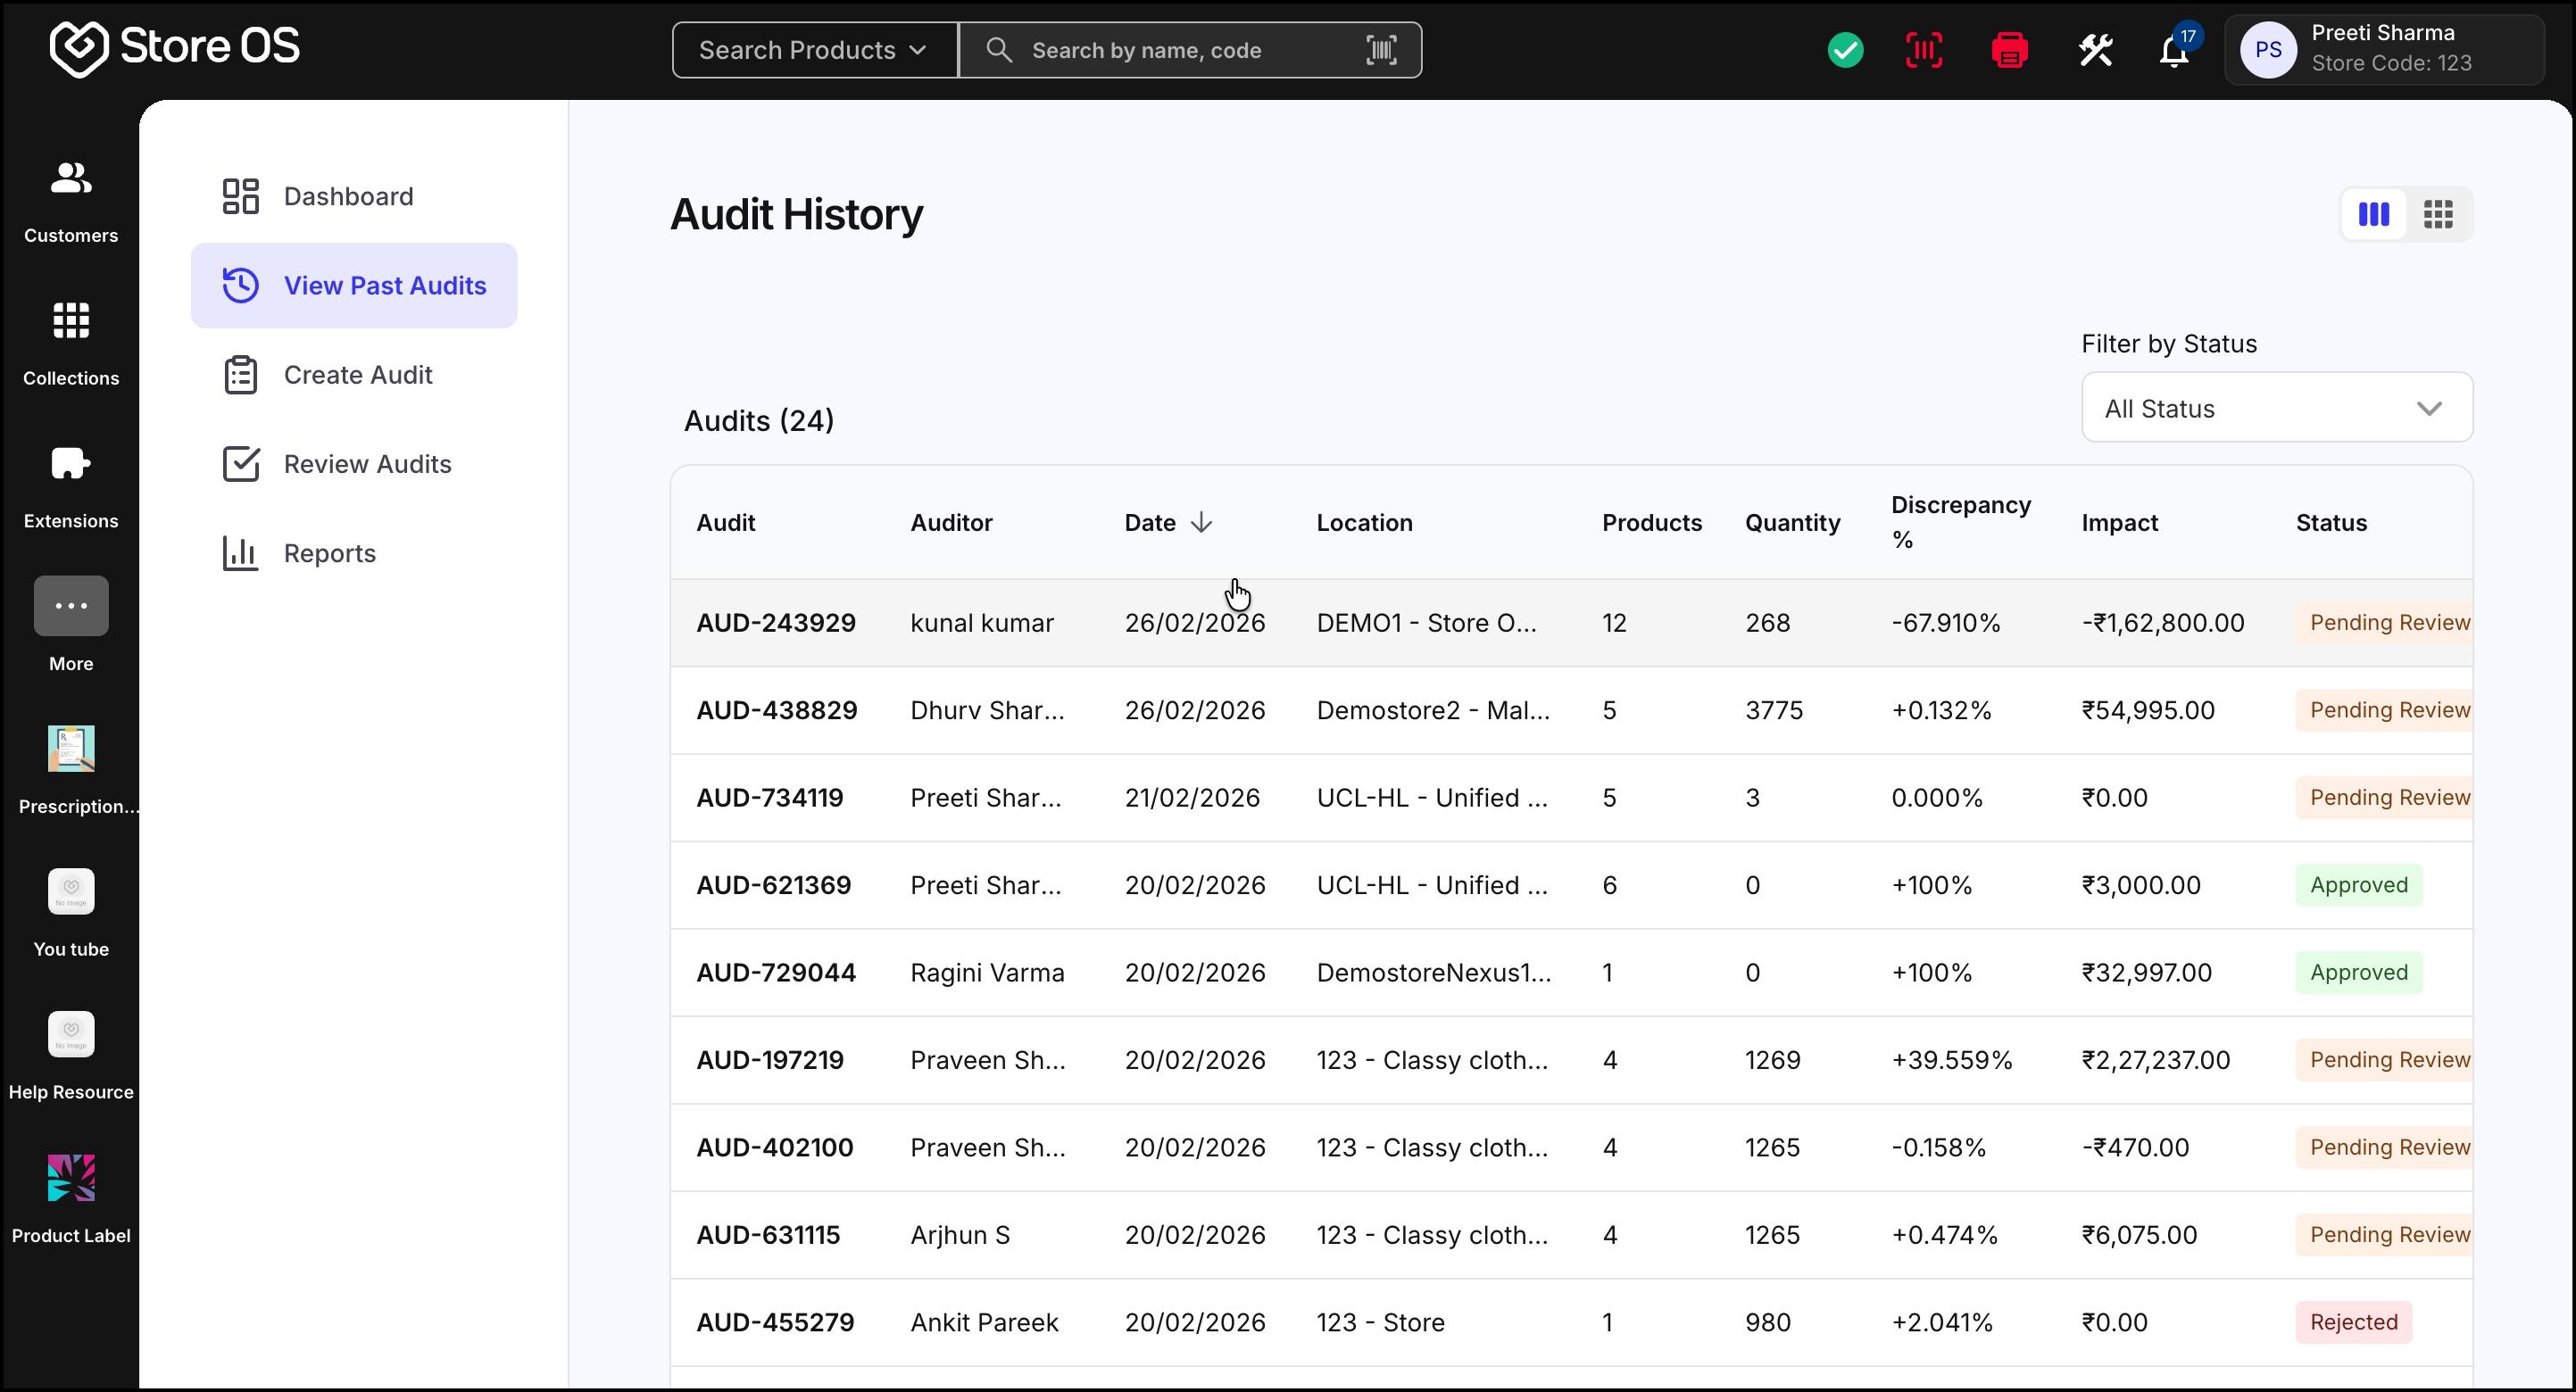
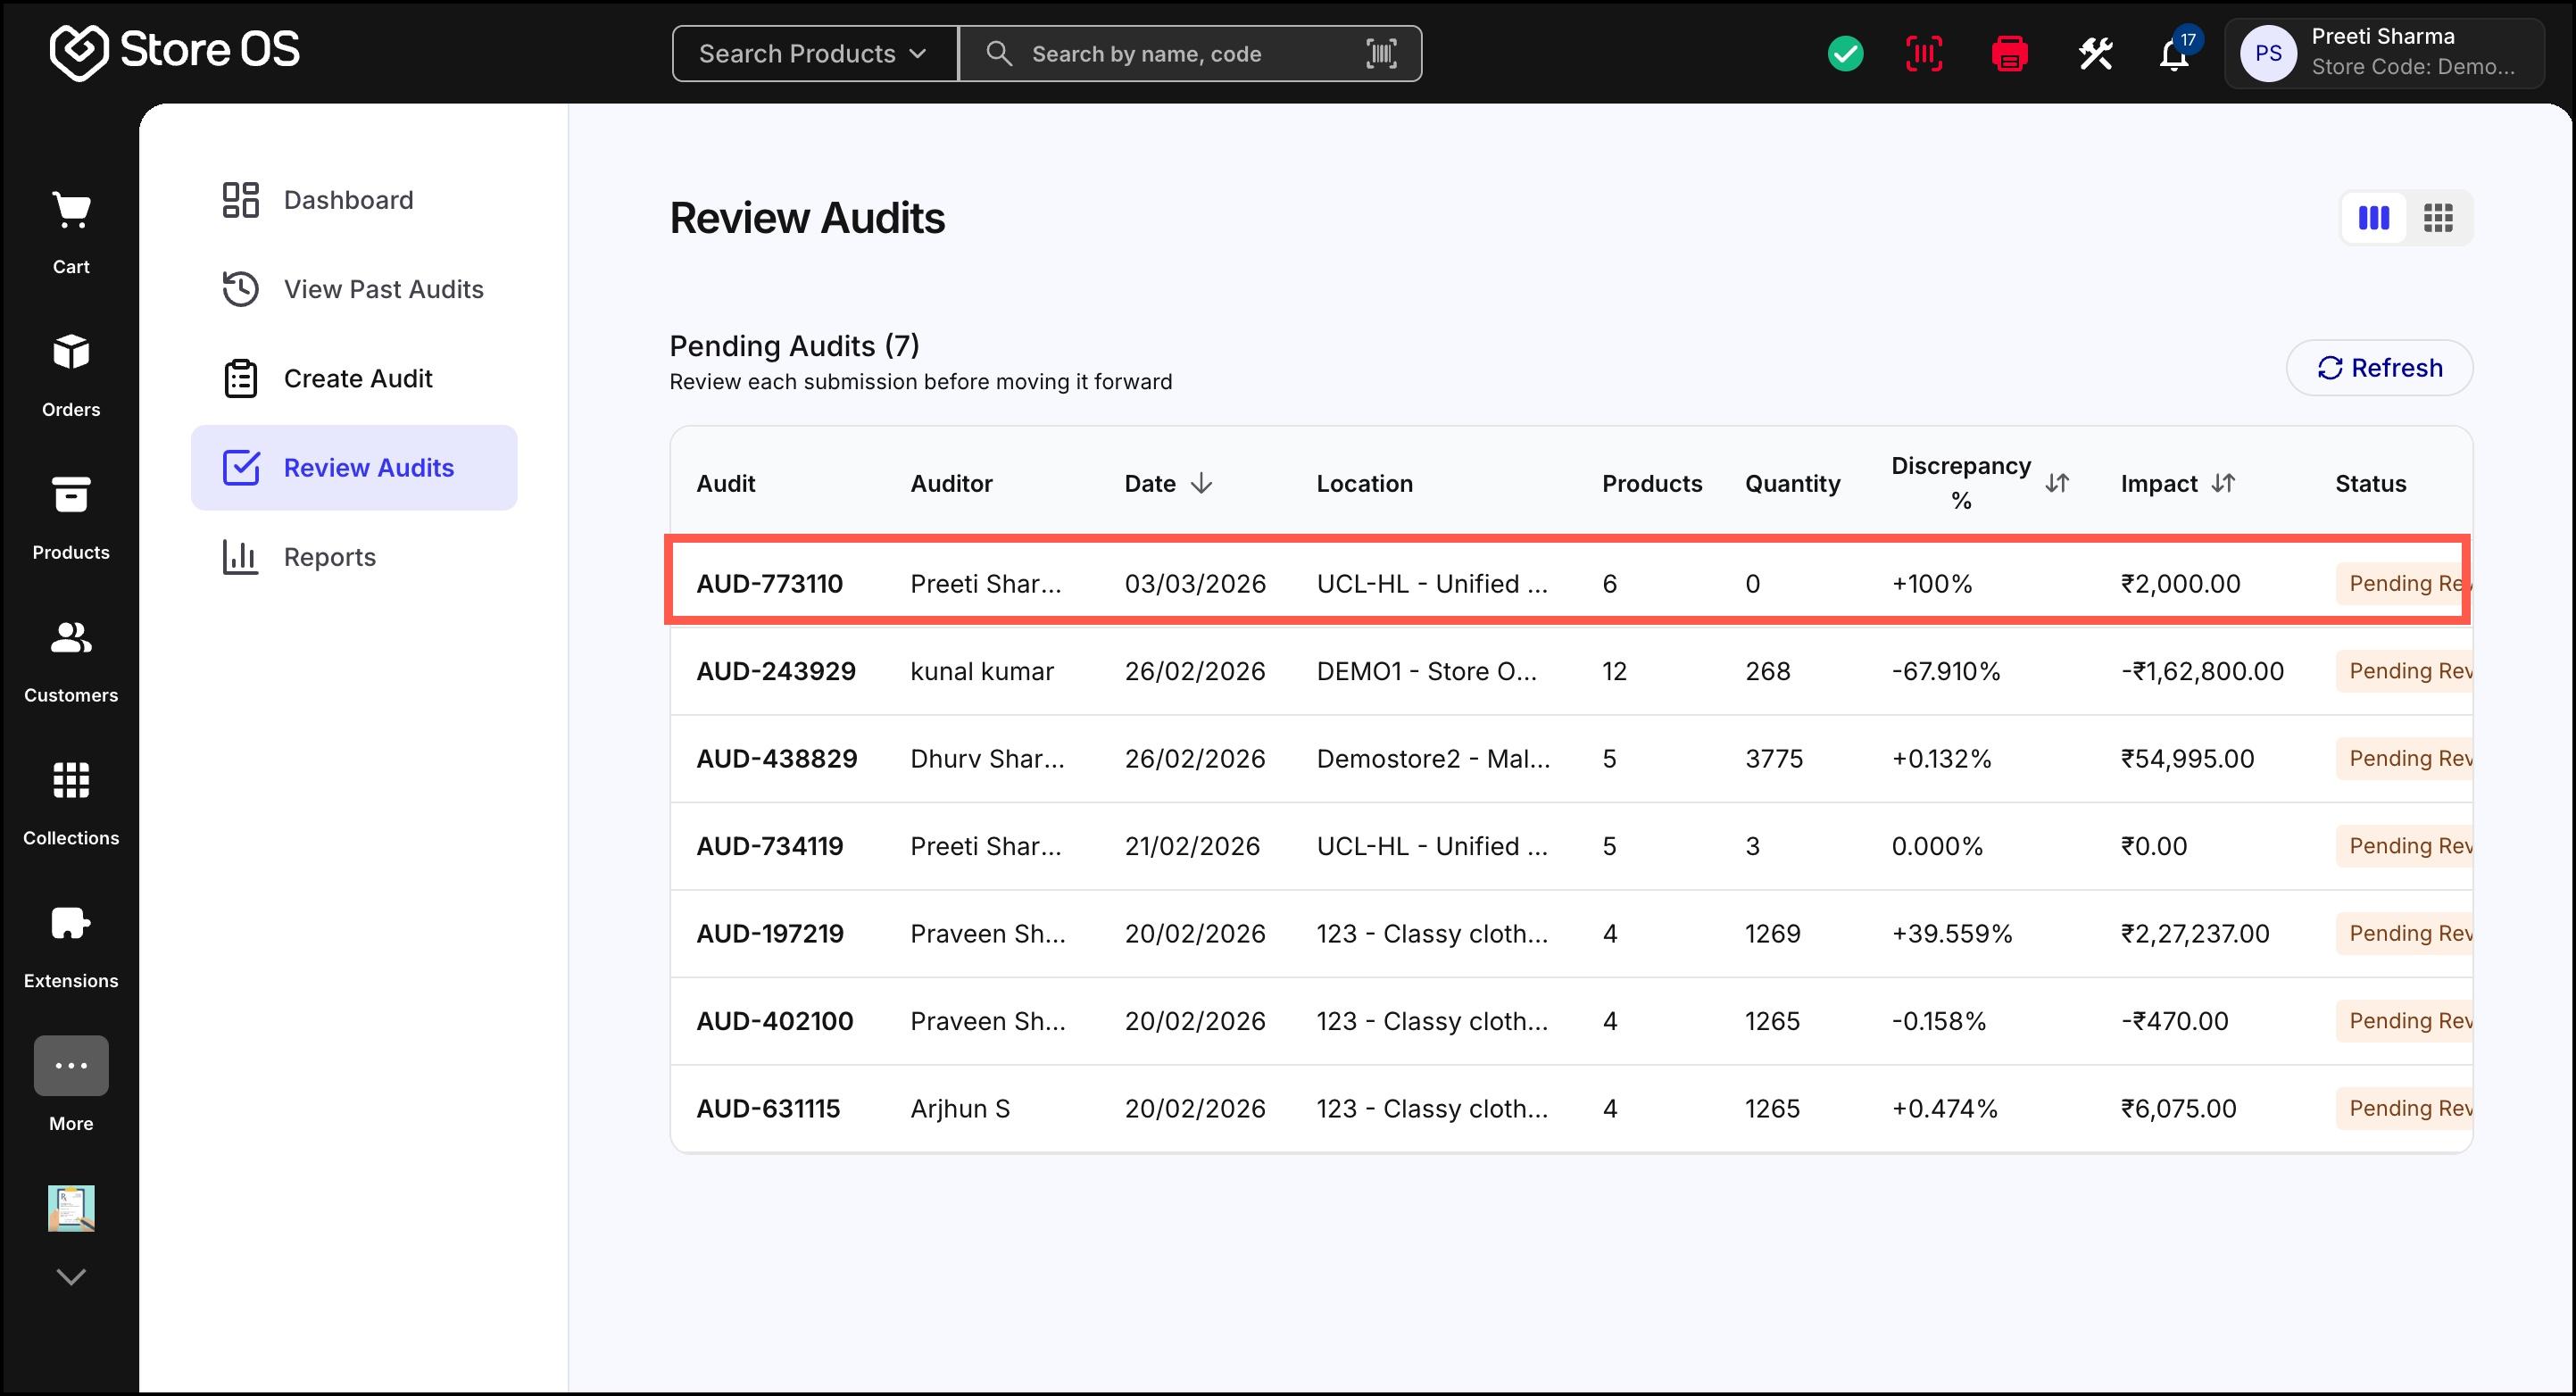
The View Past Audits section maintains a full audit trail of all audits conducted across locations. You can view audits across time and also filter them by status (Draft, Pending, Approved, Rejected) The table has following information regarding audit:
| Column | What it means |
|---|---|
| Audit ID | A unique identifier for each audit used to track the audit. |
| Auditor | The staff member who performed the physical stock count. |
| Date | The date on which the audit was created or conducted. |
| Location | The selling location where the audit was performed. |
| Products | The total number of unique products included in the audit. |
| Quantity | The total quantity of items counted during the audit across all products. |
| Discrepancy % | The percentage difference between system inventory and physically audited stock. A higher percentage indicates a larger mismatch. |
| Impact | The financial value of the discrepancy identified in the audit. |
| Status | The current state of the audit — Draft, Pending Review, Approved, or Rejected. This shows whether inventory has been updated or still needs action. |
This view can be switched between Table View and Column (Card) View.
Go to Create Audit
There are two ways to create a stock audit.
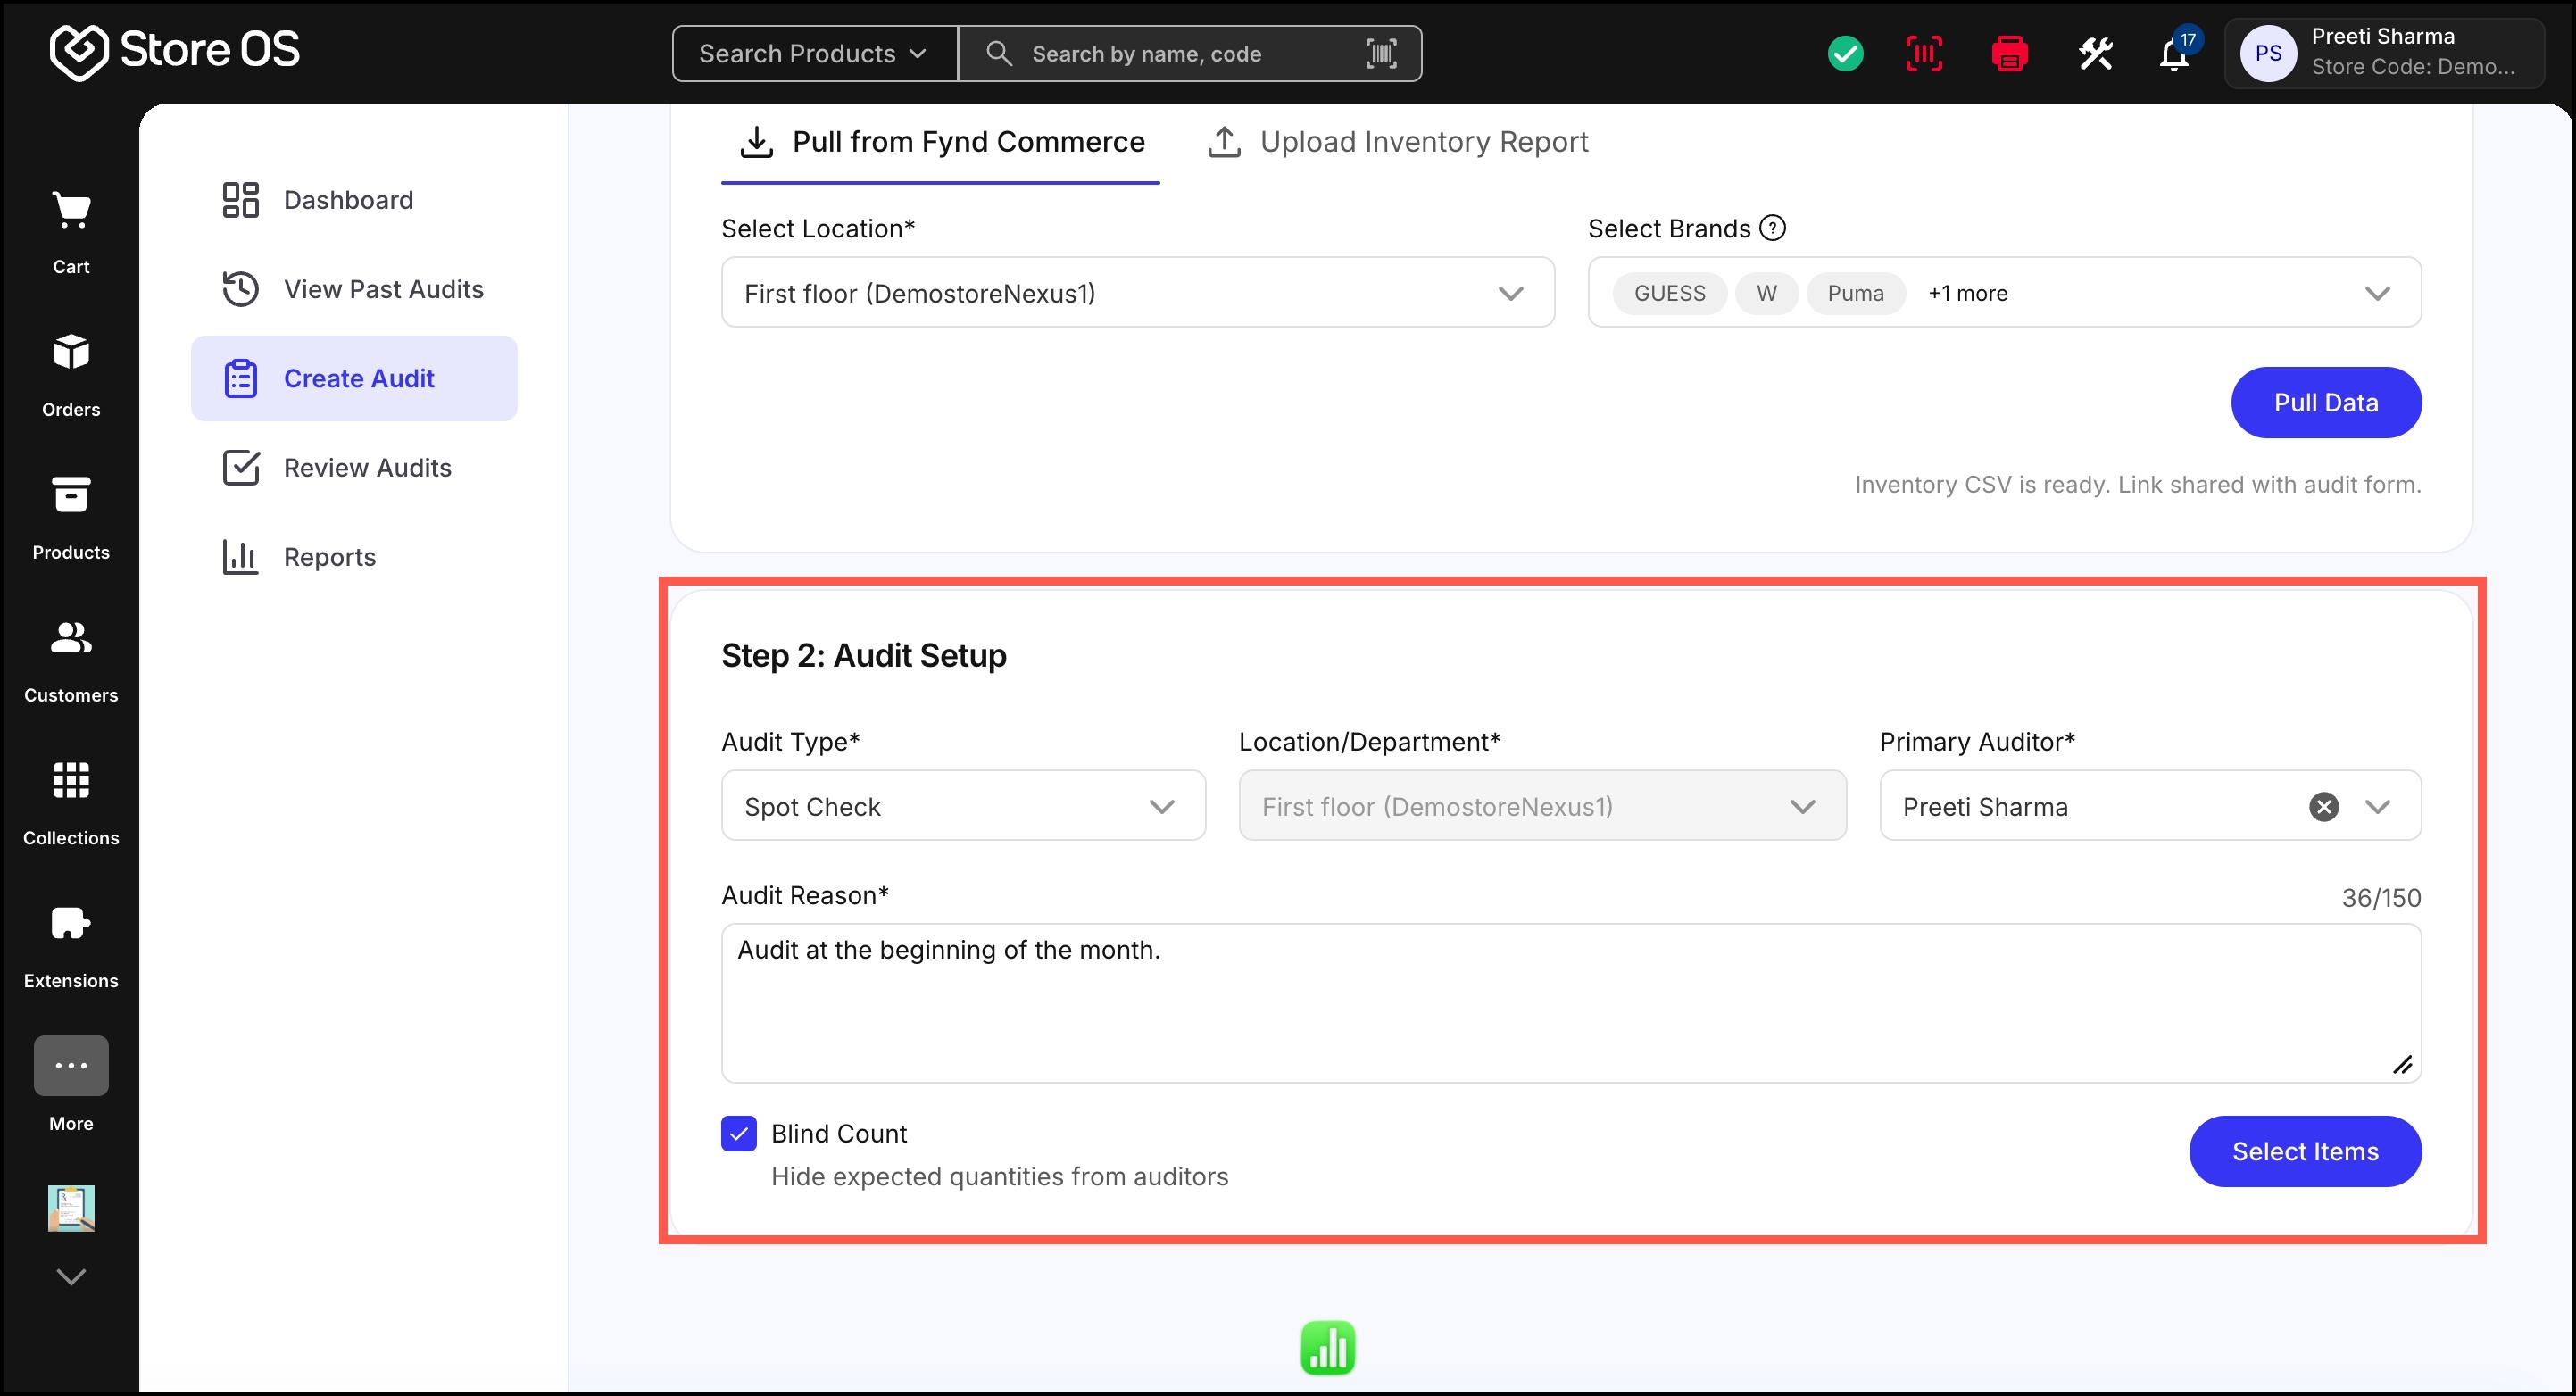
Method 1: Pull Inventory from Fynd Platform: This is the most commonly used method. It fetches the latest system-recorded inventory automatically.
- Select Pull from Fynd Commerce Platform
- Select the store location
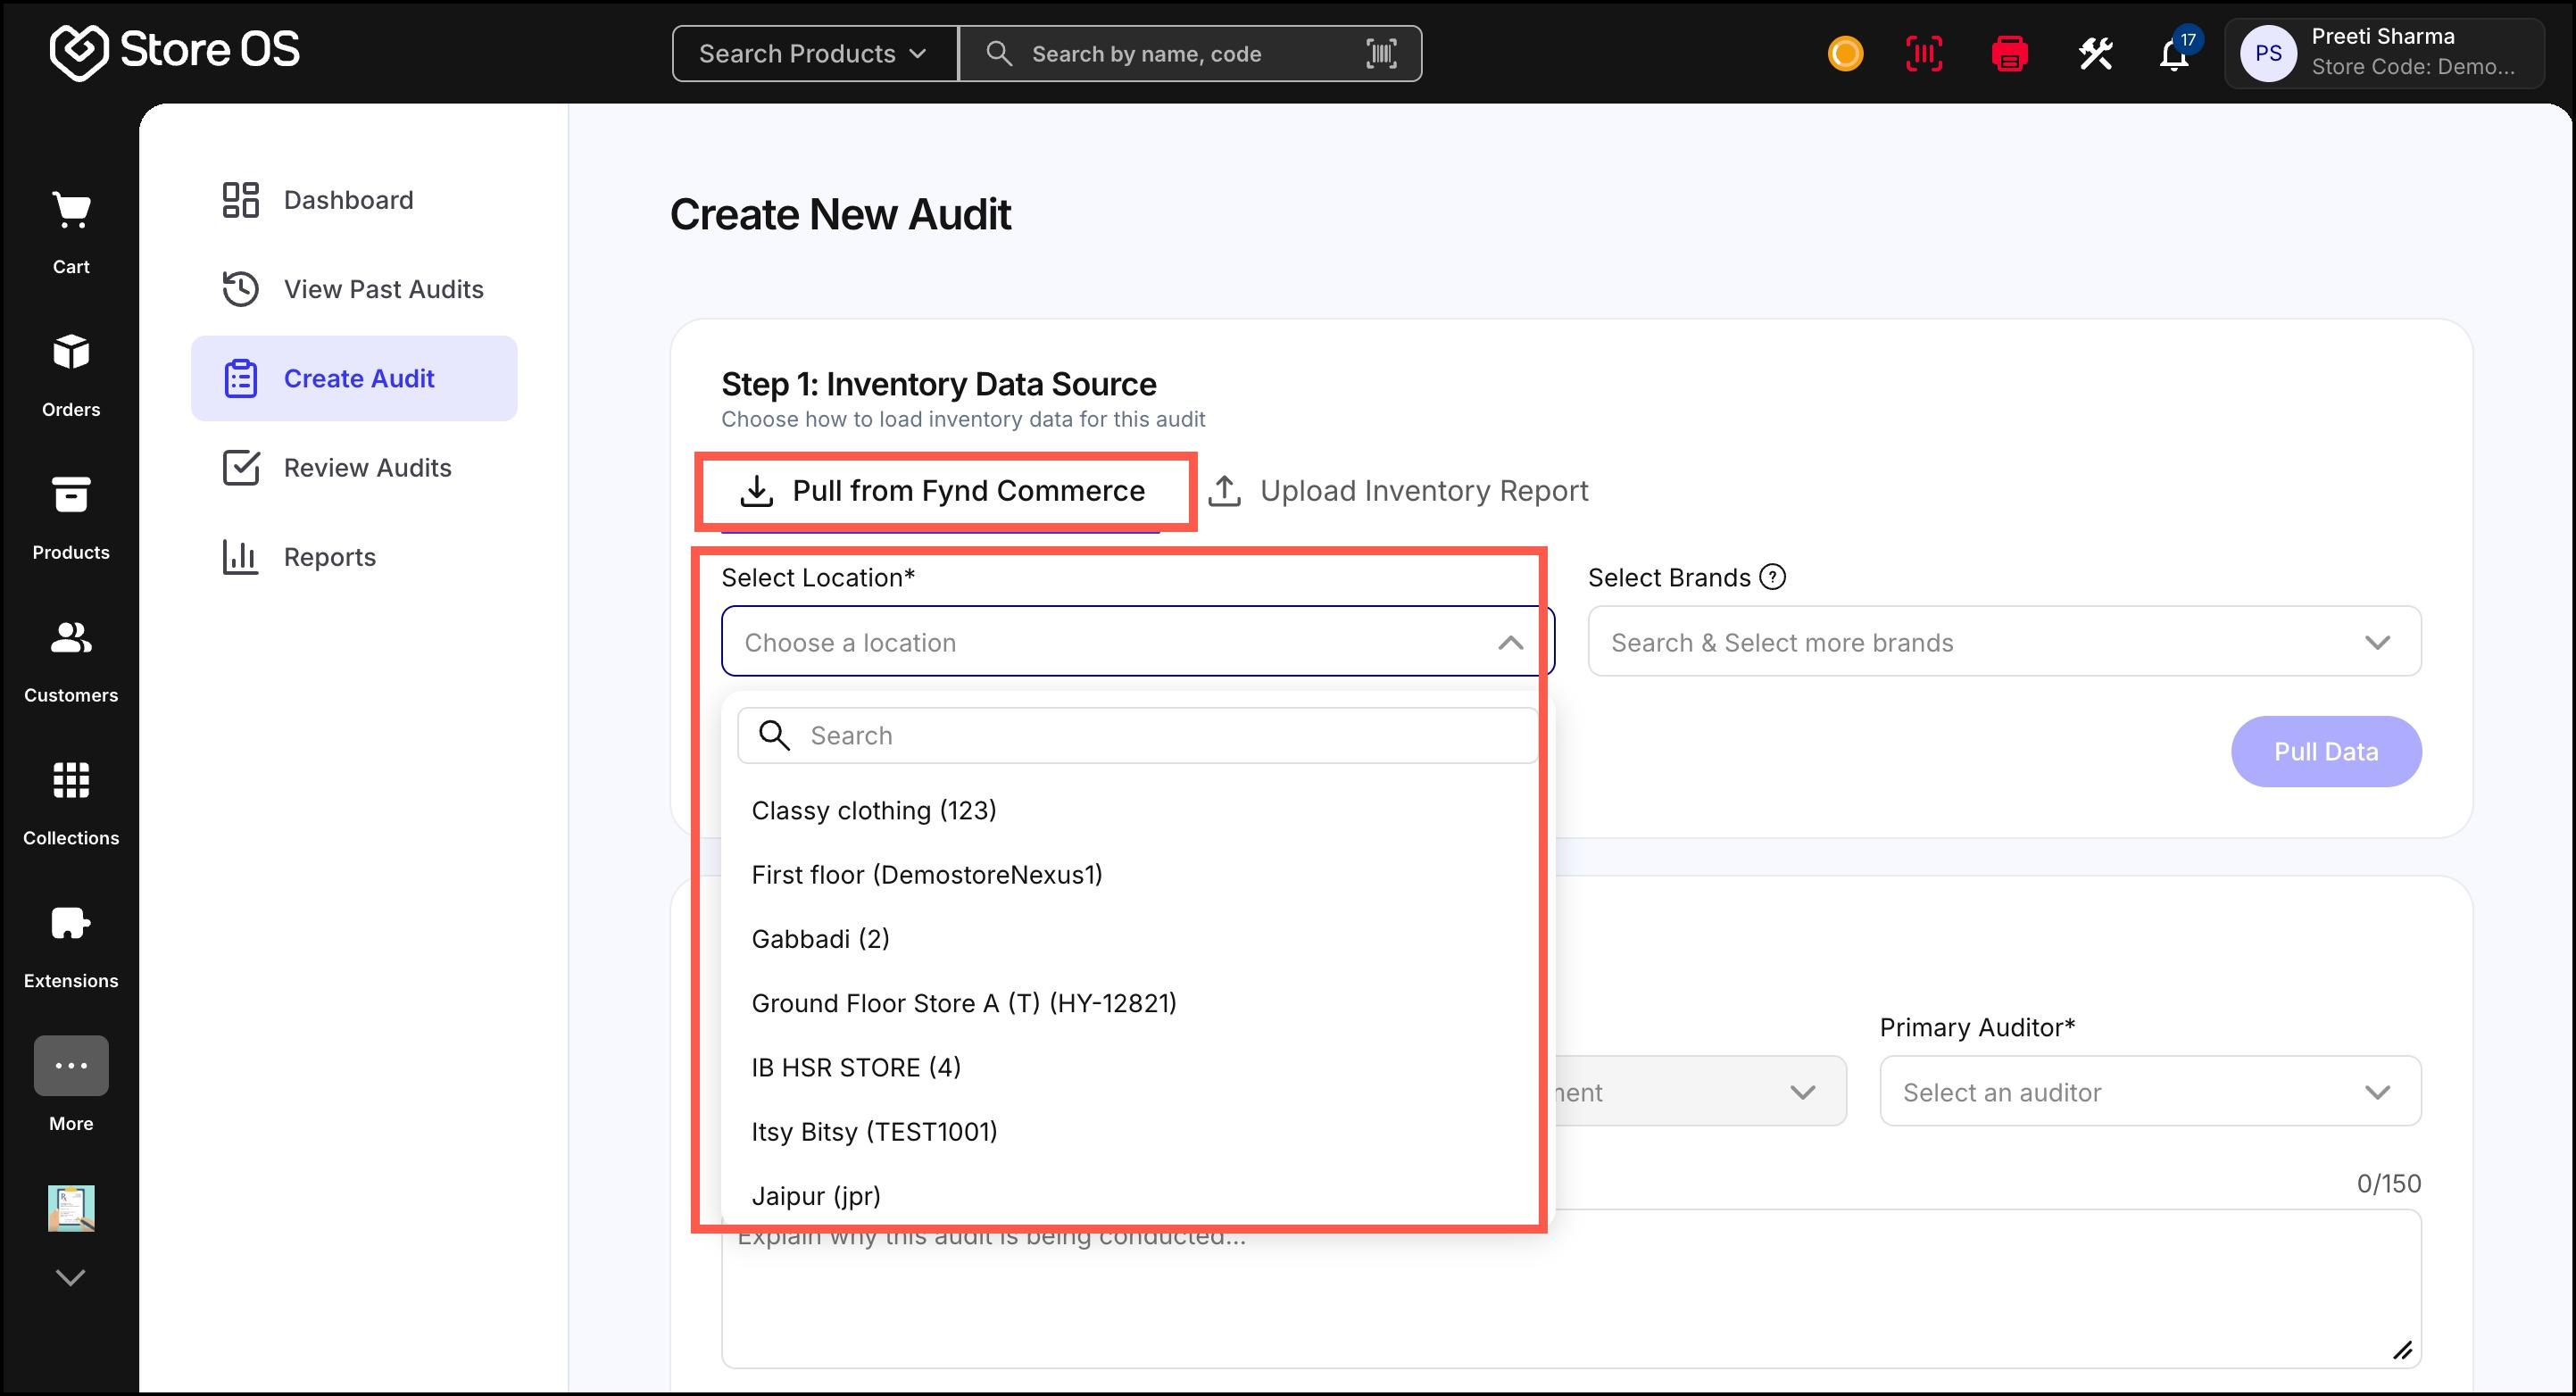
Figure 4: Pull Inventory from Fynd Platform - Optionally select brands
If no brands are selected, all brands are included by default
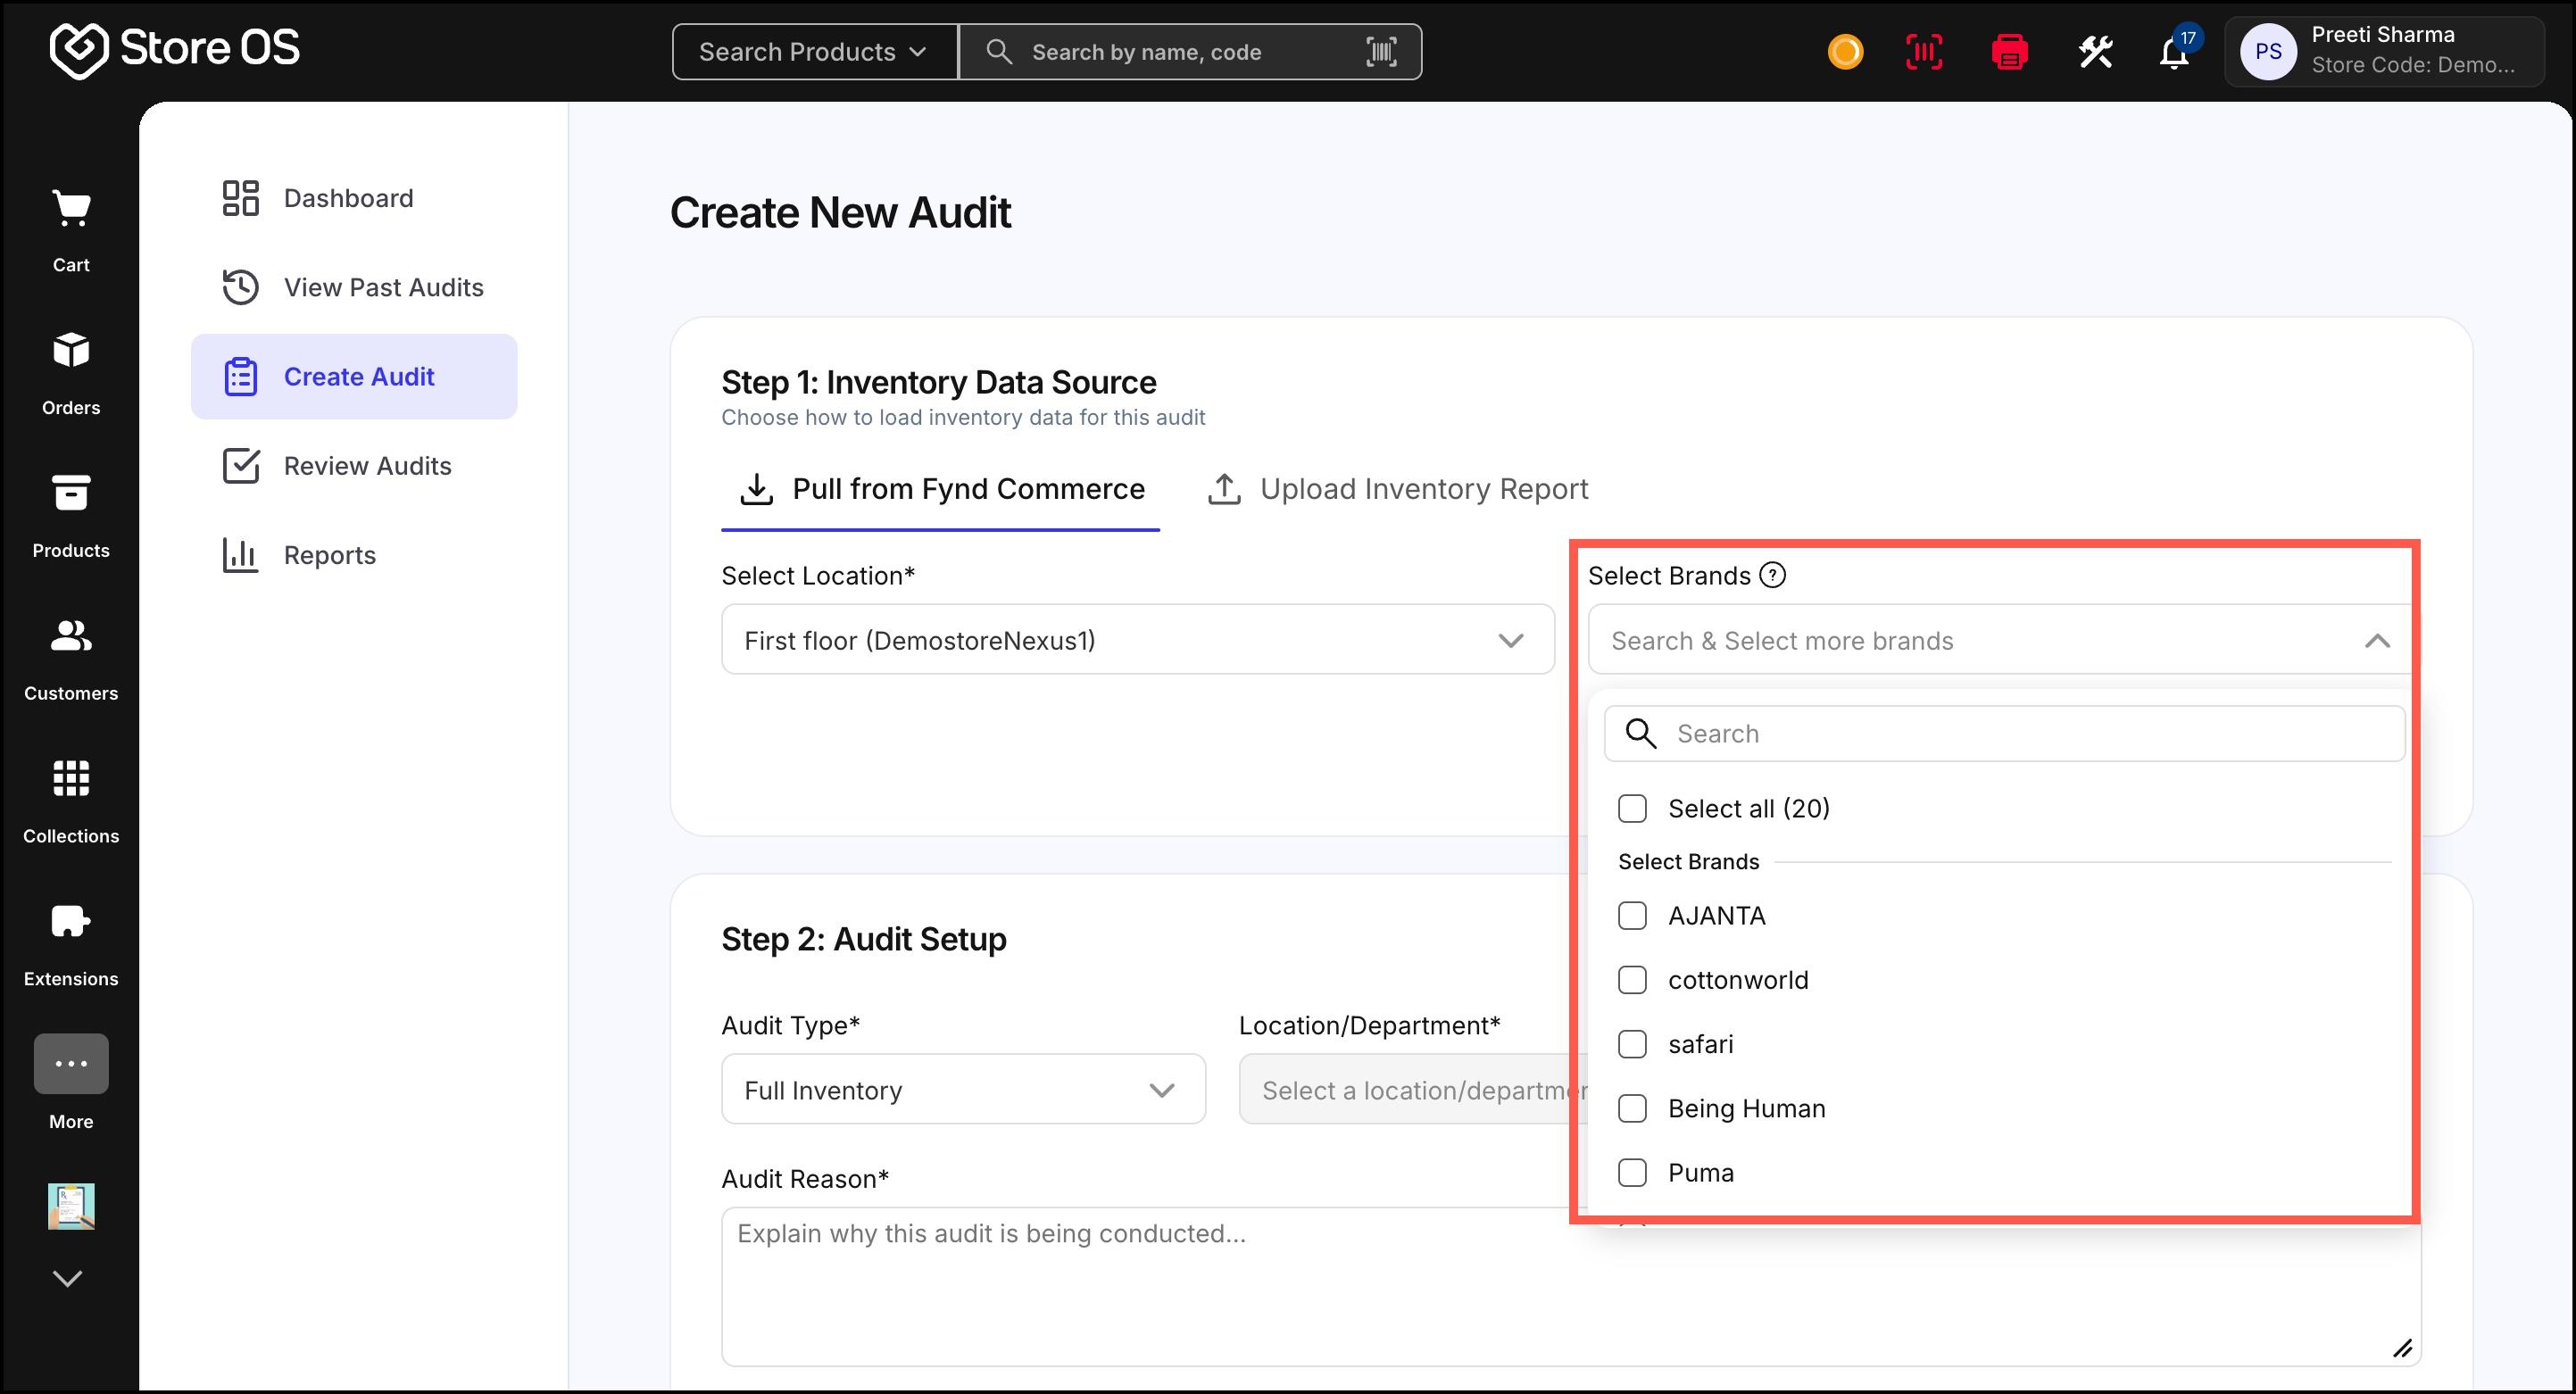
Figure 5: Select Brands - Click Pull Data to fetch the latest inventory. Once the data is fetched, proceed to audit setup.
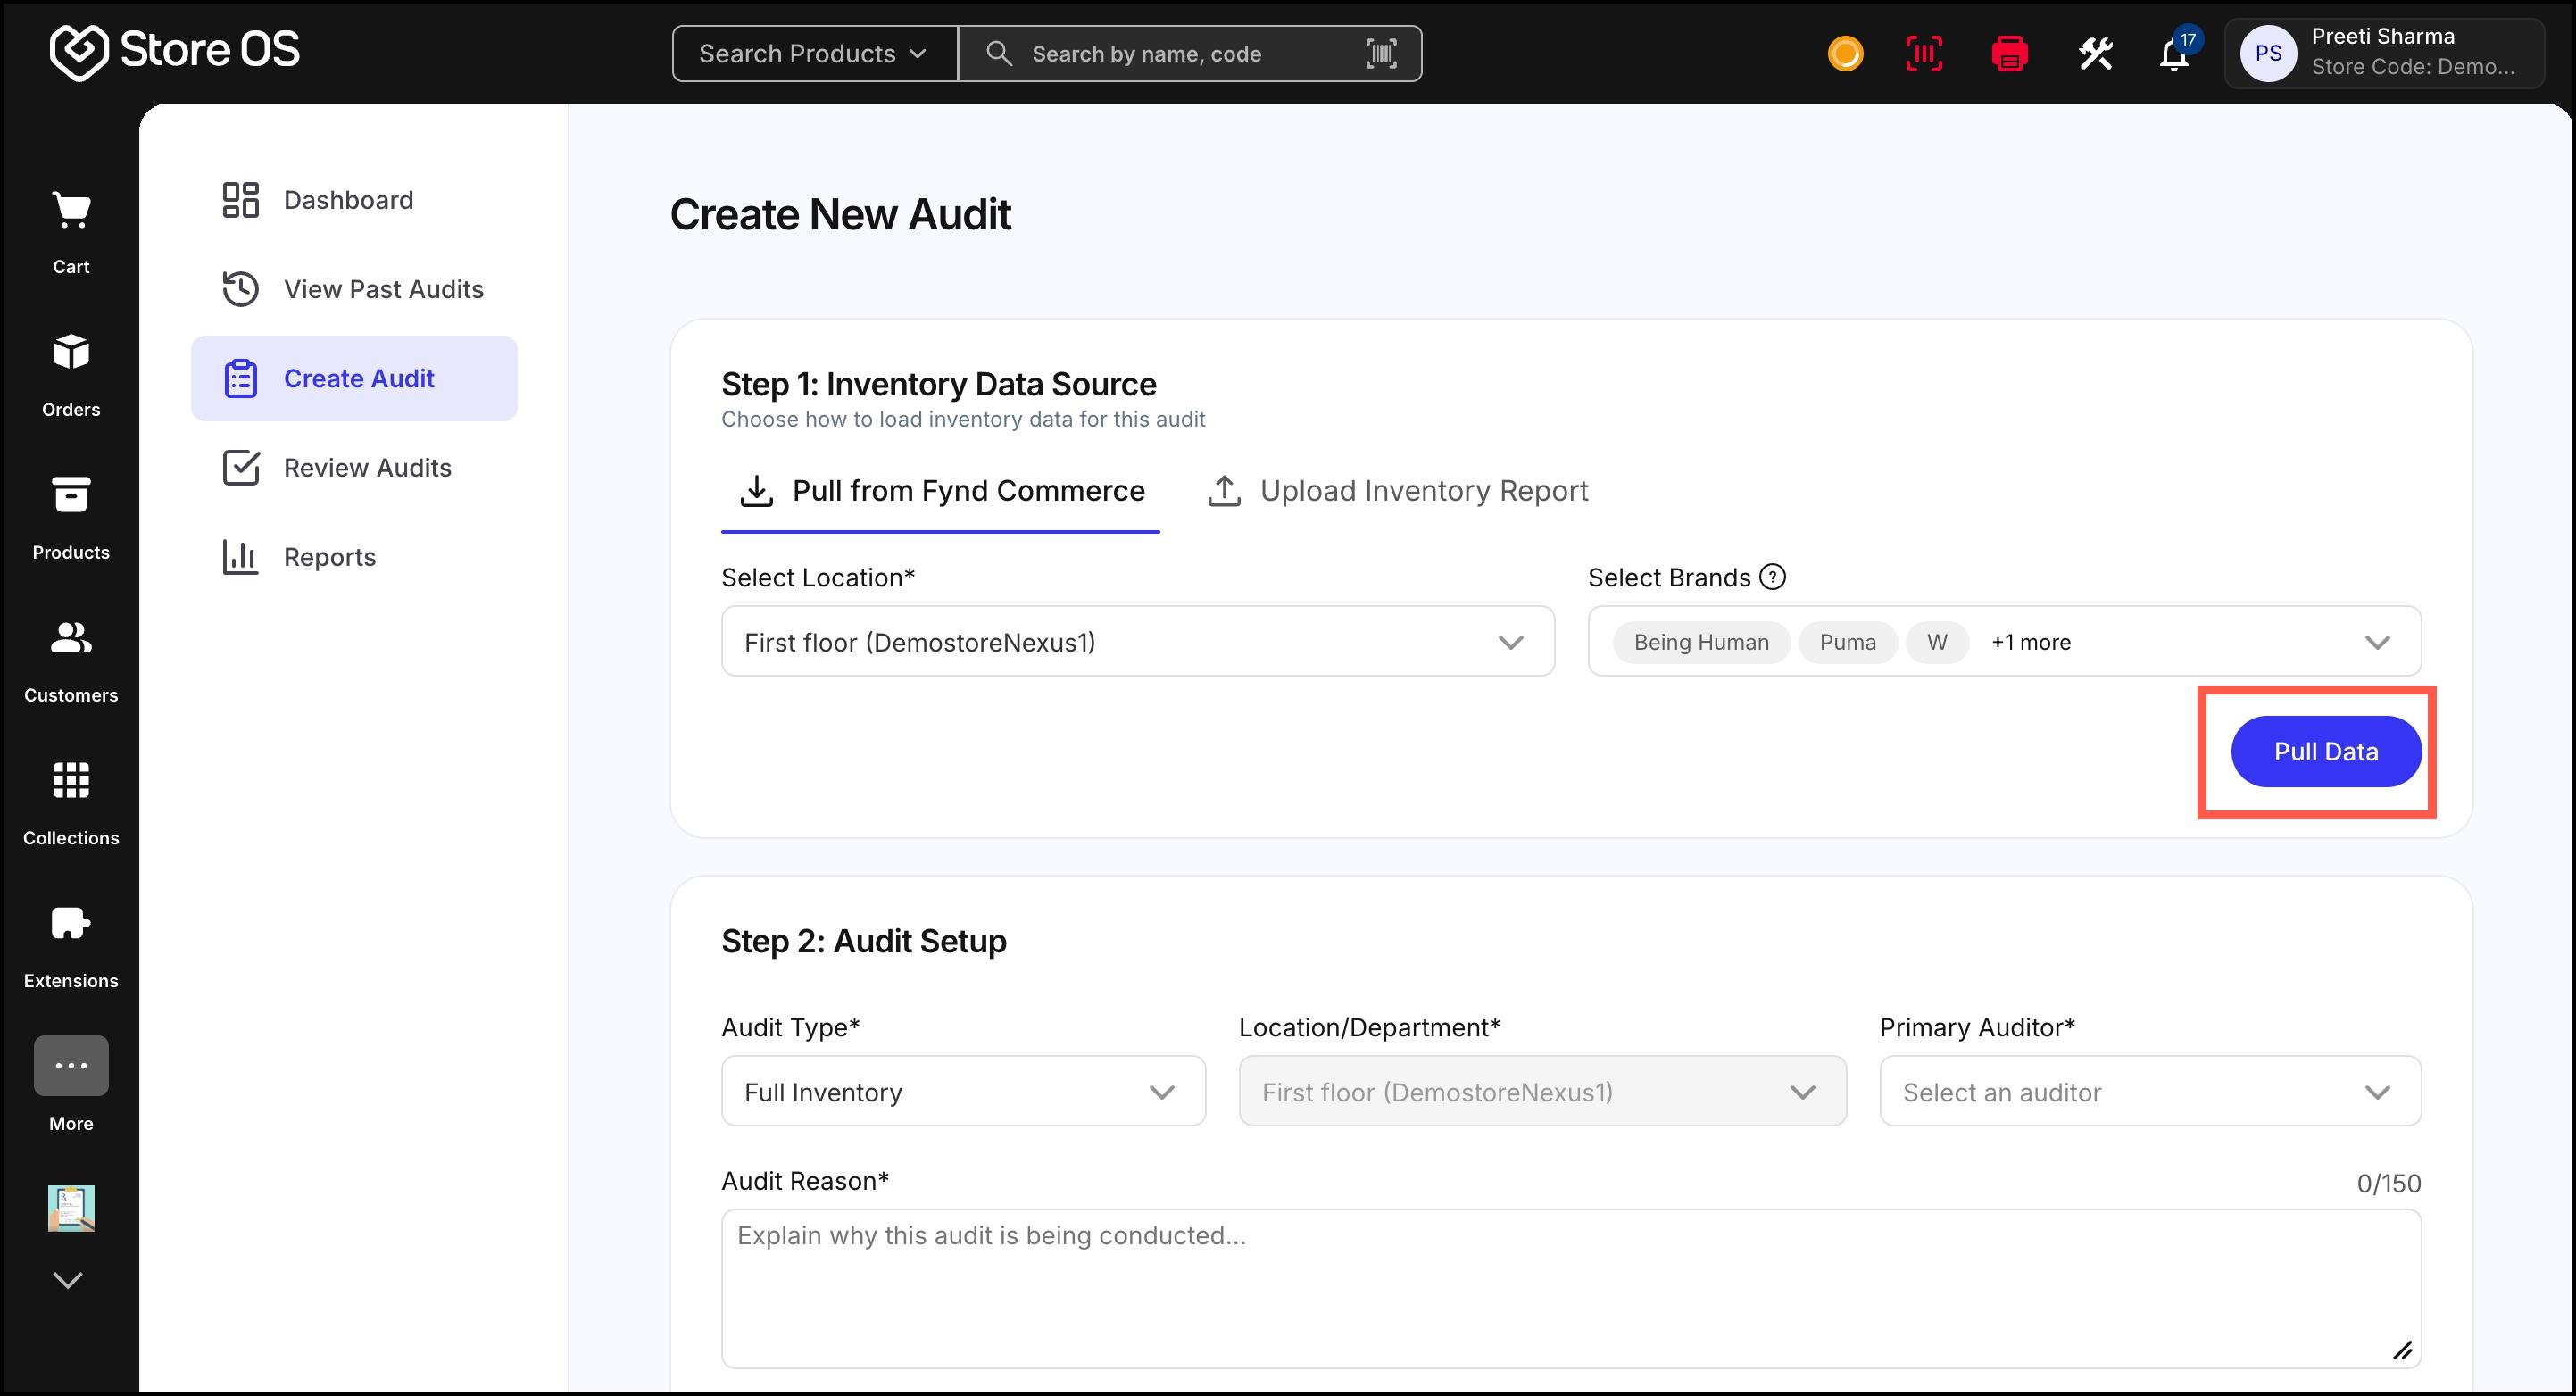
Figure 6: Pull Data Method 2: Upload Inventory Report: This method can be used when inventory data is maintained externally or when performing spot inventory audits.
- Select Upload Inventory Report
- Upload a CSV or Excel file
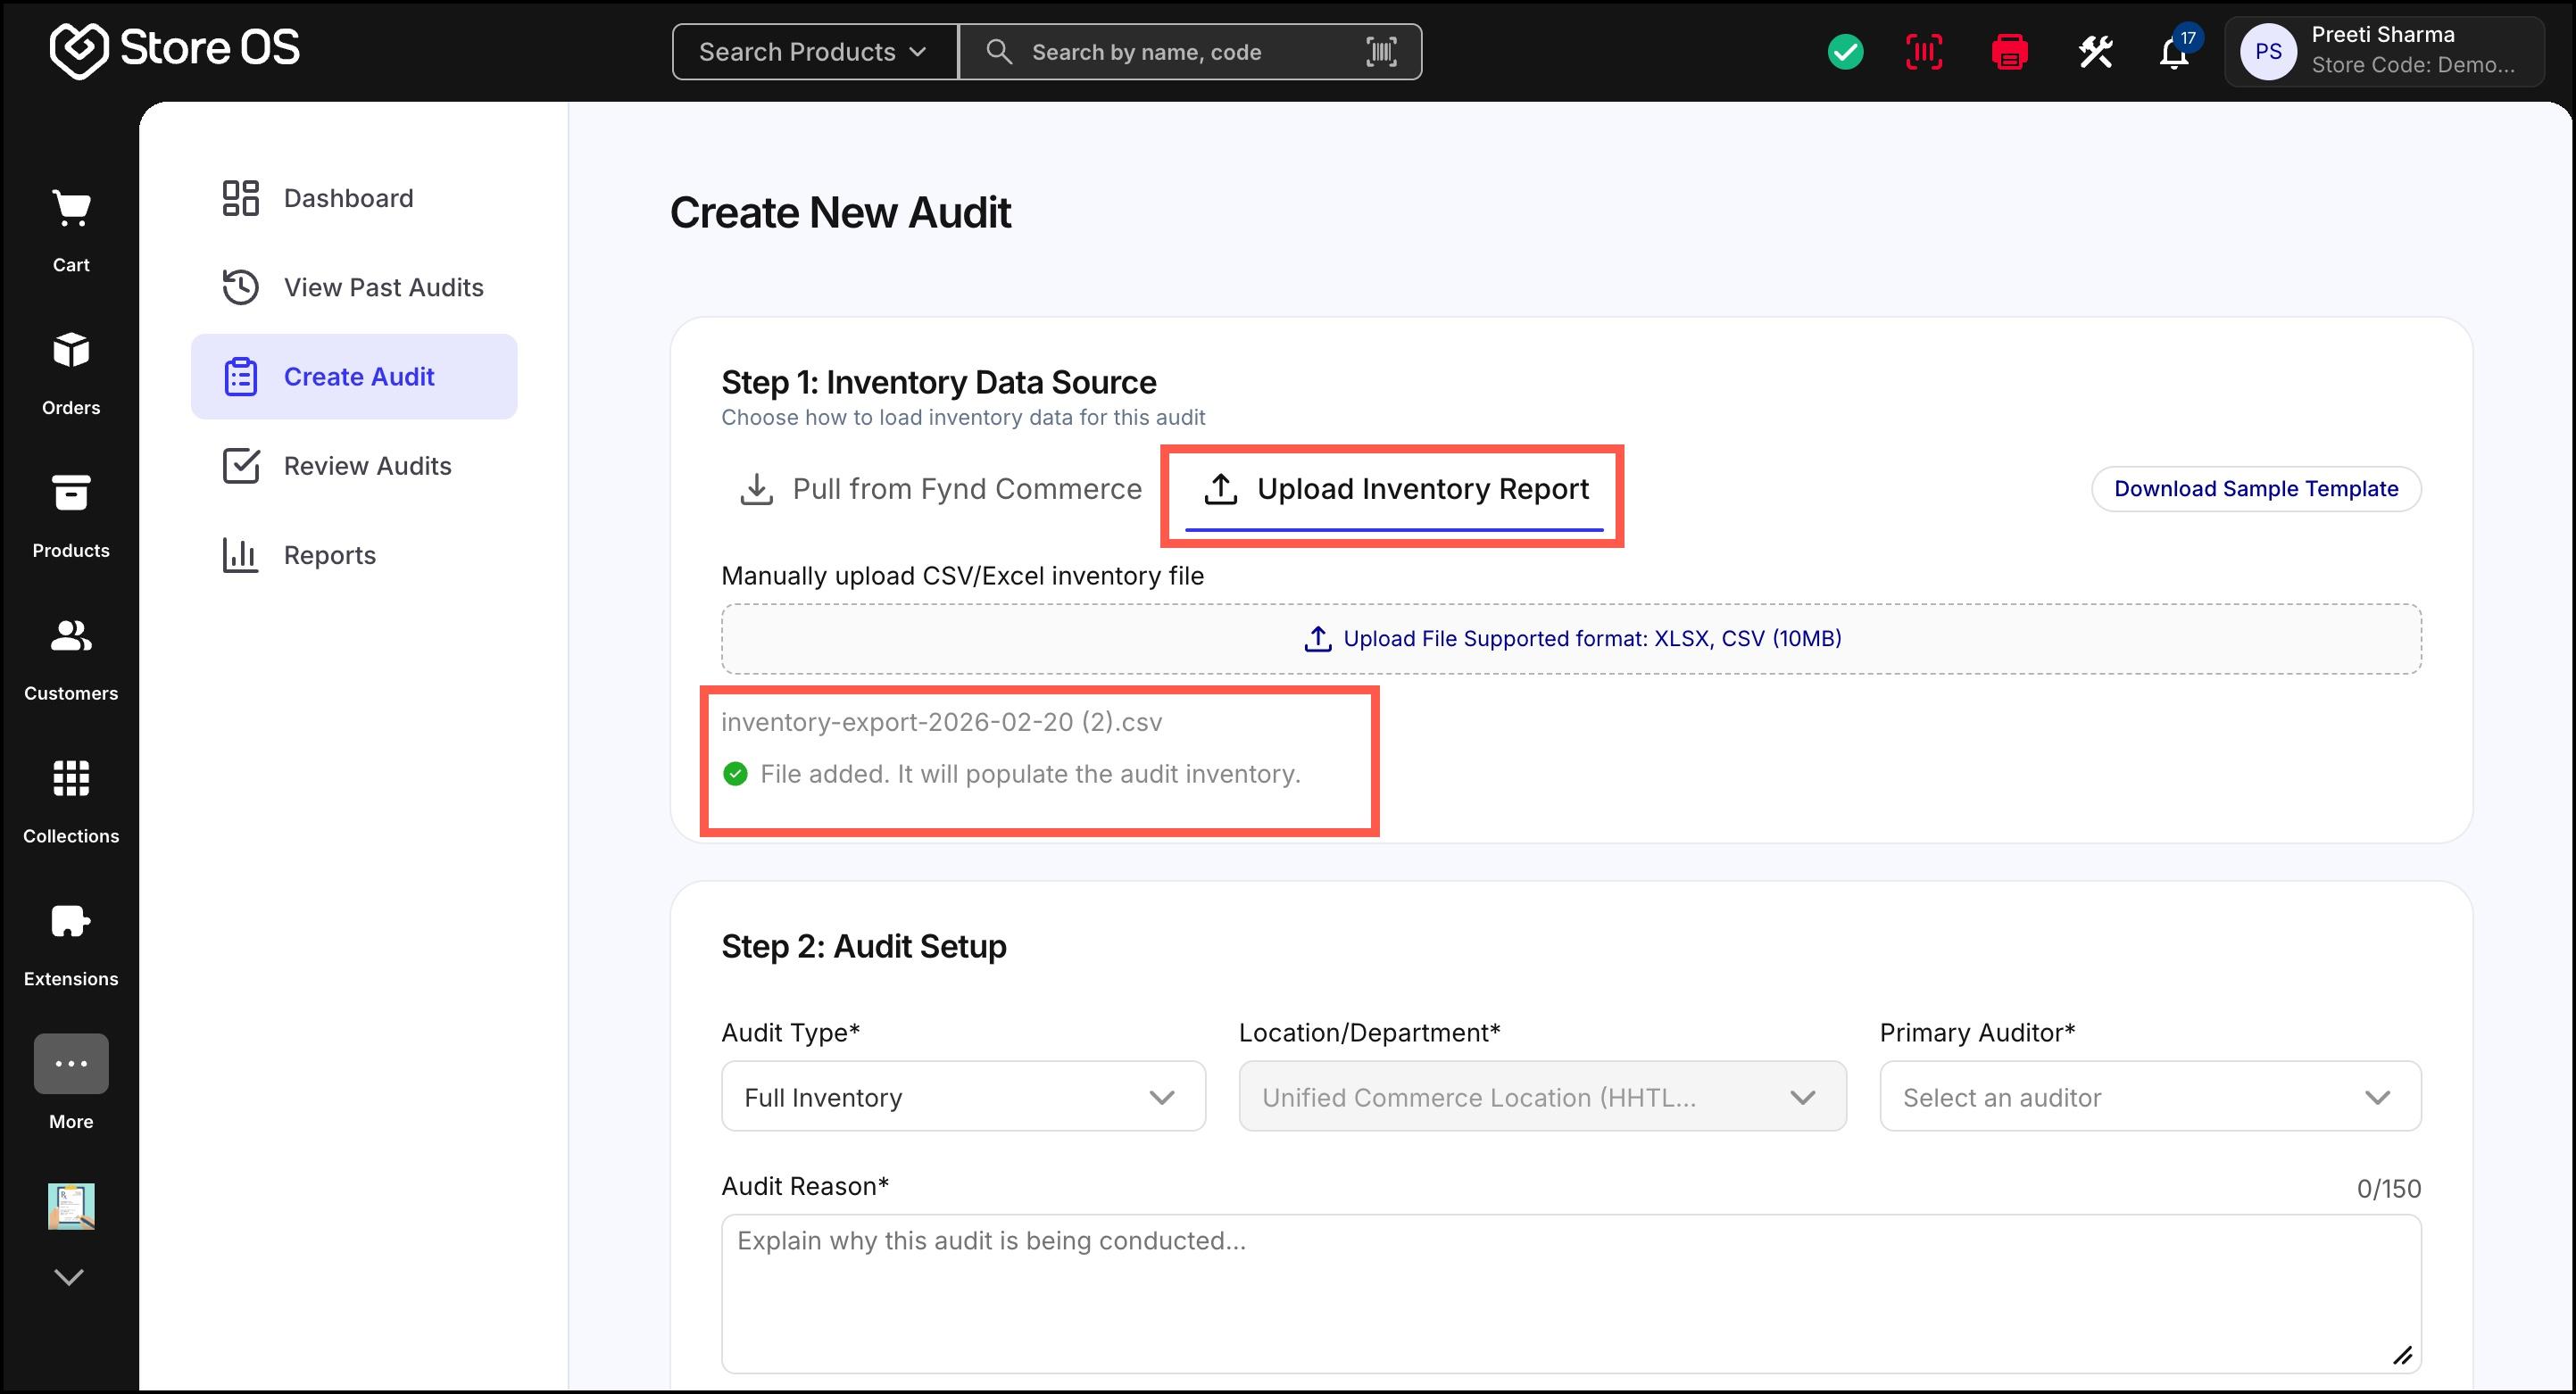
Figure 7: Upload Inventory Report The system reads the uploaded data and prepares it for audit.
The uploaded file should contain inventory data for only one store location. All products in the CSV or Excel file must belong to the same store.
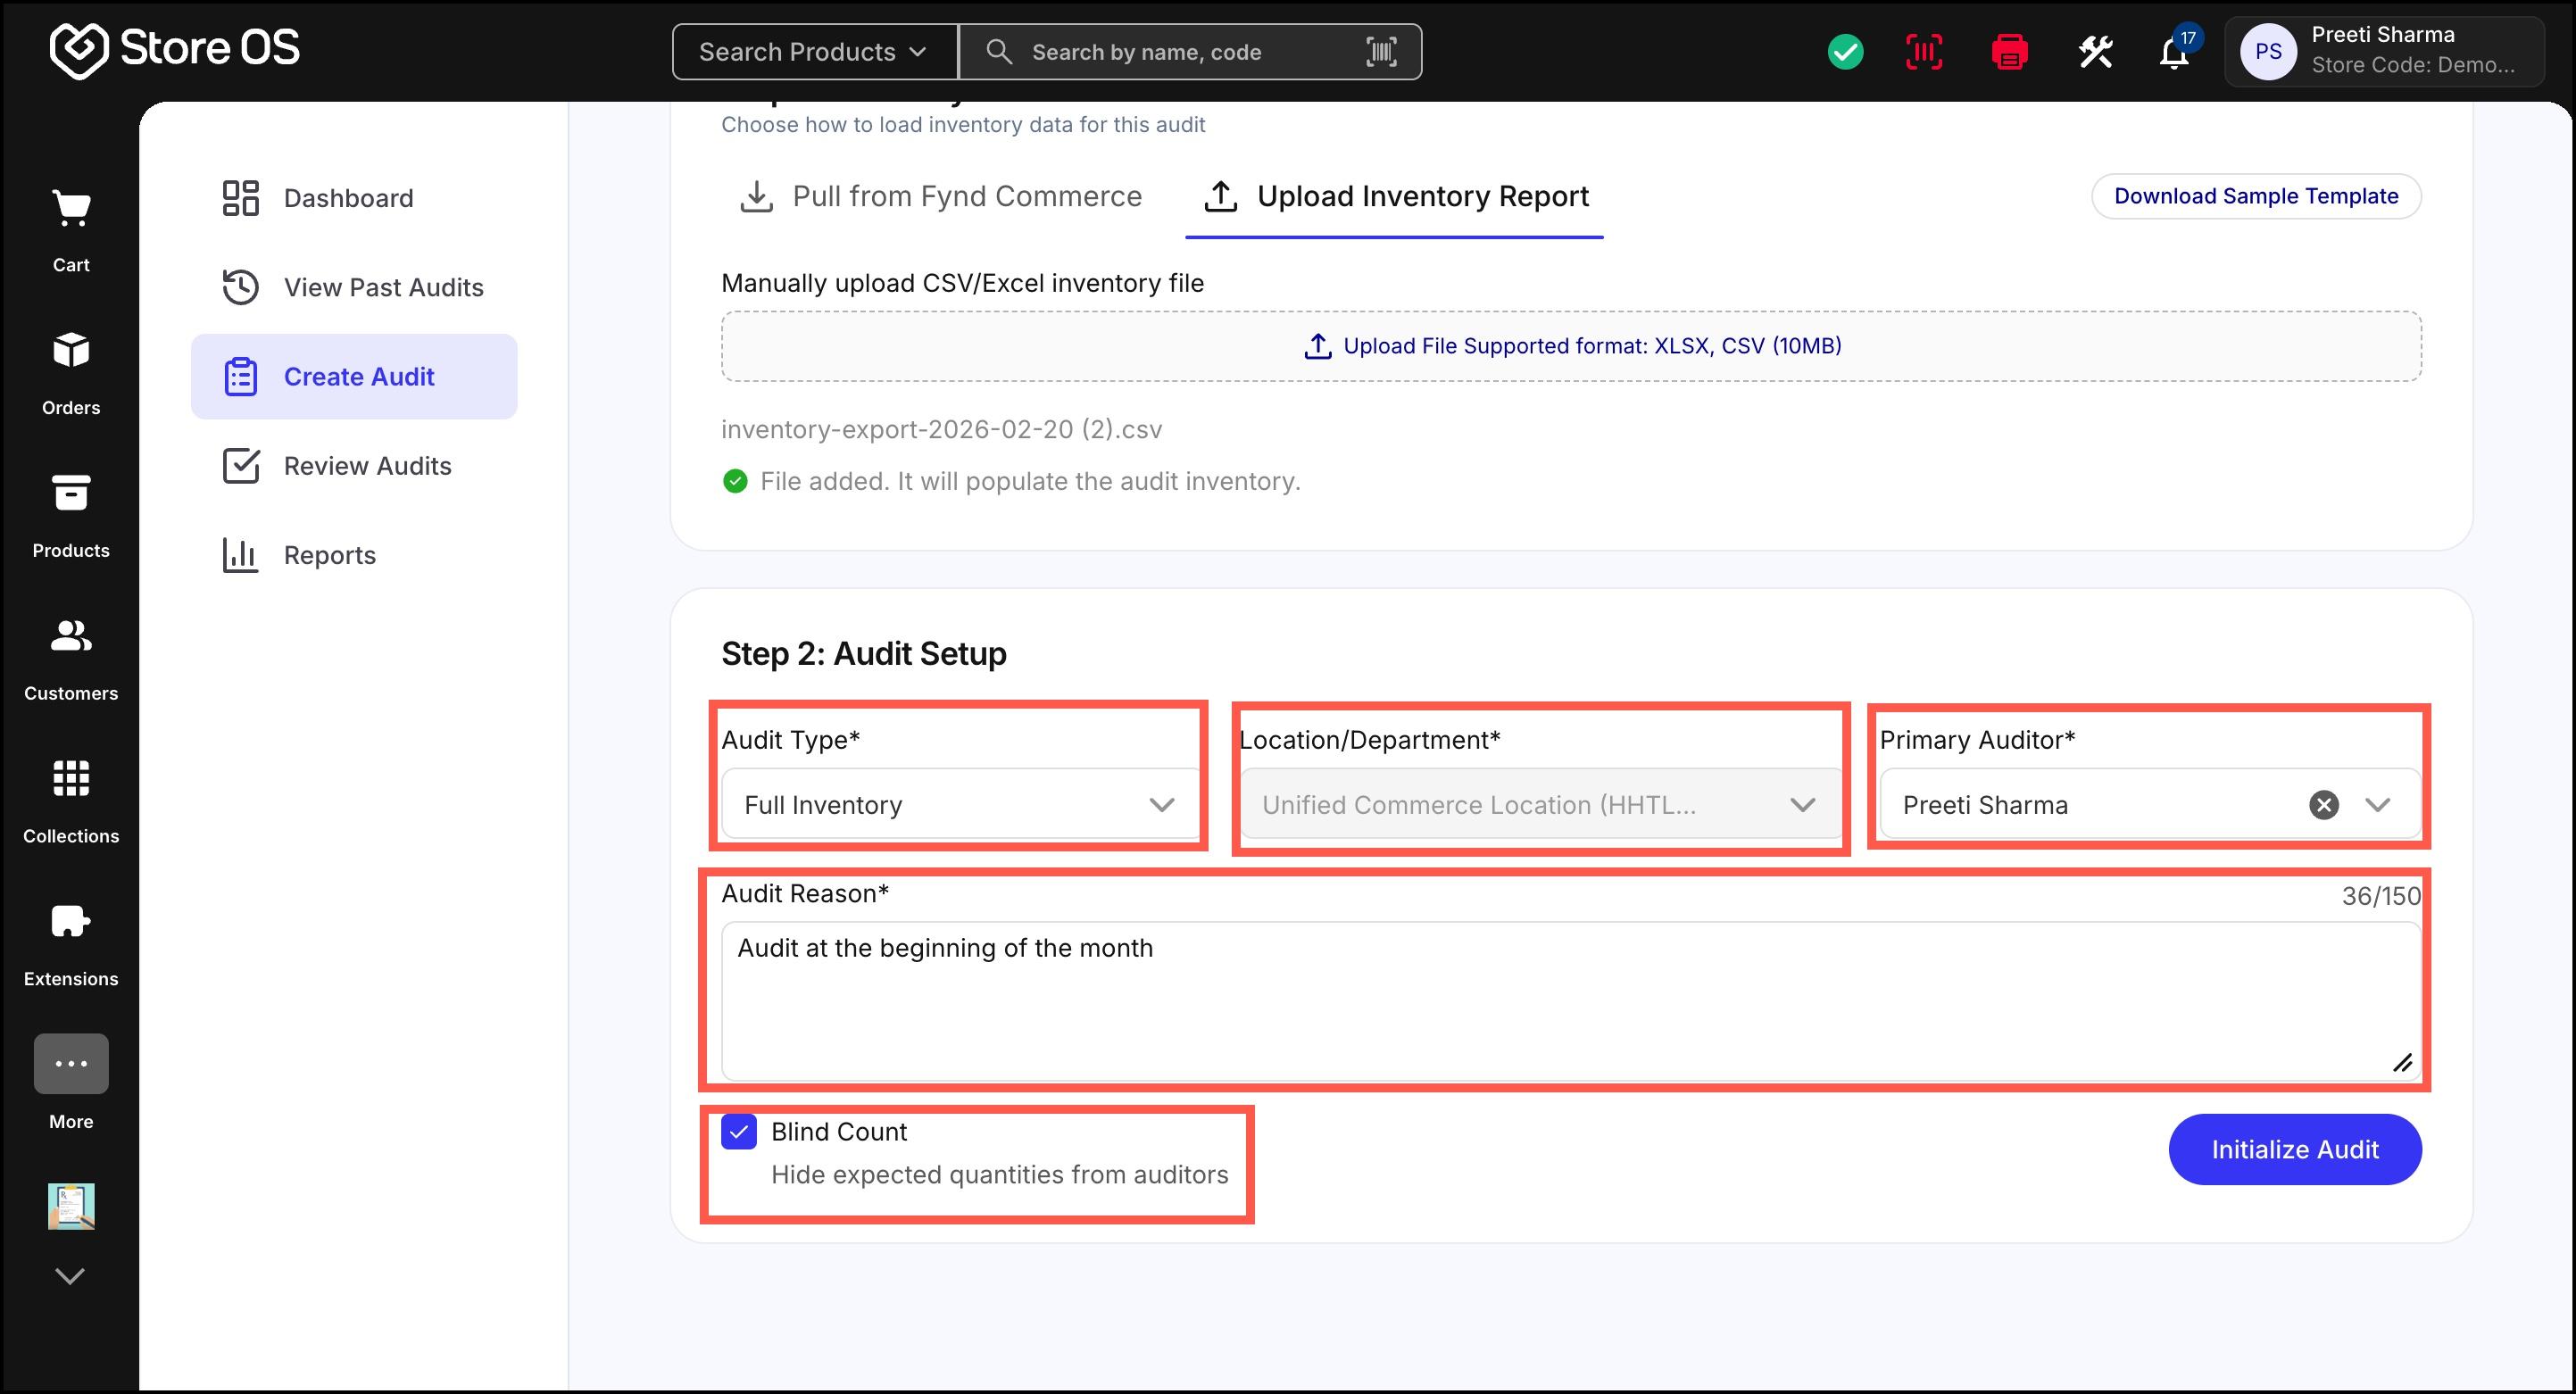
After inventory data is loaded, you must configure the audit. Select the Audit type
A Full Inventory is a comprehensive audit of all inventory in a store or location.
A Spot Check is a targeted audit performed on specific products, or locations.
Location or department is automatically set based on the field selected in the inventory data source and cannot be manually changed.
Select primary auditor
Provide audit reason
Select Blind Count if required. It is an audit mode where the expected inventory quantities are hidden from the auditor during physical stock counting. This ensures that the count is based purely on what is actually present and not influenced by system data.
Once these details are filled, initialize the audit to begin counting.
- For Spot Check, select the respective audit type.
You can then choose products in two ways:
- Manual Selection: Search using SKU or select specific products from the list.
- Random Selection: Enable Select randomly and choose the number of items to audit. System will automatically select products randomly.
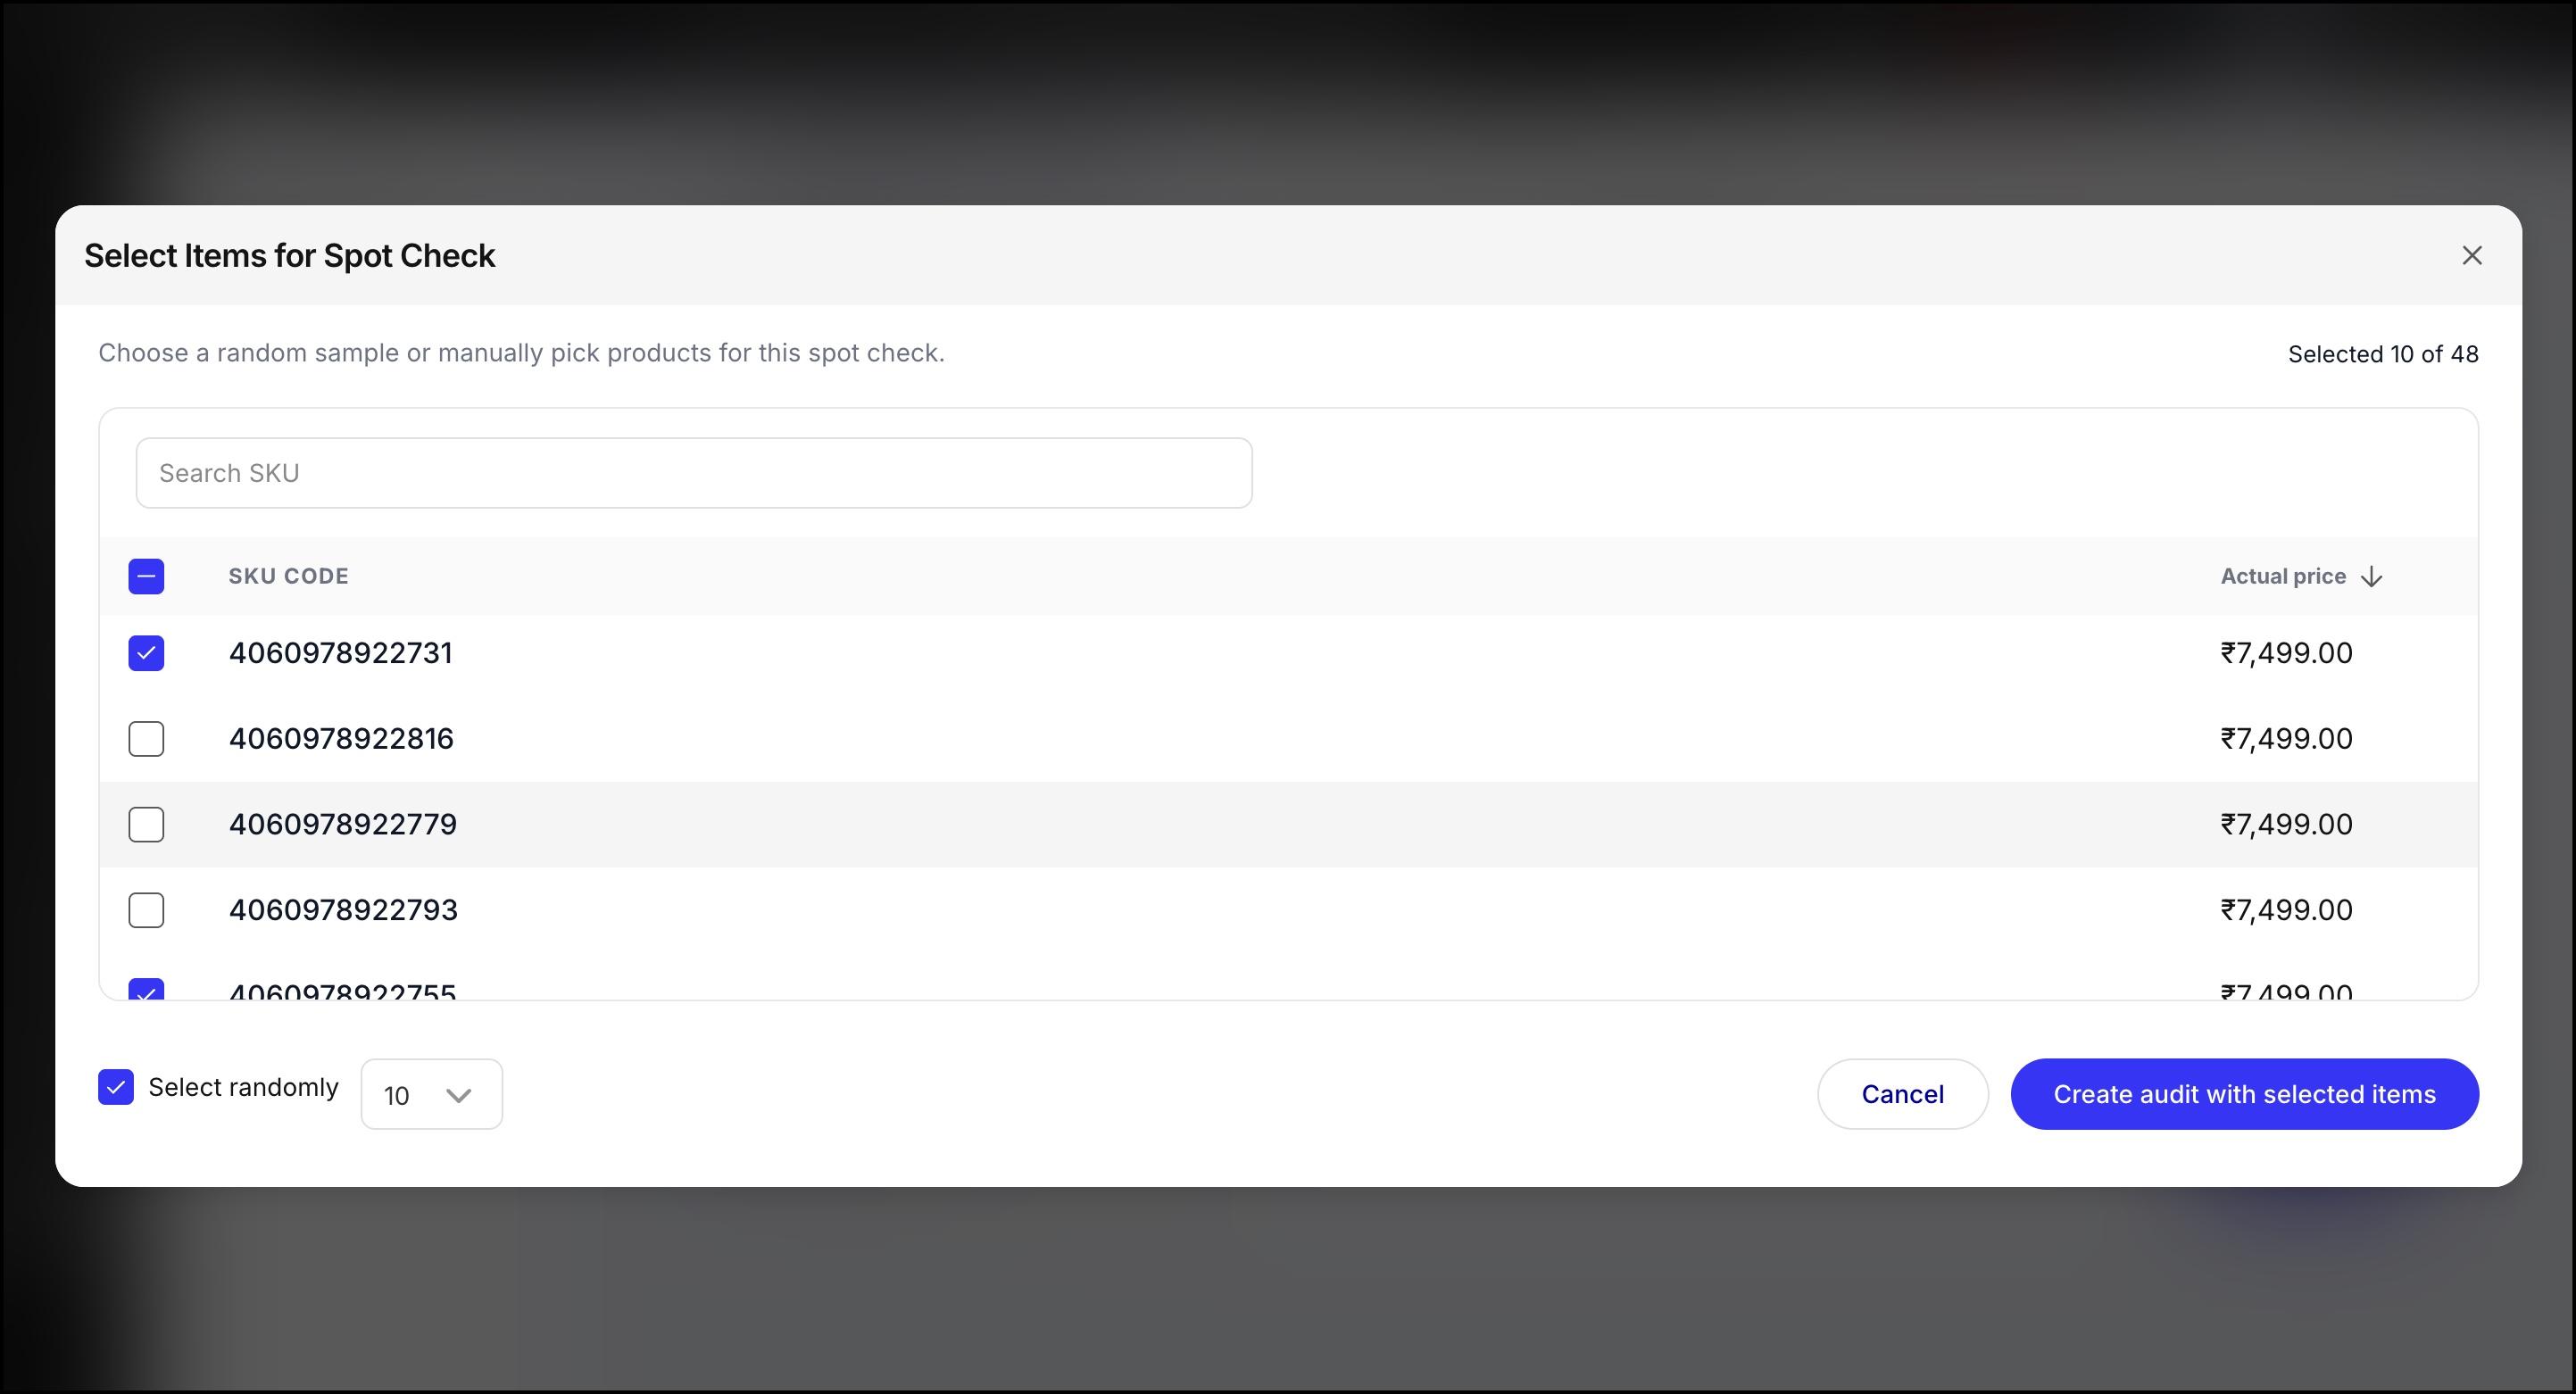
A Full Inventory Audit includes all products in the selected store or location and is conducted to verify overall inventory accuracy. A Spot Check, on the other hand, includes only selected products—either manually chosen or randomly sampled—and is typically used for quick verification or suspected discrepancies.
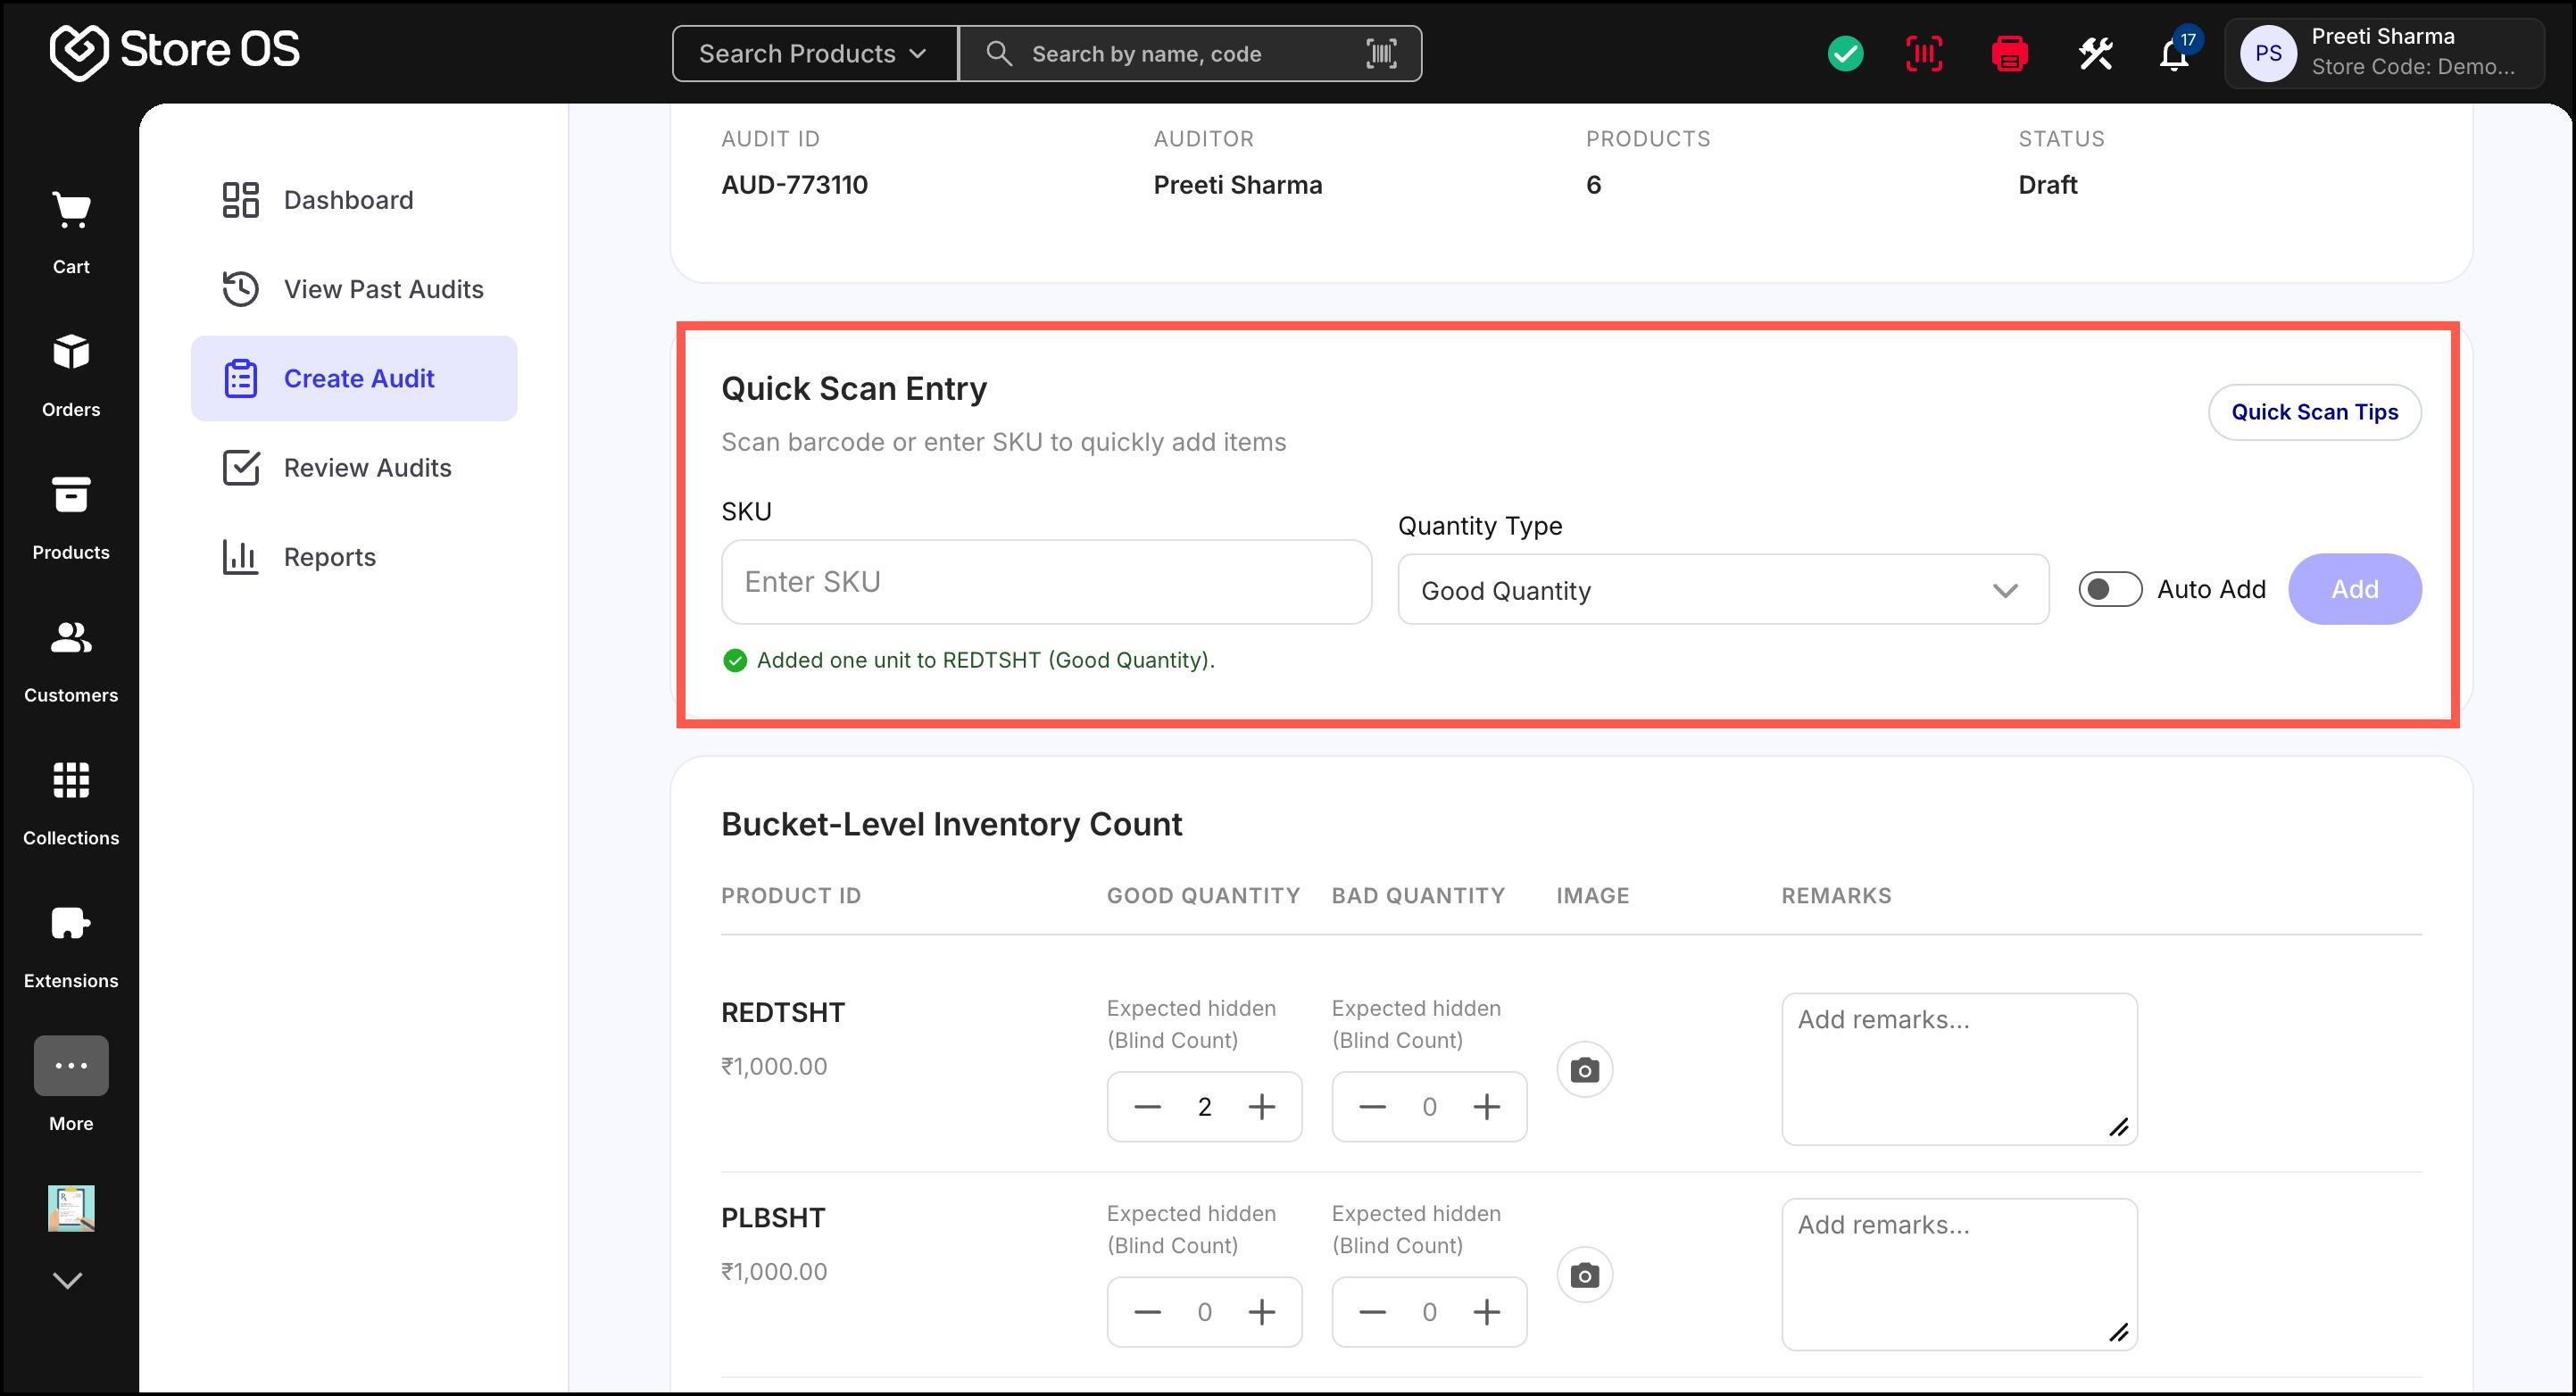
- Inside an active audit, products can be added in two ways:
Scanning the product barcode
Manually searching and adding products
Auto Add further speeds up the process by automatically registering items once the SKU is entered.
If the SKU is not part of the uploaded inventory but exists in the catalogue, it is added as a new row in the audit.
- Each product quantity must be assigned to a bucket:
Good Quantity
Bad Quantity
Bucket-level inventory count ensures that during an audit, stock is recorded in clearly defined categories. In Store OS, auditors separate inventory into Good Quantity (items that are in sellable condition) and Bad Quantity (items that are damaged, expired, or otherwise unsellable). For each product, auditors can adjust the counted quantities, add remarks explaining the condition or issue, and upload images as proof. Bucket categorisation gives complete clarity on why a discrepancy exists—not just that it exists—making audits more transparent and easy to review.
- Once all details are added, audit can be:
- Saved as Draft – Used when the audit is incomplete or needs to be reviewed by another person later
- Submitted – Sent for review and approval
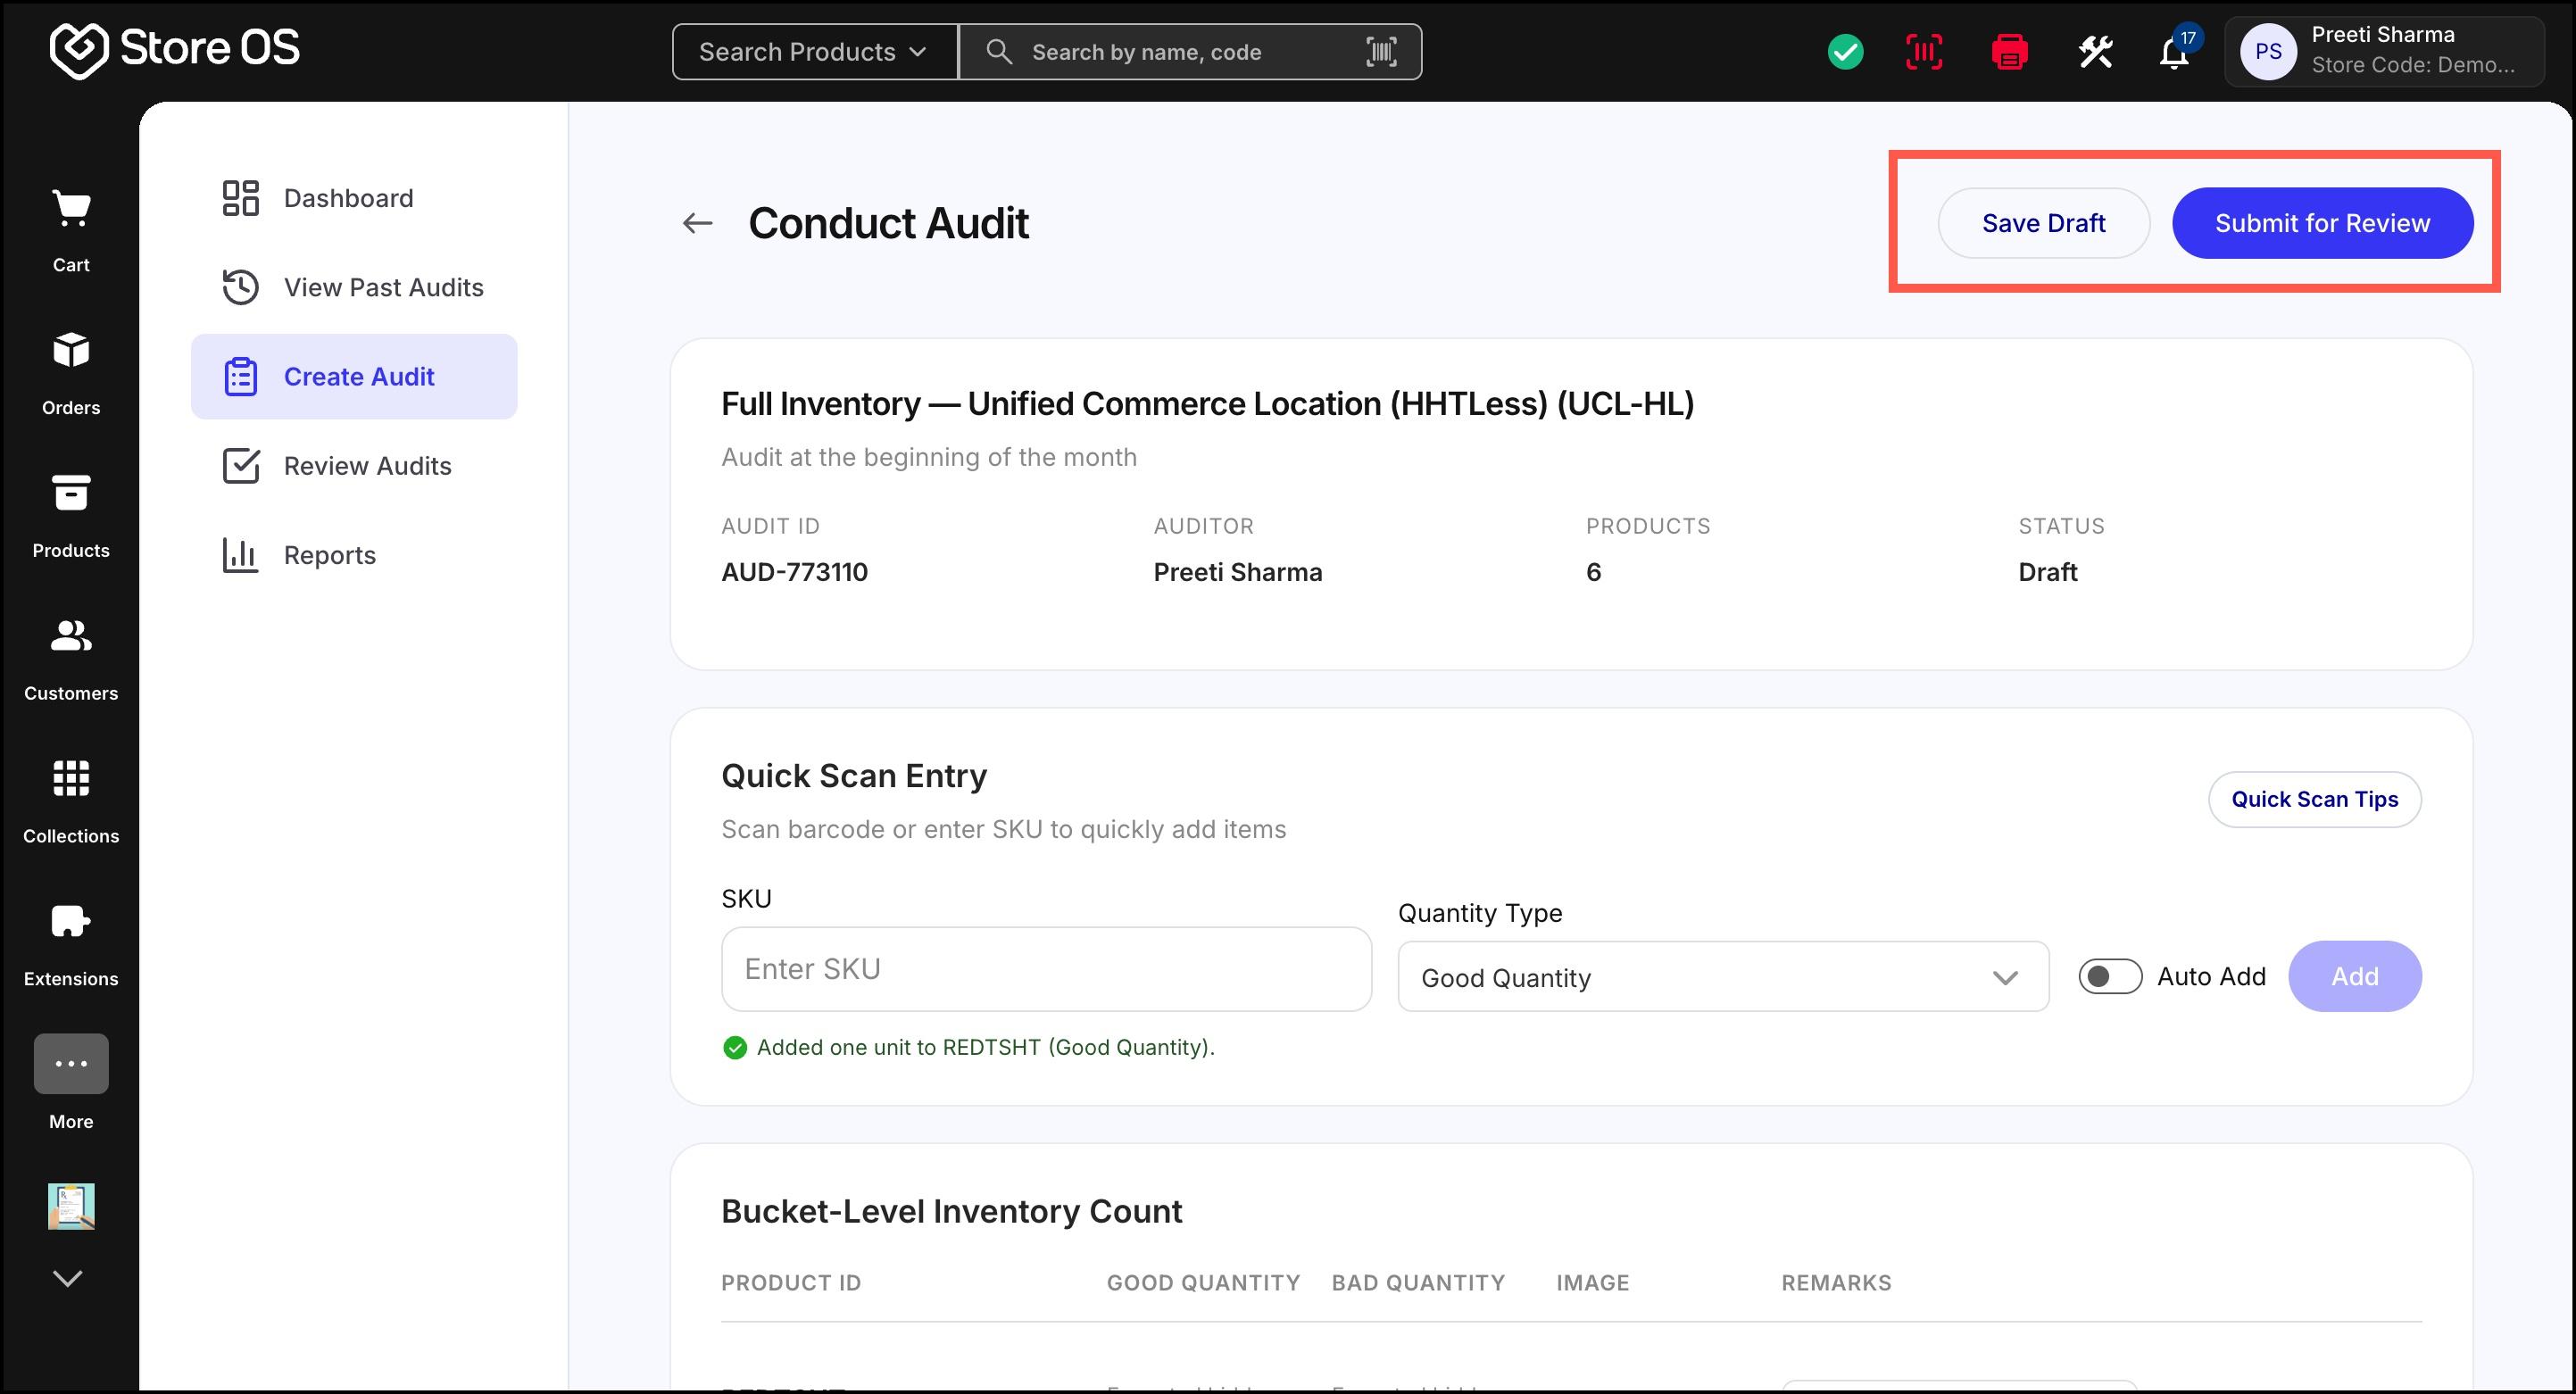
- Draft audits appear in View Past Audits and can be edited or deleted by admins.
Once an audit is submitted, it appears in the Review Audits section. It has following sections:
- Audit Details: It provides a high-level summary of the audit–why the audit was conducted, who performed it, and how significant the discrepancies are—before deciding on the next steps. It includes information such as the audit type, location or department, primary auditor, audit reason, blind count status, audit date, and overall discrepancy percentage with value impact.
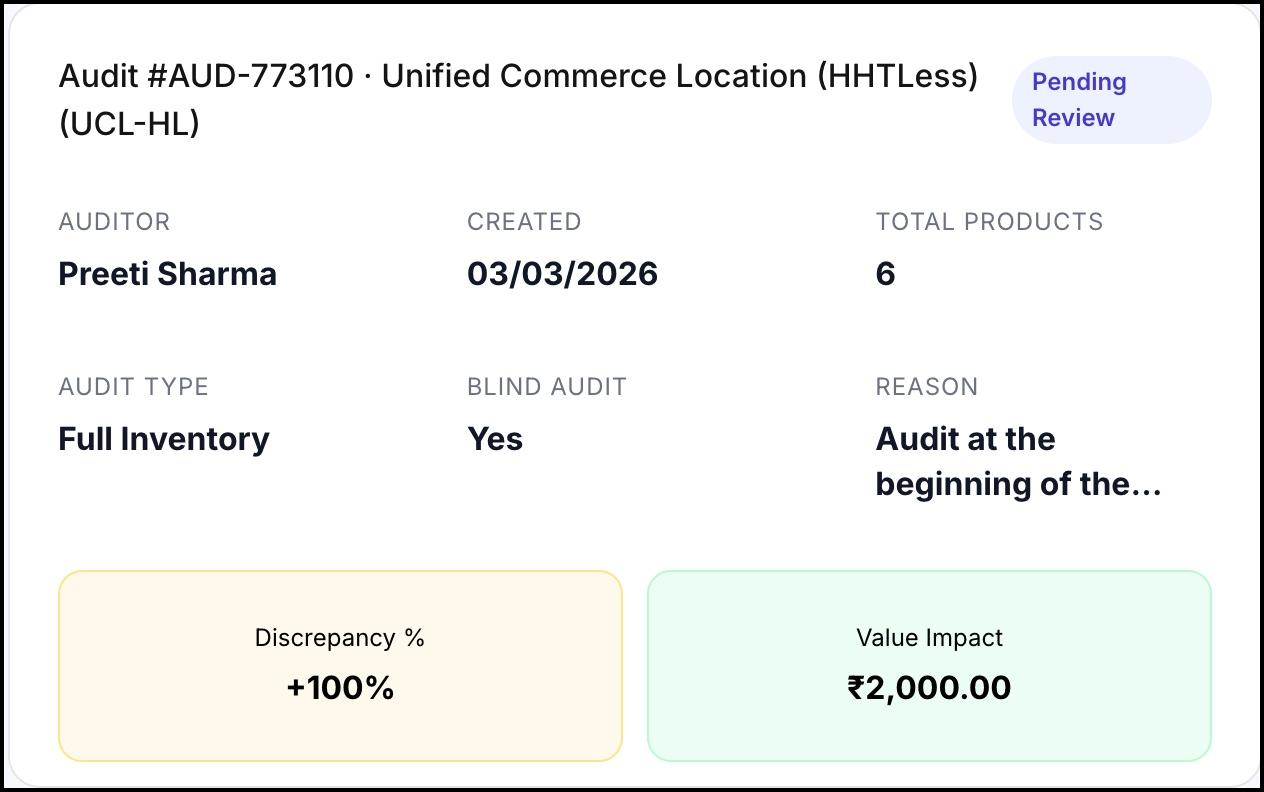
Figure 14: Audit Details Add Review: This is where the final decision on the audit is made. Reviewer can select how inventory should be updated:
- Adjust: It updates inventory by applying only the difference between the system quantity and the audited quantity. For example, if the system shows 100 units and the audit finds 95 units, adjusting inventory will reduce stock by 5 units.
- Replace: It updates inventory by setting the stock quantity to exactly match the audited count, overriding the system quantity entirely. For example, if the system shows 100 units but the audit confirms only 72 units, replacing inventory will reset the stock to 72 units.
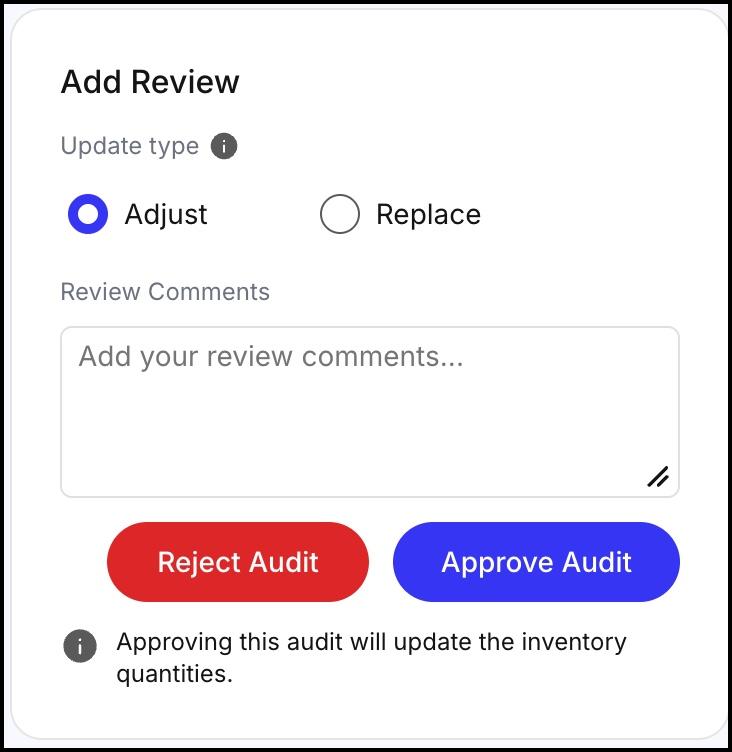
Figure 15: Add Review Products: It shows a detailed breakdown of the audit. For each product, the system-expected quantity, the physically audited quantity, and the resulting variance is shown here. Any remarks or images added by the auditor are also visible here.
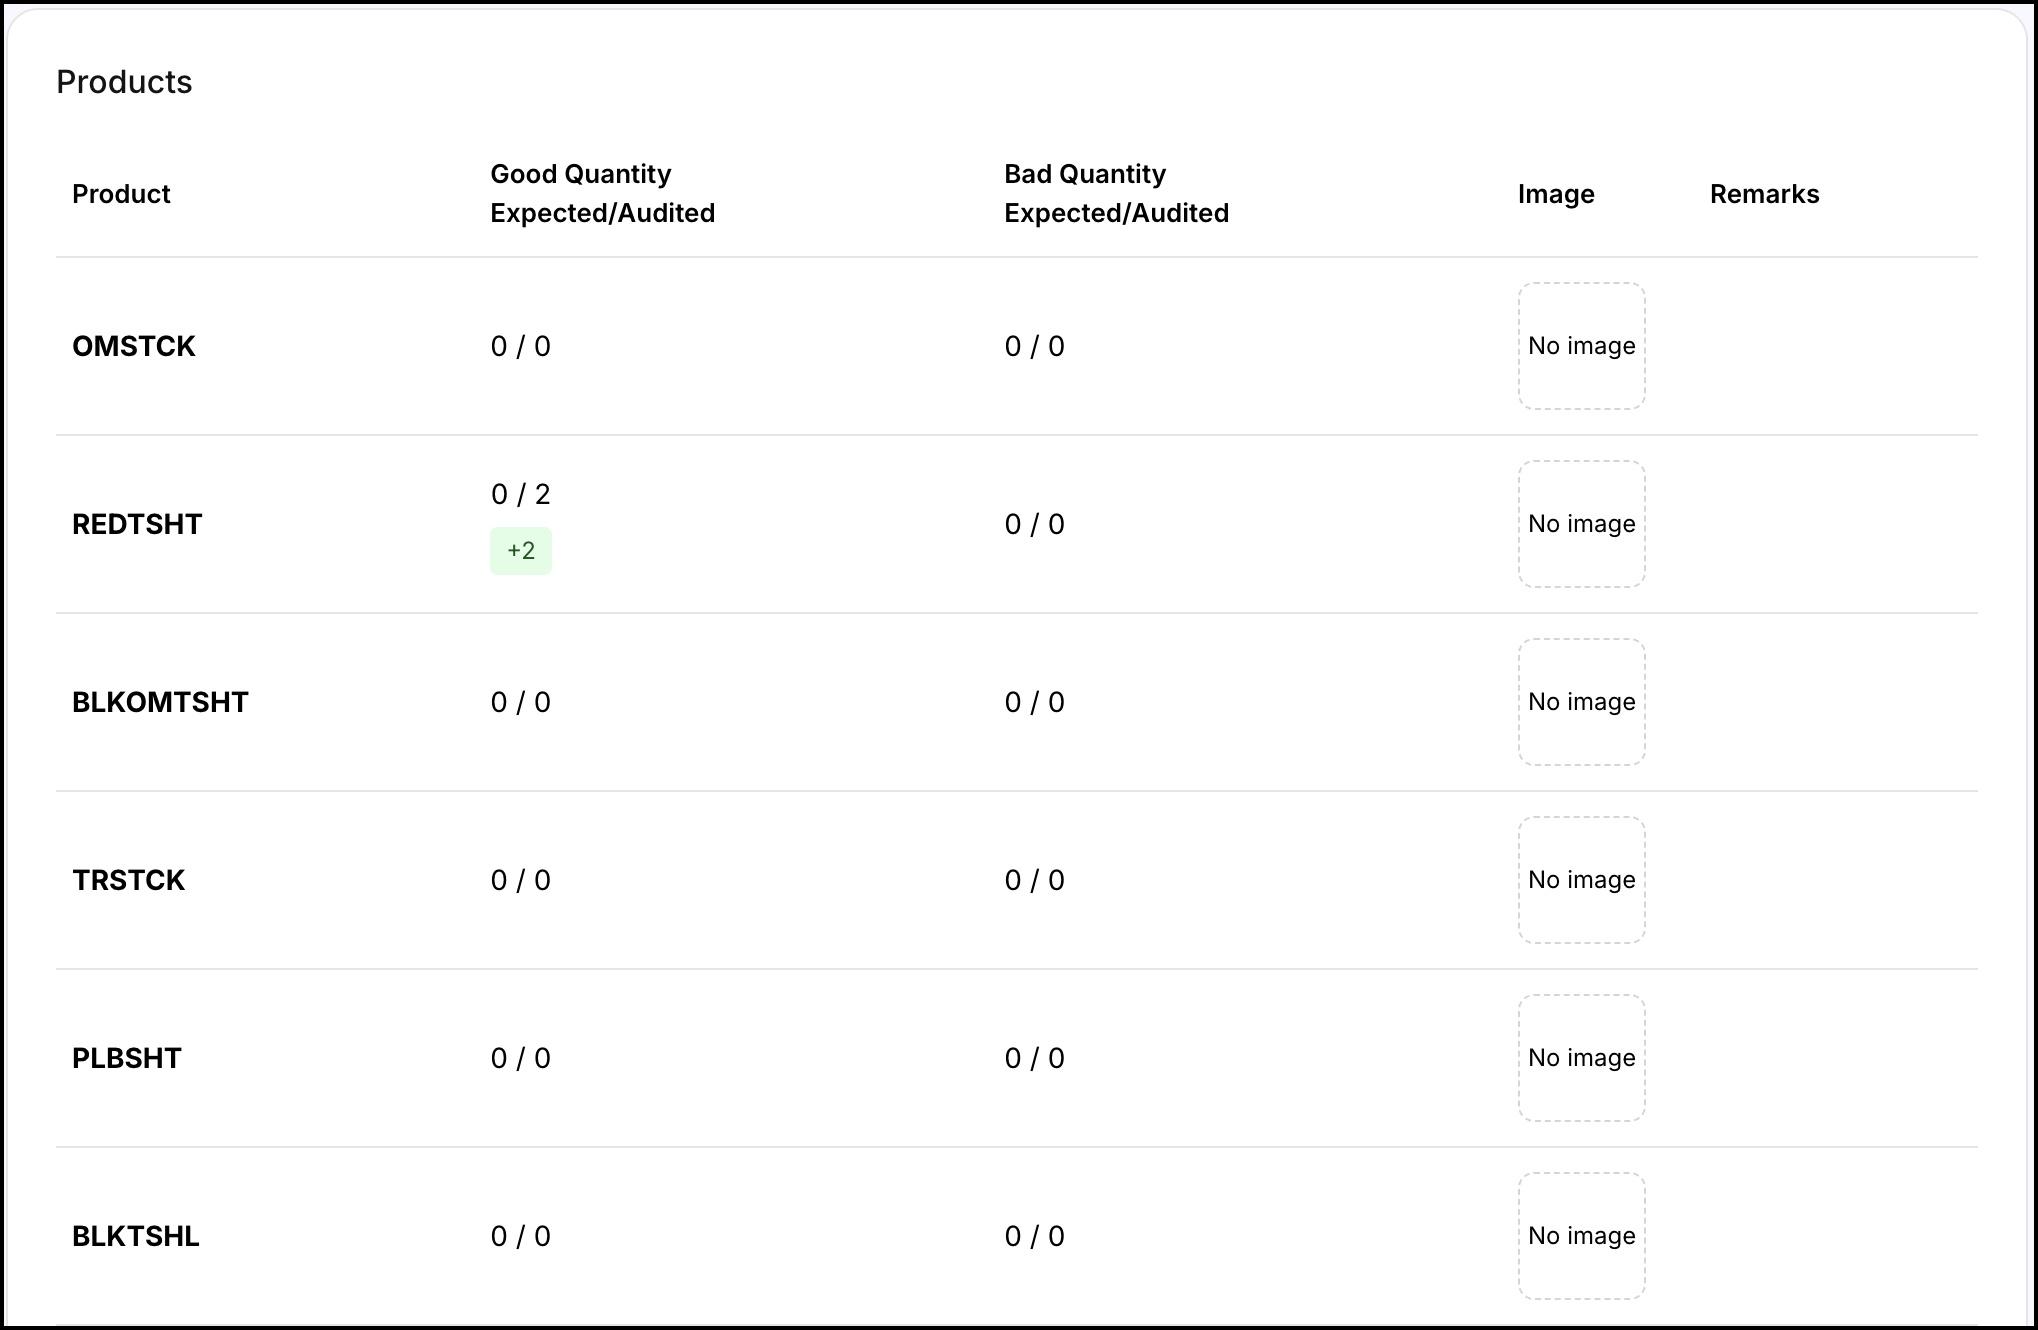
Figure 16: Products When an audit is approved:
- A background job is created
- Inventory is updated in bulk
- Changes are reflected in the My Products section of the Fynd Platform
This represents the successful completion of the audit.
The Reports section provides insights such as:
- Total audits completed
- Approval rate
- Pending and rejected audits
- Total discrepancies identified
- Value impact of discrepancies
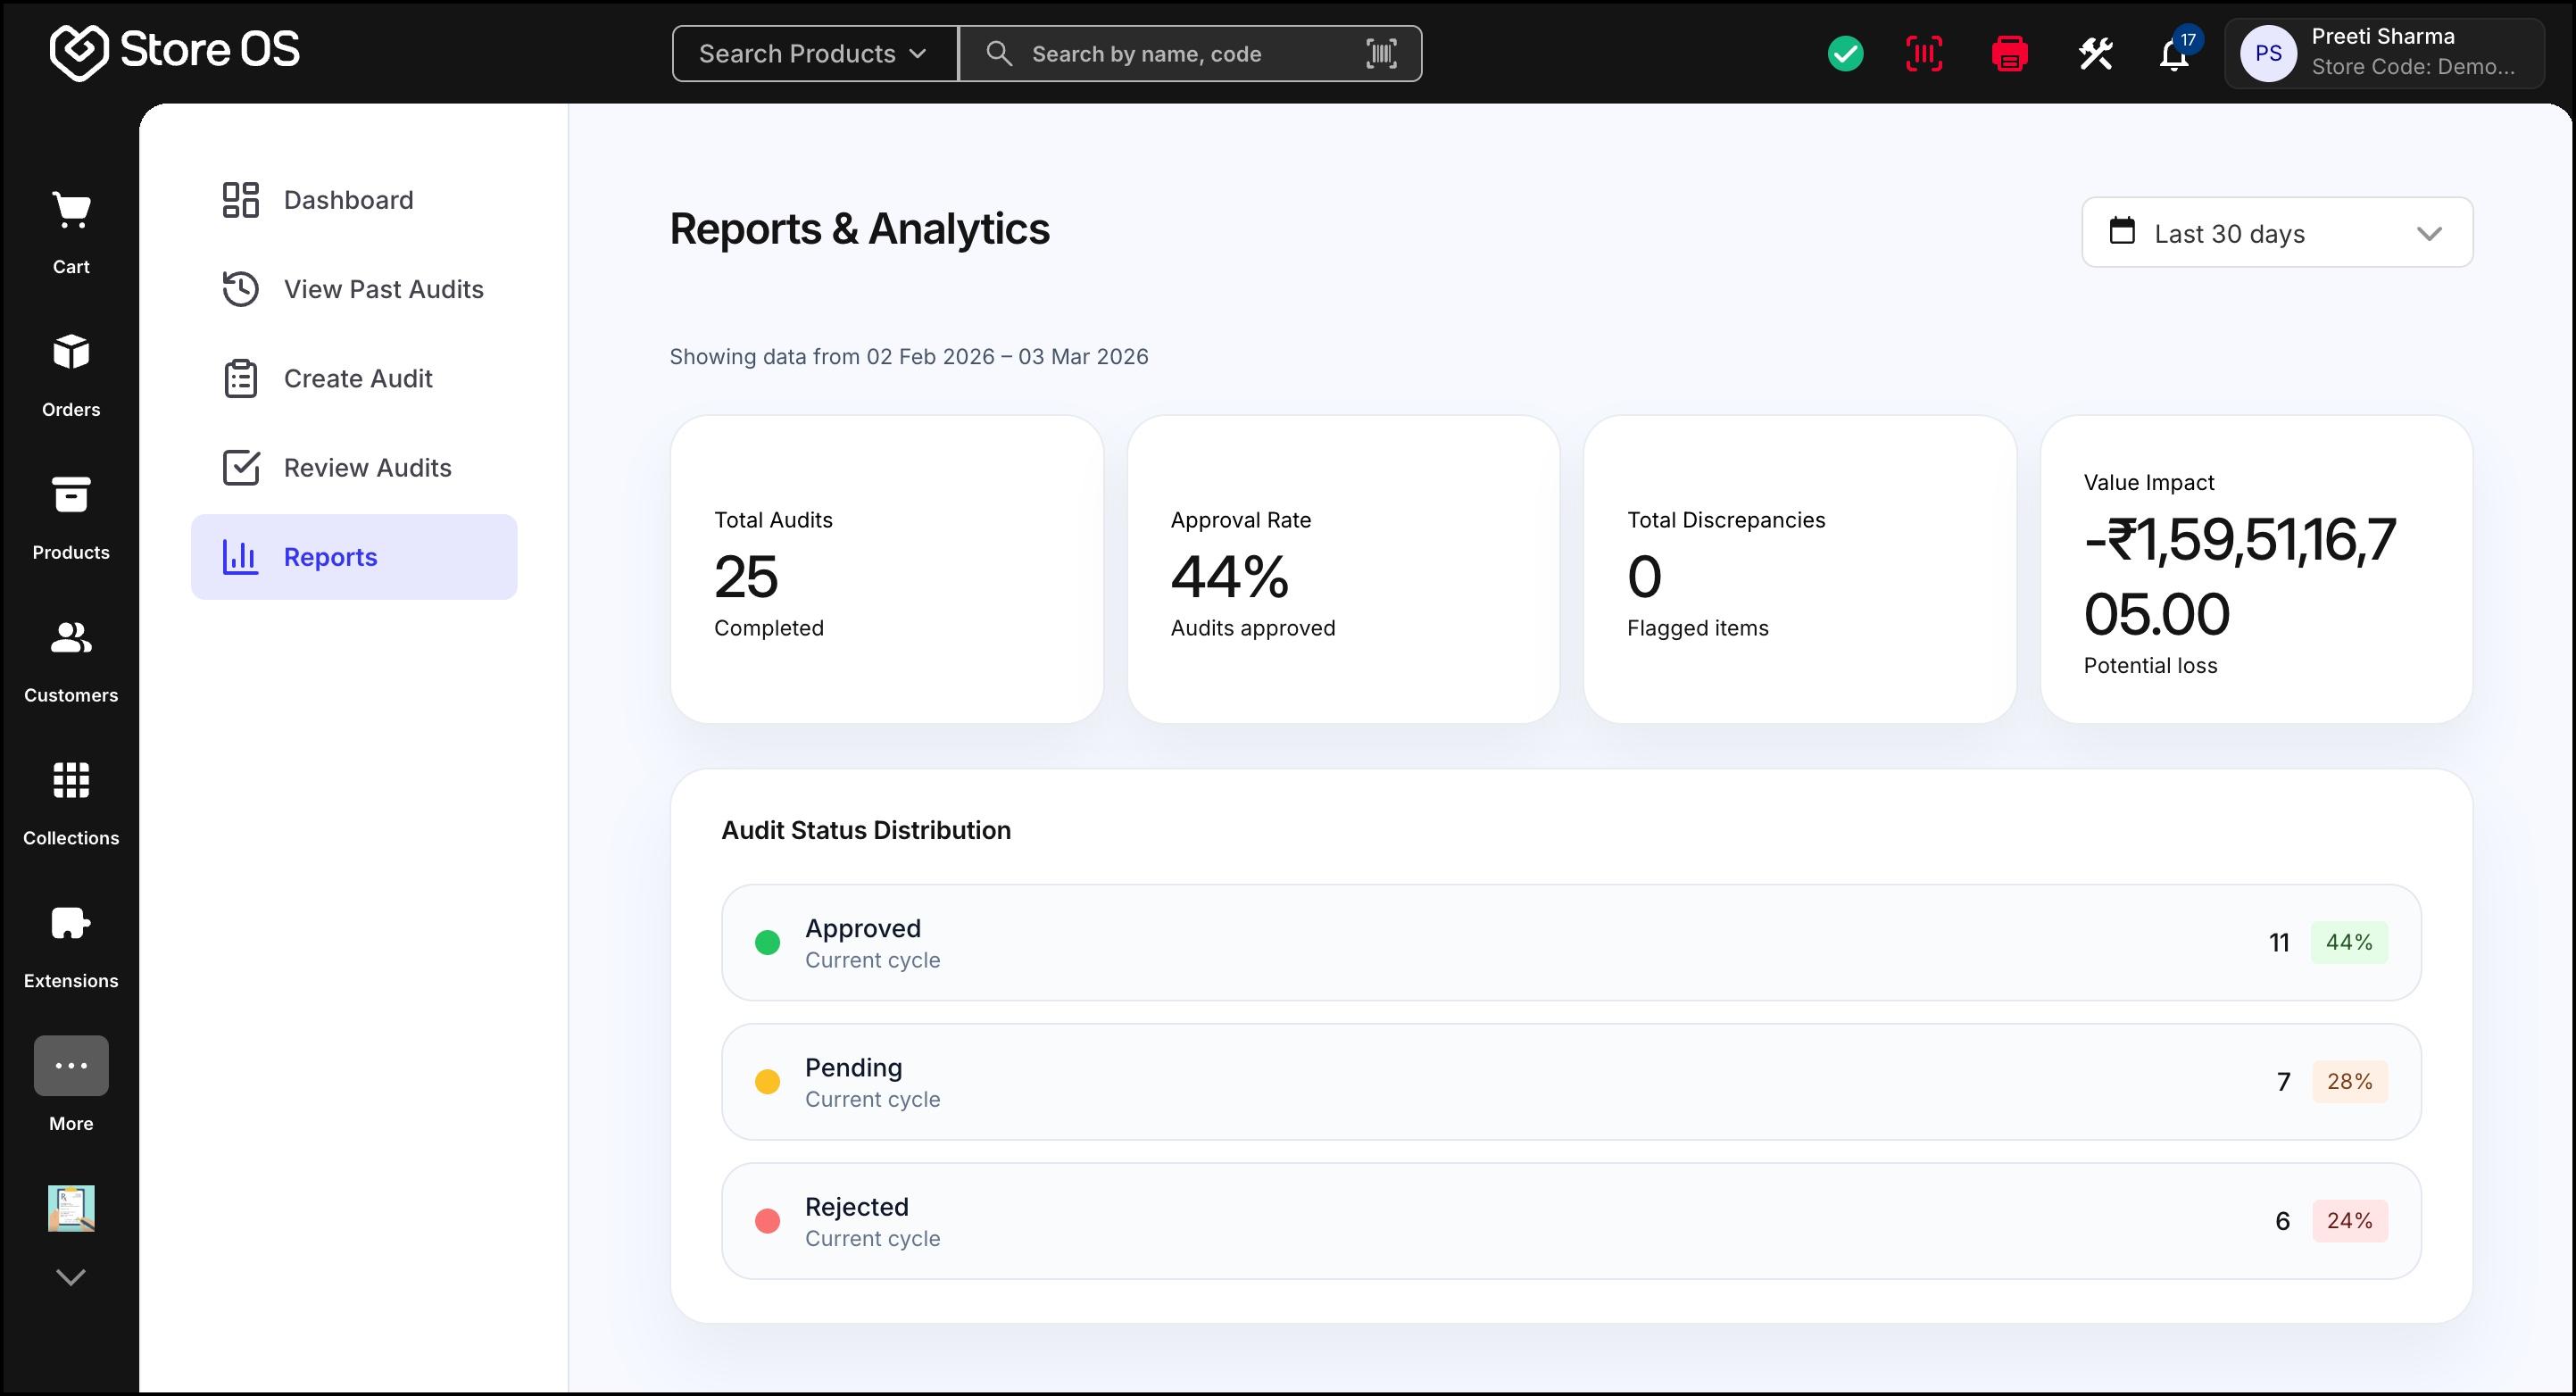
Admins can view reports across all stores. Non-admin users see reports only for audits assigned to them.
Stock Audit helps merchants maintain accurate inventory by aligning physical stock with system data. With clear roles, controlled approvals, and a complete audit trail, it ensures inventory accuracy, operational transparency, and better decision-making.